Up and running with Azure VM and GoDaddy domain

Create your Azure VM

Setting up a VM in Azure is easy…too easy. Probably the trickiest part is finding the most cost-saving options, which are few. I always start with the most shameful offering and upgrade only as desperation demands.

But I found that, try as I might, I couldn’t get away with the basement B1s offering. It simply lacked the memory resources to setup. However, you can always start with B2s and downgrade when the settings are locked in. The main challenge is memory and apps such as IIS are demanding to run.

However, the monthly fee of B2s is currently $42, which is high. You pay hourly for the VM to be on. So if you turn it off, it saves you money. Most servers are always available so that’s not an option beyond development.

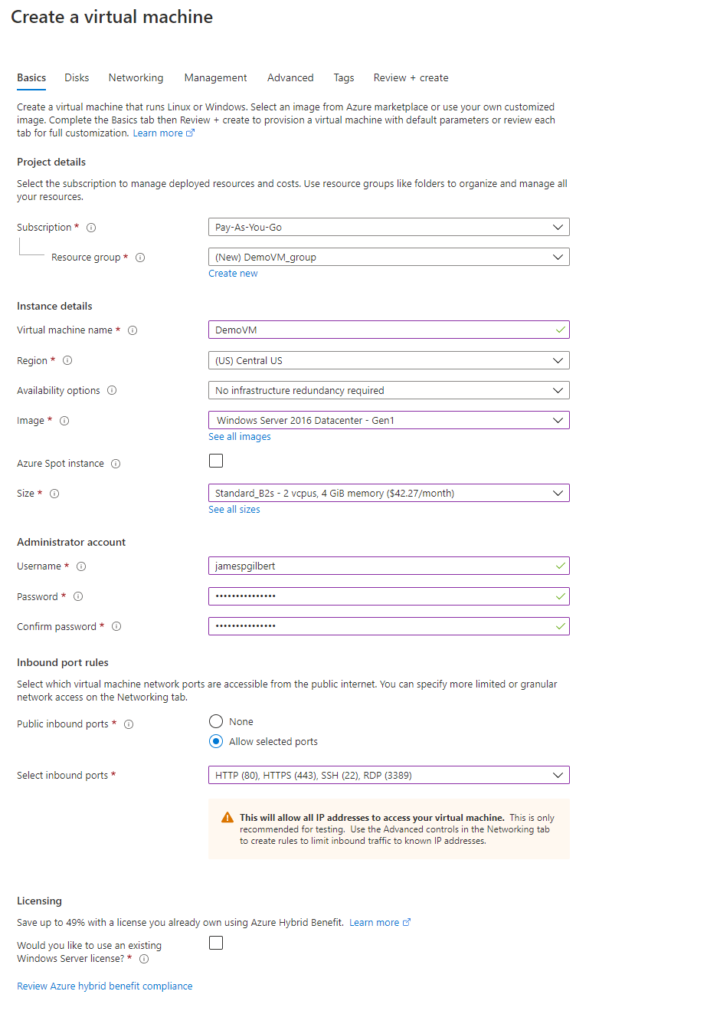
The full settings I pick below are as follows:

  • Windows 2016 Datacenter Gen 1 (Don’t worry it’s just a rebranded Windows Server 2016)
  • Standard_B2s
  • Inbound ports HTTP (80), HTTPS (443), SSH(22), and of course RDP (3389) which we need to access the VM!
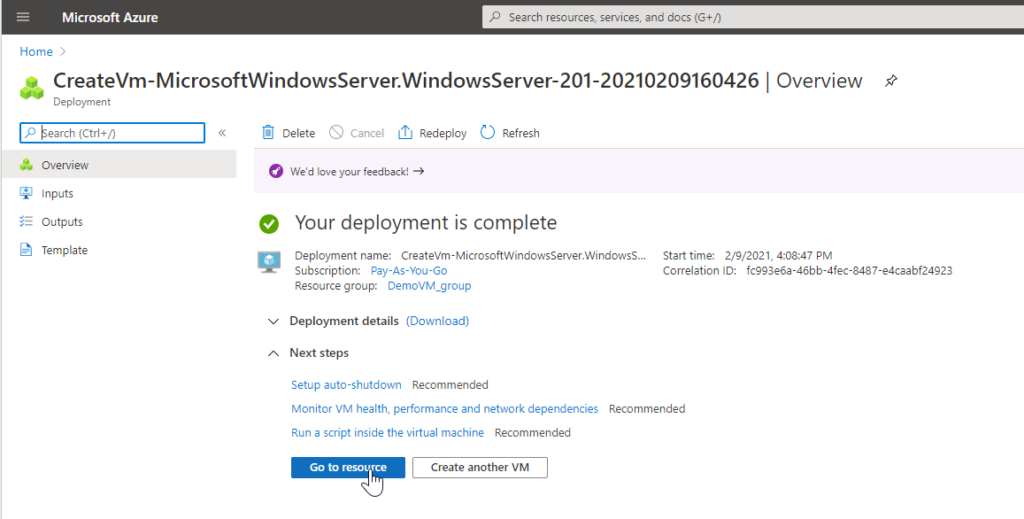
Your newly created VM will deploy and create plenty of Azure notifications in the process.
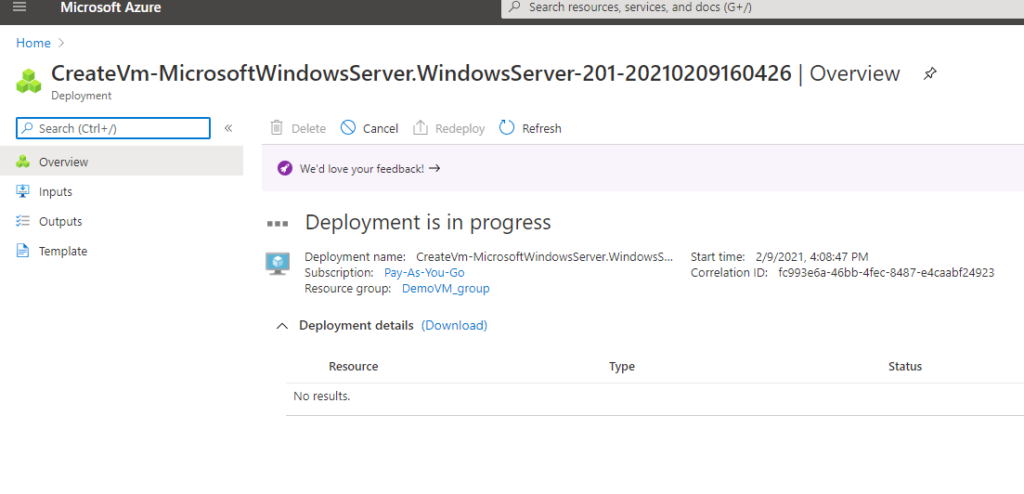
When deployment is complete, go to the resource.
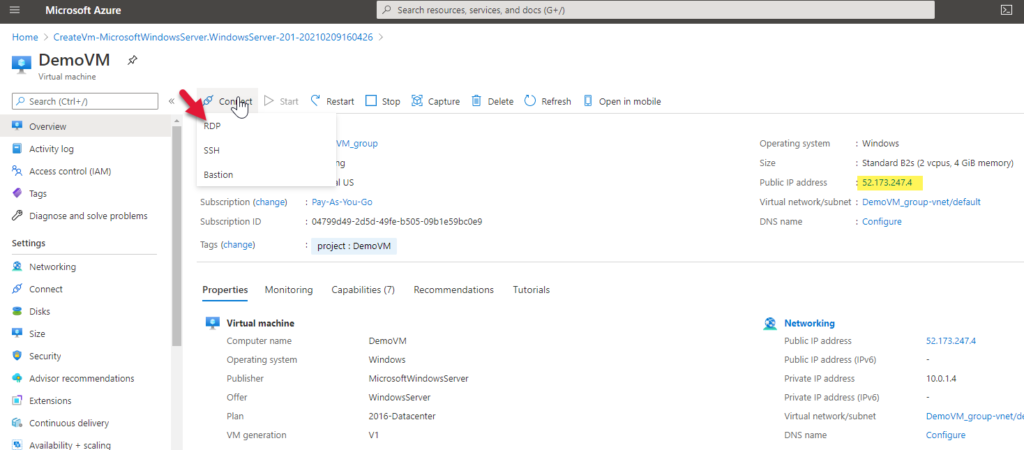
On the resource’s overview page, you can see your VM’s IP (highlighted yellow below). Copy it and otherwise make note of it since we will need it later.

Via the connect menu option, download an RDP connection file which will connect you to the VM with Windows’ Remote Desktop client.
RDP into your VM

Open the RDP file and you will be prompted for credentials. Make sure you are using the option which gives you both the user and password fields (in case you are on a network and the computer assumes your domain or user).

Say okay to all the risky messages about accessing this shadowy entity you created.

It’s okay, we know this guy.

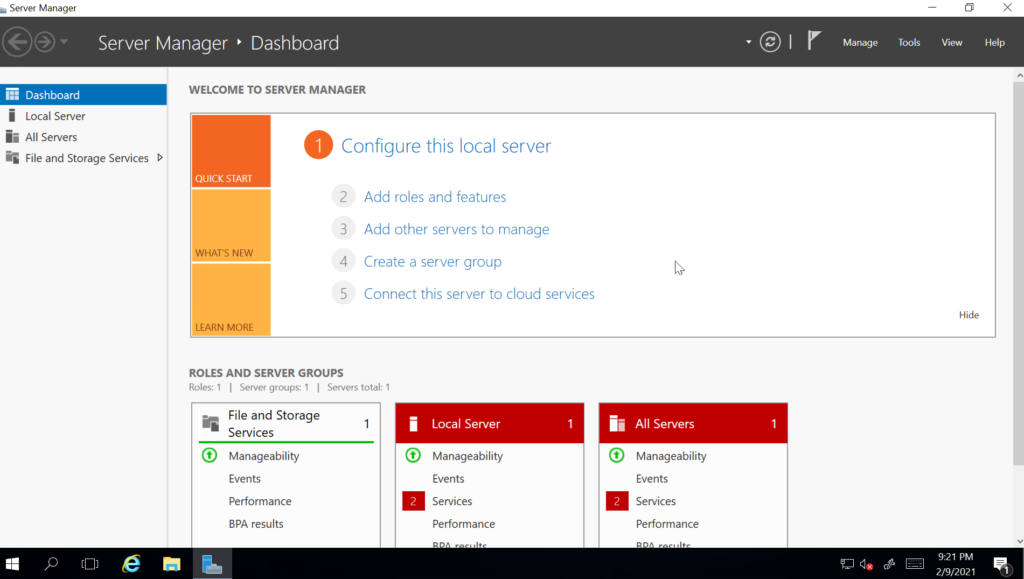
Once connected to your VM and logged into Windows, Server Manager will start.

Setup IIS

The first thing you will need to do is add IIS. To do so, you can click the Add roles and features via that numbered menu or via the Manage menu.
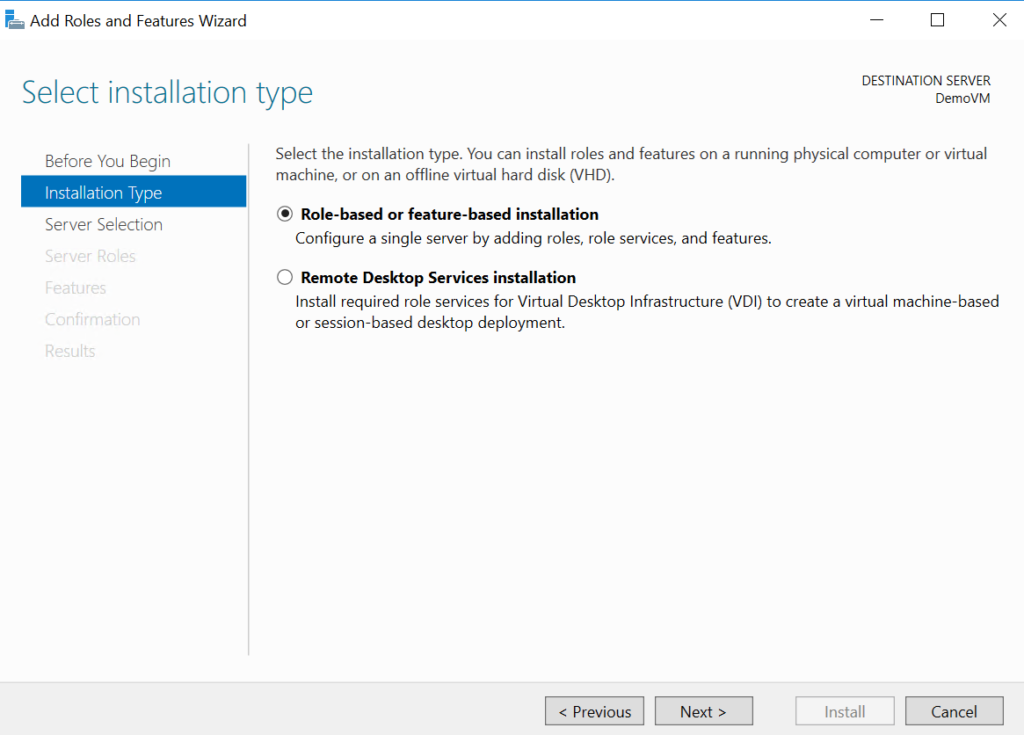
In the wizard, choose Role-based or feature-based installation.
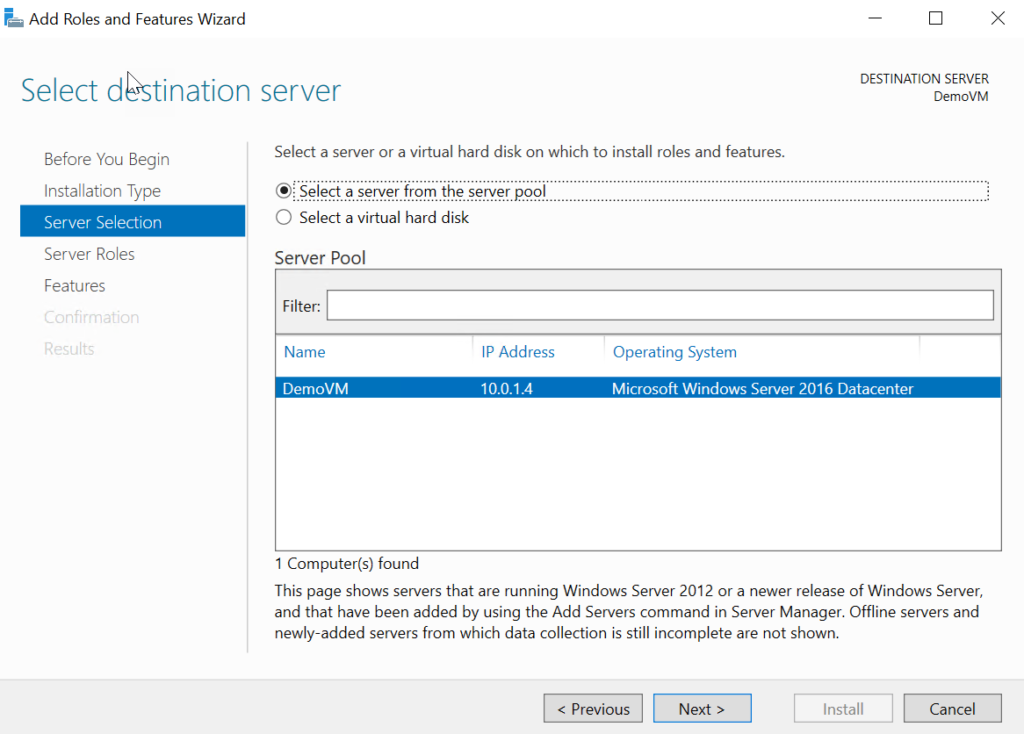
Select your server (it should be the only item).
In the following list, simply select the IIS option, which you will need to access.
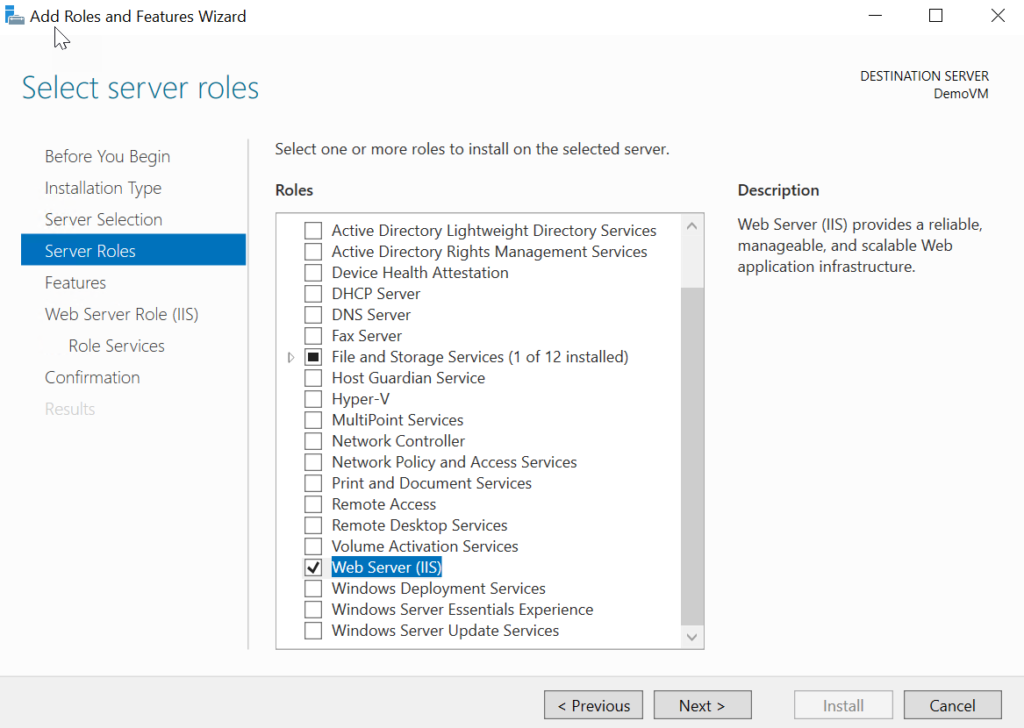
When you check off IIS, the side bar list changes to include the IIS options. We’ll select these in the next screens.

I recommend the following options

  • .NET Extensibility 4.6 (requires ASP.NET 4.6)
  • CGI (used by PHP which also requires .NET 4.6)
  • IIS 6 Management Console and IIS 6 Metabase Compatibility (for SMTP support)

Configuring IIS

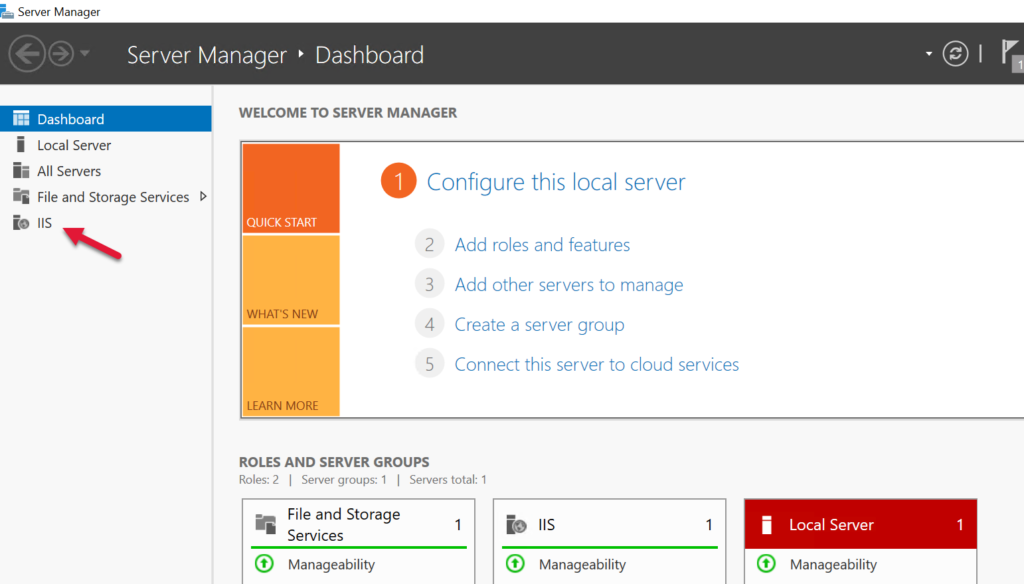
After the install you will see IIS in the sidebar options.
Select IIS in the sidebar and right click on your server to get the context menu, and select from it Internet Information Services (IIS) Management.
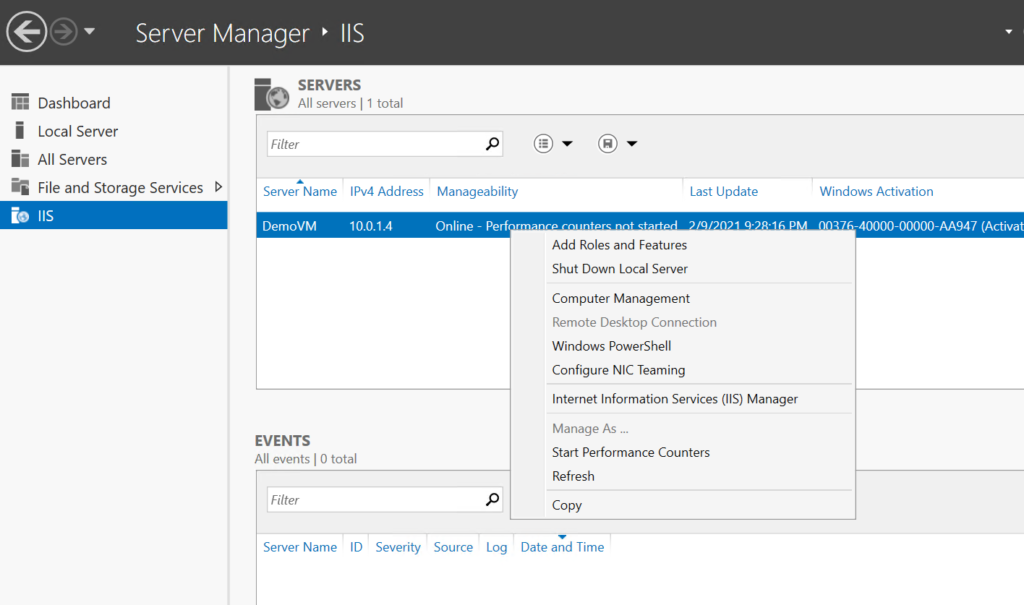
Right click on our server and choose

We may want to have more verbose error messages to help us debug the issues related to getting the server running. We can do that via the Error Pages option which appears when the Default website is selected.
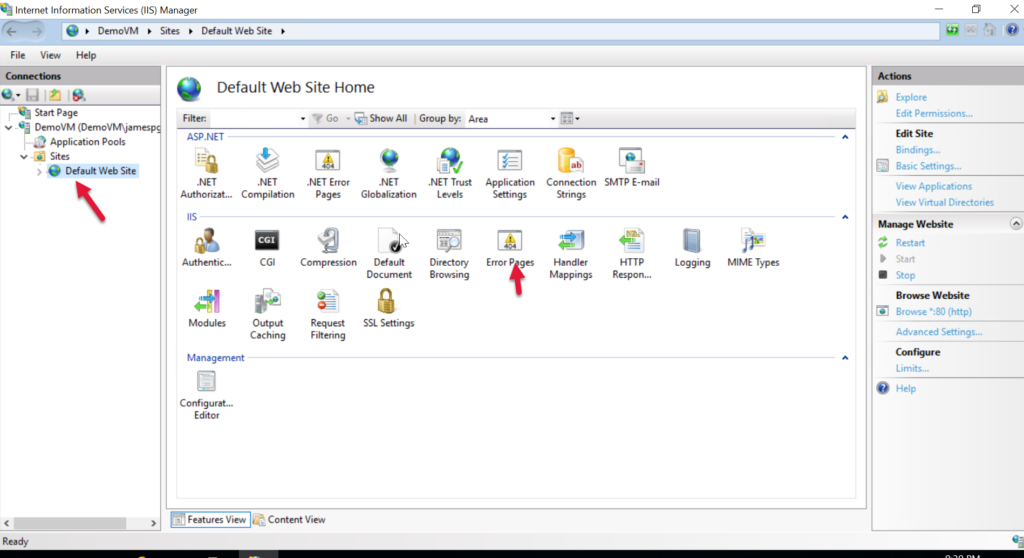
Select the 500 (server) error and choose Edit Feature Settings…
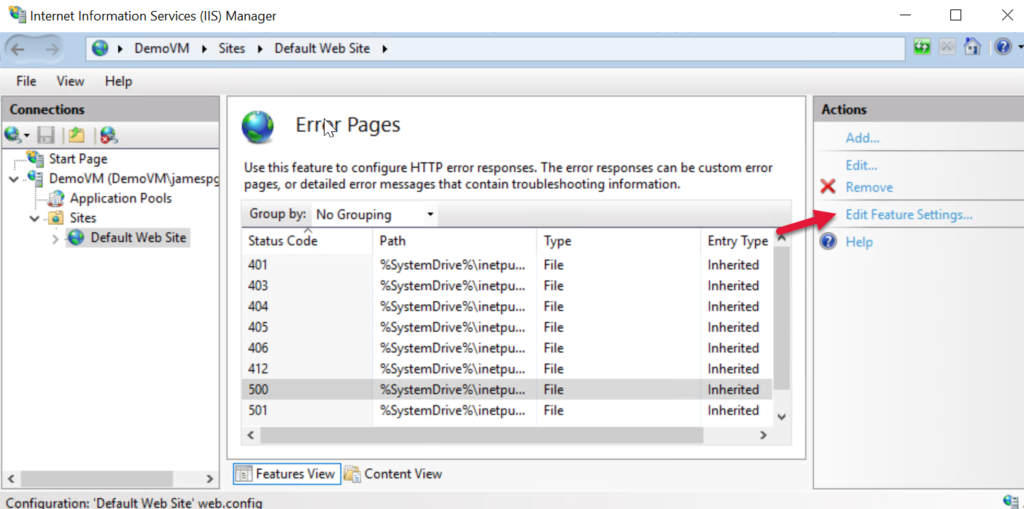
Turn on Detailed errors, because we want to see why something fails when we try to access this VM remotely. You can turn this off when everything is running okay.

Detailed errors for everyone!

Test remote access to the VM

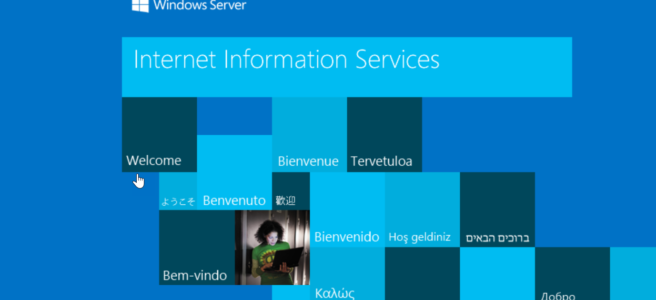
Enter http:// followed by your IP address. You should see the default IIS splash page in drab shades of blue and speaking in tongues:
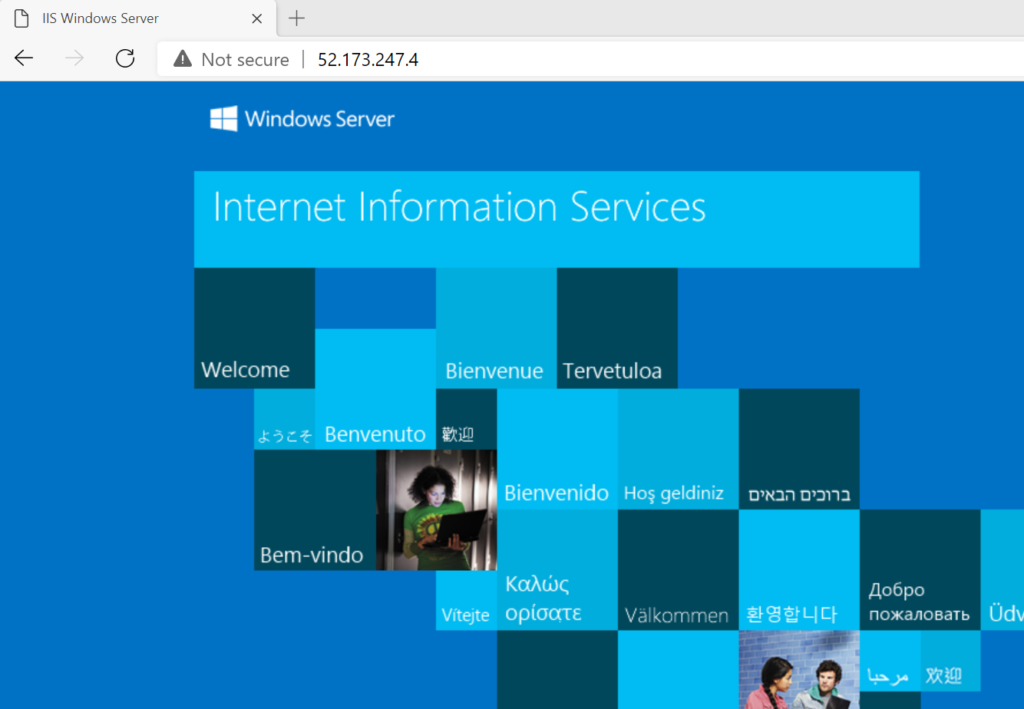
Blue and insecure but present.

Setup Azure DNS

Now you will need to setup Azure DNS for your VM. To do this, you will need to pay Azure at least $1 more per month (at the time of this writing) by way of a DNS Zone (trampoline and ball pit access not included).

Create a DNS Zone for your domain and put it in your VM’s resource group

Once the DNS Zone is deployed, go to the resource. You’re going to need the top two name servers listed for configuration with GoDaddy:
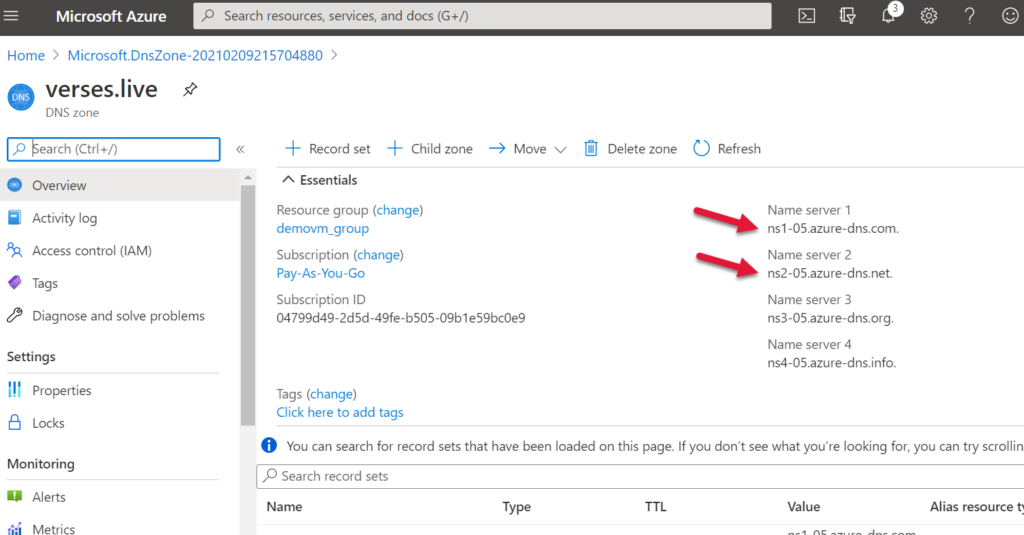
You need to also add a record to this DNS Zone to map it to the VM’s IP Address. You’re create a new A type record for the @ name and fill in the VM’s IP in the address field.
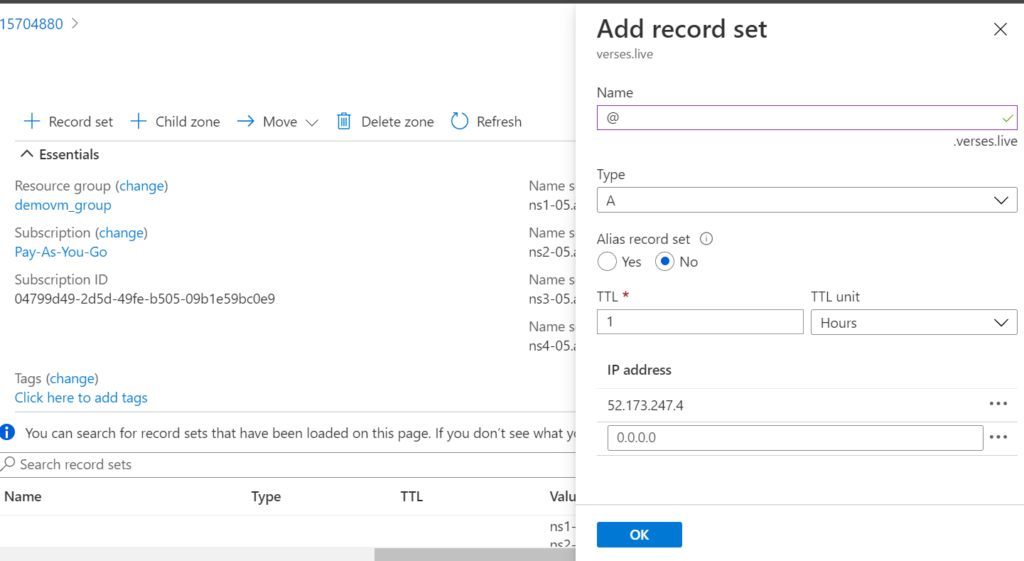
Okay, A$ure is all set…for now.

Link your GoDaddy domain to your VM

Speaking of seedy, money-grubbing establishments, GoDaddy has your domain ready to be linked. You need to setup it’s DNS settings and download the SSL certificate.

In the domain’s ellipses menu, choose Manage DNS.

Scroll down past several intrusive product offers to find the Nameservers section and click Change.

All you need to do here is set the name servers to the one’s you copied from A$ure in the prior step above.

Find the “Enter my own nameservers (ADVANCED MODE, BEWARE!!!)” link under more product promo links and click on it.
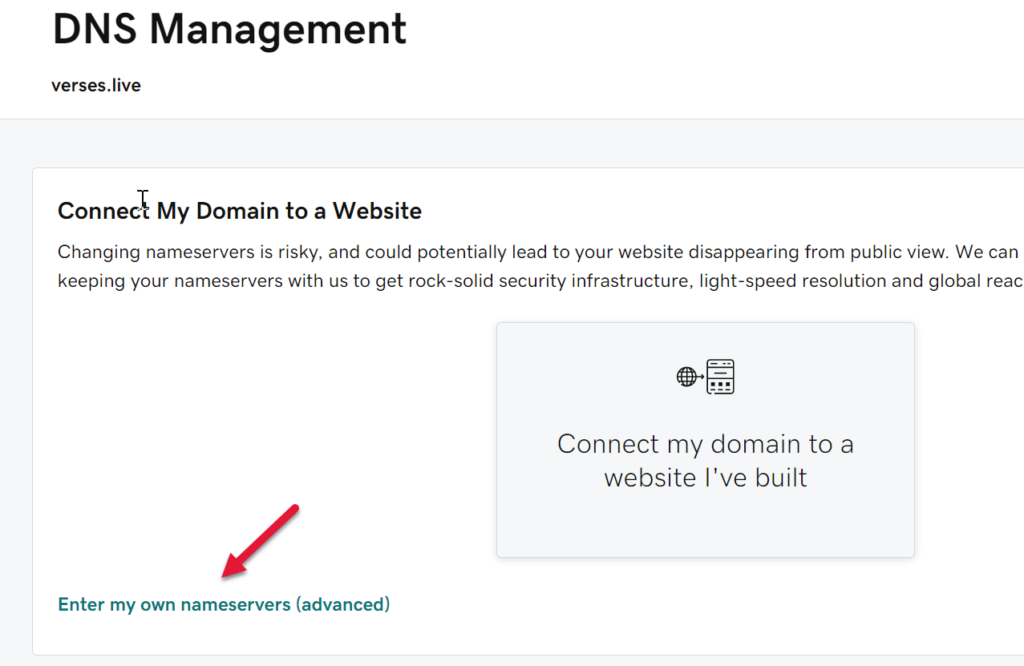
Click at your own risk.

In the next risky screen we must point out that truly, the Internet is rife with peril!

So enter the Azure DNS settings you copied (without the periods at the end of them). At the time of writing this, Azure helplessly includes periods after the name server text so be sure to remove that when you paste it in the following fields, which are RISKY.
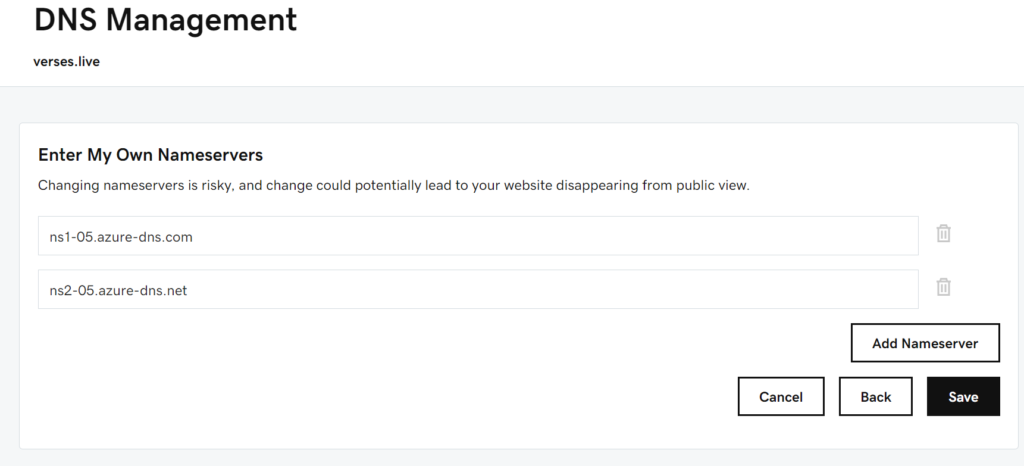
Dangerous? Perhaps, but it’s the only way to live.

When these changes are saved, the , all the CNAME stuff will go away because GoDaddy doesn’t manage that stuff anymore, Azure doe$.

Name server changes can take some time to propagate. While you wait, maybe spend some time seeing what charges Azure has been applying your credit card. Azure’s budgeting UI is quite intuitive.

Testing remote access to your domain

Once you’ve finished tabulating your soaring Internet fees, you can check in on your namespace propagation. Enter http:// followed by your domain name and you should see the blue-cubical worldview of the IIS default website:
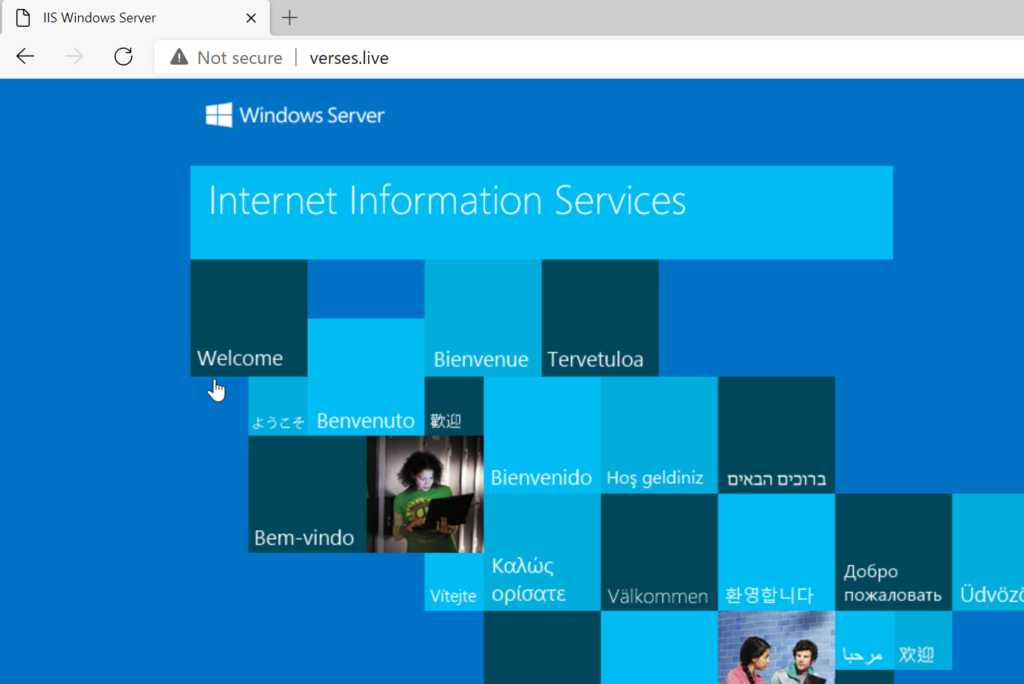

I got the Blues, ohh let me tell you I have the Blues
I’m a guy you can’t excuse, ohh let me tell you I have the Blues
Sam Myers

Fixing your Instagram feed after the Facebook API change

The fun begins!

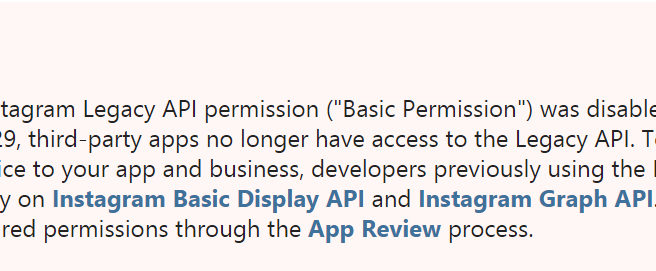
On June 29th, web developers and admins of the world were reminded that Facebook owns Instagram. The legacy API methods to simply get the dang content of an Instagram user were disabled, and the new Facebook-entangled API was required. And, depending on your employer, you were, at that time, also reminded of the importance of Social Media to your company, or you weren’t because it’s not important.
To fix the feed, you will need the following:

  • A Facebook Account (see how they pull you back in?)
  • Enrollment of your FB account as a Facebook Developer
  • Access to your company’s Instagram account

To start, go to My Apps on the Facebook Developer Dashboard, and Add a New App:

In the options pop-up, choose For Everything Else:

Enter the app name and the email address that FB will contact if you turn your app into malware.

Users of more…established (top-heavy) companies will likely have a Business Manager account to select in the 3rd field of this pop-up, in which case you need to select that here in order to access the content later.
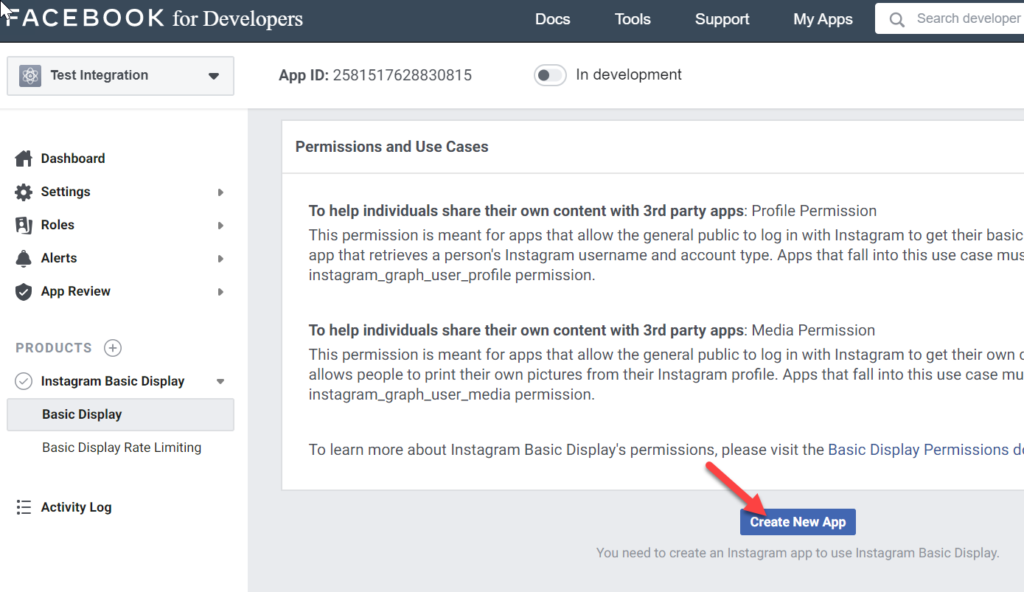
Now, in the dashboard of the app you just created you will need to select a product. We will click the Set Up button for Instagram Basic Display:

Basic…yes, basic like a fox!

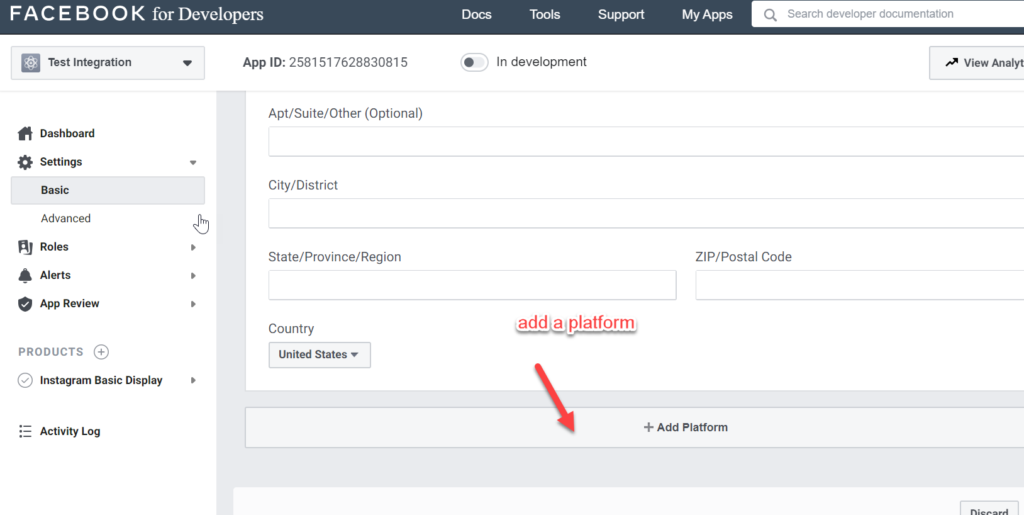
Go to the Basic settings of the App:

Now, watch how complex Basic becomes…

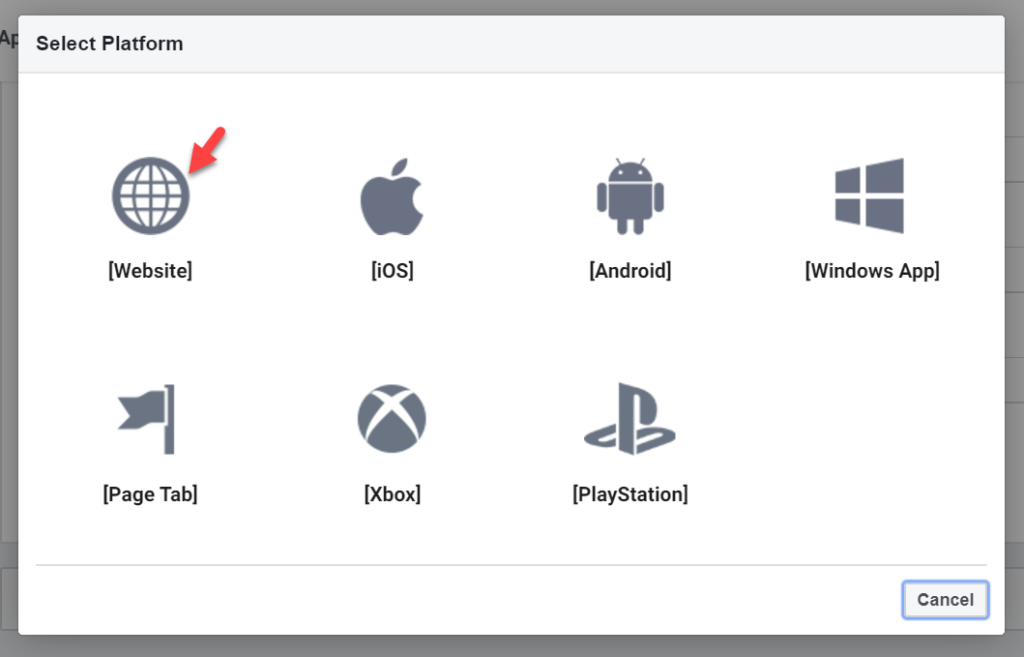
What website you enter is not important, because it will just be redirect there to give you a token, but how you enter it is important because the way it is entered in later API calls needs to match the way you enter it here. Be sure to Save Changes via the blue button at the bottom right of the page.

Next we are going into the Instagram Basic Display product we created to create…an App! Yes, it’s an App within an App, so let’s just call it the sub-app.

I don’t know if it matters what we call this sub-app, but I gave it the same name because it was existentially easier to consider:

Our creativity is failing us.

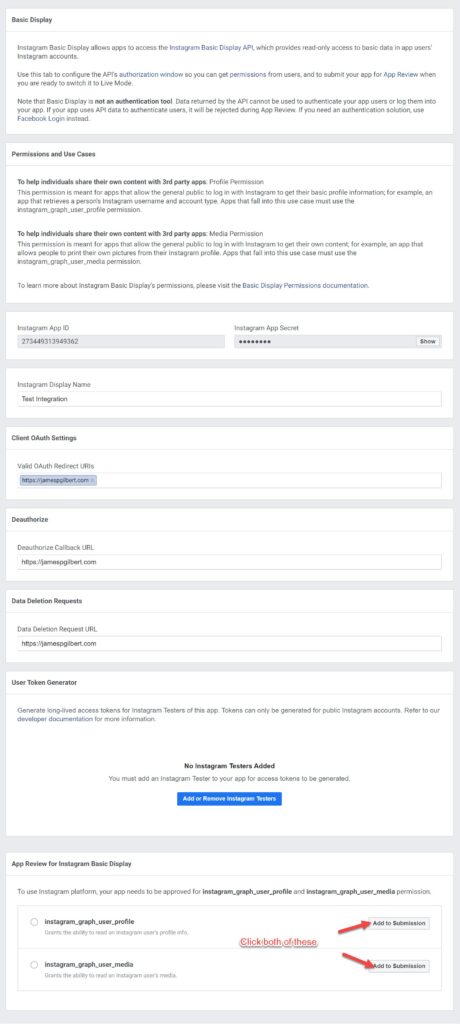
Fill in the sub-app’s settings, providing the same URL as Website Platform URL that you provided earlier. You can see I left a slash off of my entries and it didn’t matter.

Also, click both Add to Submission options to give the Sub-app access to your content; Instagram_graph_user_profile, and Instagram_graph_user_media. Our app will never be submitted for review but the API will still complain without these.

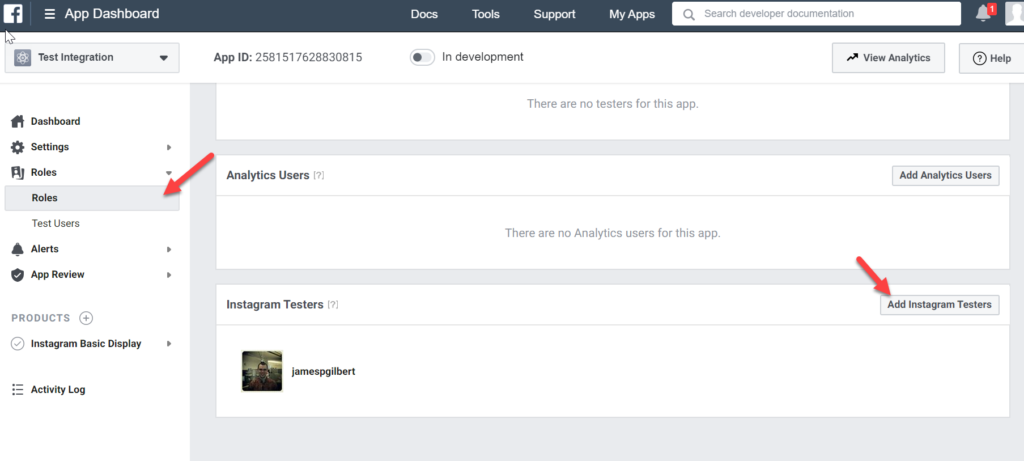
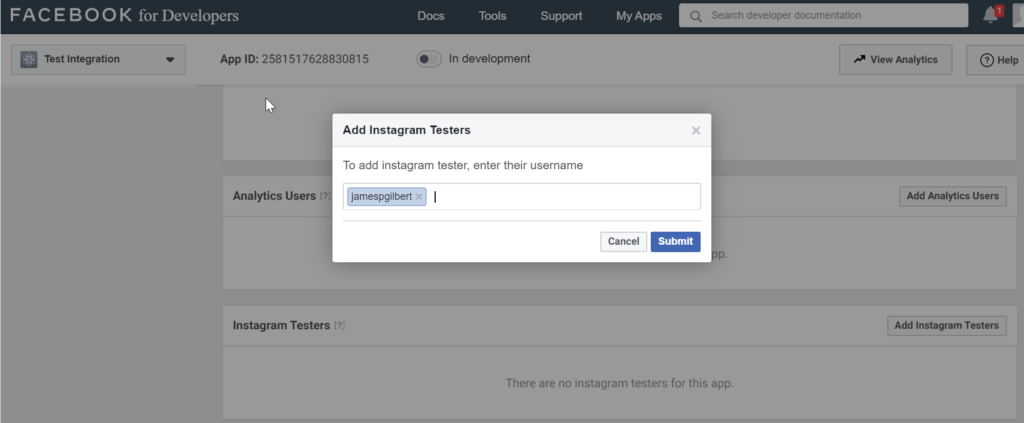
Back in the sidebar of the app (not the sub-app), click Roles to add an Instagram Test User; this will be used as the account that receives the invitation to use the app.

I would simply add the Instagram user of the account you want to get the feed from. What’s more Basic than that?

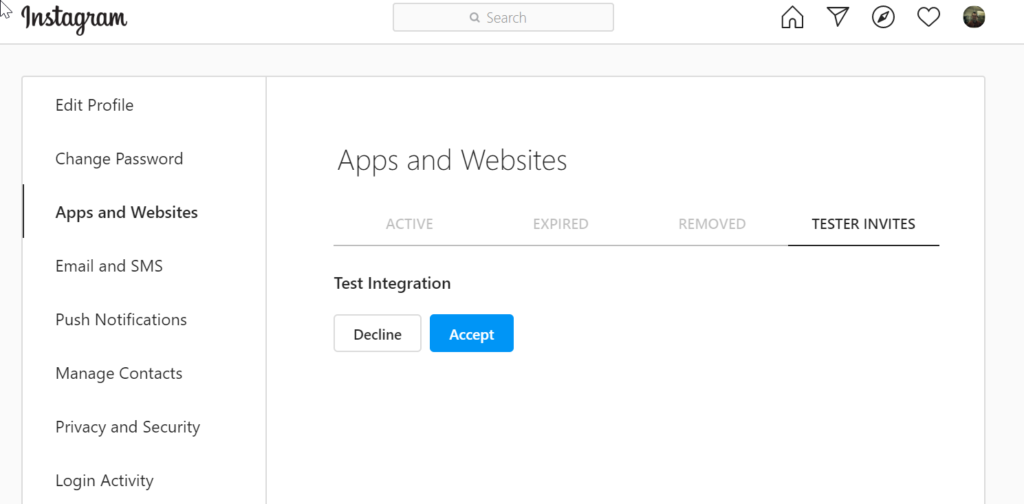
Log into the Instagram account, and under Settings, find the Apps and Websites option, and then the Tester Invites, and accept the invitation:

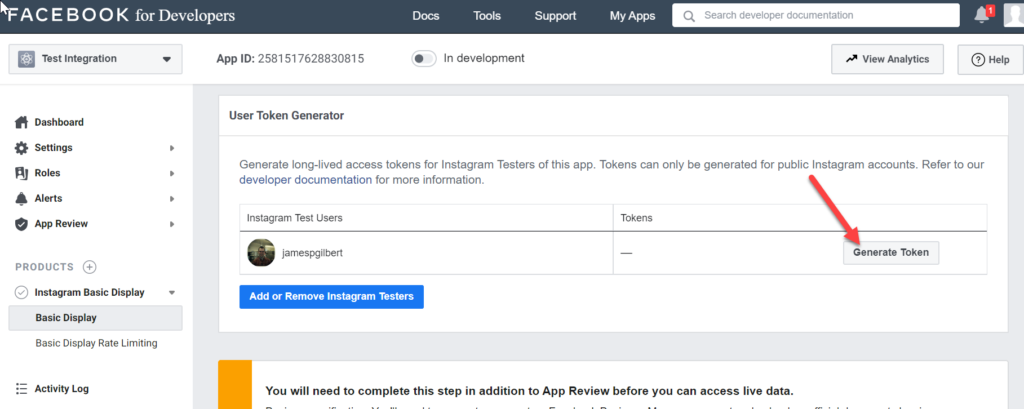
Once the Instagram Test User is added, you can generate an access token under the Basic Display option of the sidebar, which shows the sub-app’s info and settings:

A light at the end of the tunnel?

When you click the button, an Instagram login pop-up will appear, and you will have to login the Instagram account and permit the access:

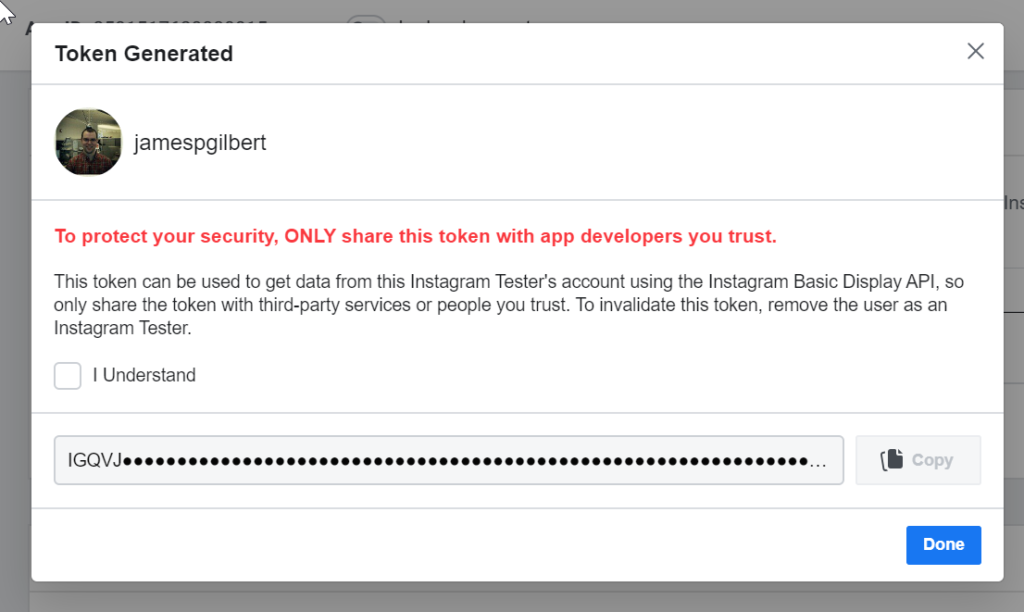
Once that’s done, you will FINALLY see the Access Token in the following pop-up, which will make you tell the computer you understand that this is a Security Matter of Great Importance to access what is most likely a public facing page, before you’re allowed to see and copy the token value. Put the value in a SAFE!!/convenient place.

No biometrics required?

With this token, you can get are the data of your Instagram, but you will need first to get your user id. This can be retrieved via the following call:

https://graph.instagram.com/me?access_token=[YOUR SUPER-SECRET ACCESS TOKEN]

…This call will return a single piece of data: your Instagram User ID, which you can then provide to calls to get content, such as retrieving recent posts:

https://graph.instagram.com/[YOUR HARD-TO-FIND USER ID]/media?access_token=[YOUR SUPER-SECRET ACCESS TOKEN]

…This call will return the id’s of latest 10 posts from the Instagram account.

The media of each post needs to be retrieved from another call:

https://graph.instagram.com/[THE RETRIEVED POST ID]?fields=id,media_type,media_url,username,timestamp,caption&access_token=[YOUR SUPER-SECRET ACCESS TOKEN]

…This call will return the media_type; IMAGE or VIDEO; and the media_url to finally show some content from you likely-public facing Instagram page.

Oh, the comments and like counts aren’t supported by the Basic Display API. It’s possible to get this info via the Facebook graph, but that’s beyond the scope of this walk-thru.

Every issue, quirk, and glitch I ran into while developing a SharePoint Add-In

My job can be heavy with the SharePoint Online, and I do like to tinker around on it using the REST API and Script Editor web parts, and you can do cool stuff just with those.

But as soon as you start specking out workflows, it’s probably time to elevate to Apps or Add-Ins.

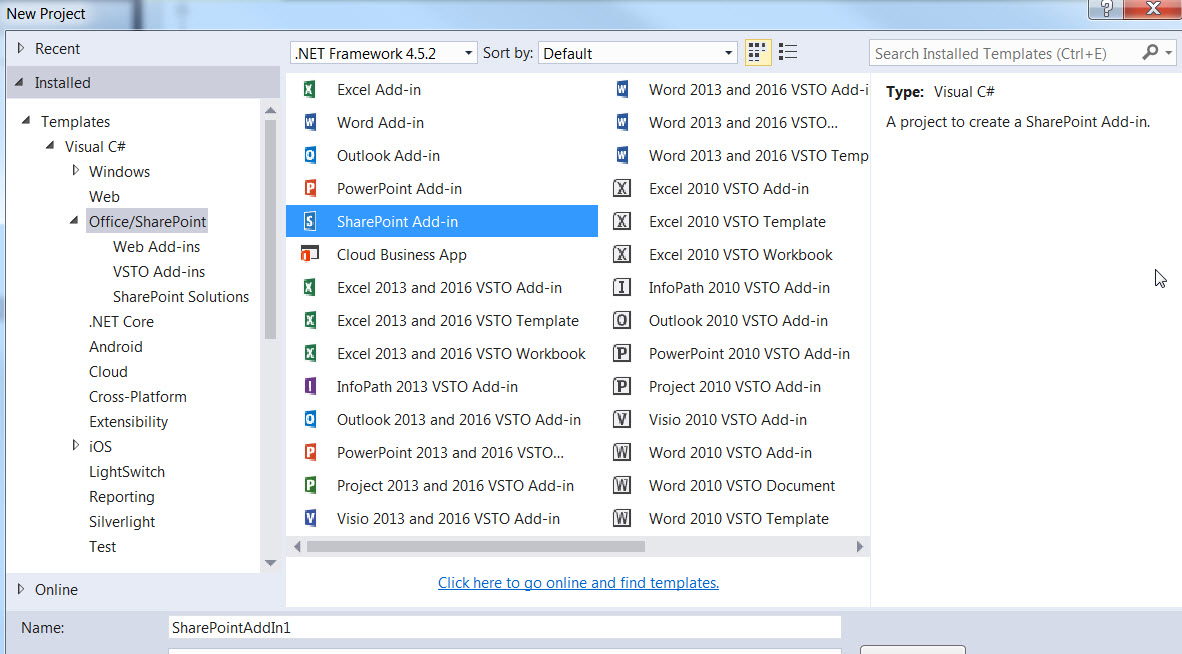
I can’t figure out what SharePoint wants to call them, but when you go to develop it in Visual Studio, you’ll be picking the SharePoint add-in project:

sharepoint-addin-project.jpg

I set out to create a polling add-in because I already had it working as a REST API script web part, so I figured, why not package the thing?

But the simplicity with which you can build out your app via Visual Studio’s bountiful UI is almost wholly negated by the weird ticks will will encounter as you develop.

I will try to catalog them here…

Extra, un-asked for Features

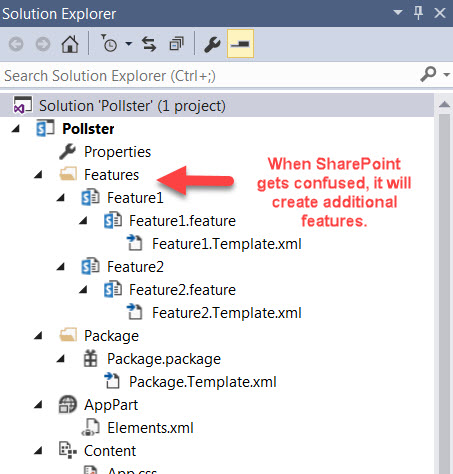
The first issue I ran into was new Feature nodes would be added depending on what I deleted from and added to the project. Visual Studio would seem to lose track of the Feature1 that it created by default, and begin to add new items to a second or even 3rd Feature node.

When that happens, delete the extra feature nodes, and take a look at Feature1 to be sure it is including all the relevant items of your project (which is probably all of them).

sharepoint-addin-quirk-extra-features

Retraction, Retraction, what’s your function?

When you re-deploy your add-in, it sometimes needs to retract the one that’s already there, and many issues arise.

One is, retraction can dodder on indefinitely, causing you to need to cancel the operation (the option should appear under the Build menu). But then you will need to rerun retraction, which is fine, except when SharePoint thinks the add-in is retracted.

A couple times I’ve had to go onto the deployment site, and delete the add-in, but even when cleared from the recycle bin and second stage recycle bin, SharePoint still believes it’s there!

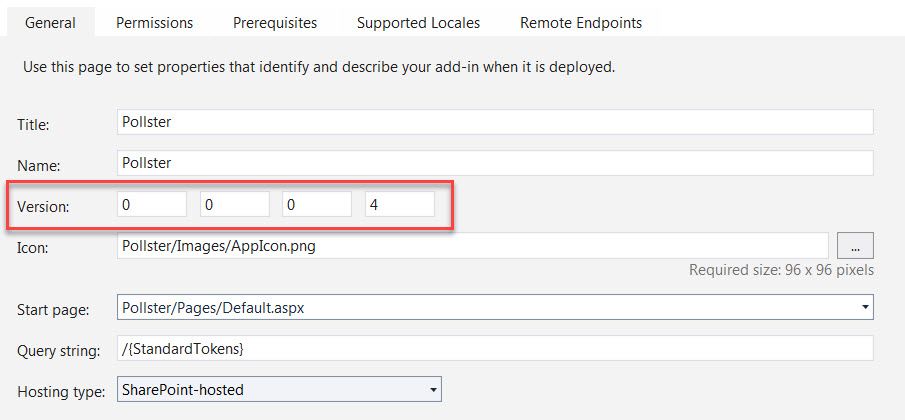
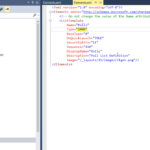
One solution I found is to tick up the version (after you’re certain the add-in is removed), this way, SharePoint will not insist the app is there with the same version, because you changed the version:

pollster-app-manifest

(h/t this thread)

Confused schema

It’s not enough to have lists with separate schema settings, if their Type field is the same, SharePoint may confuse the schema, and you will see two lists with the same field set, which is jarring, really. Even if you completely delete the list, and recreate it, remapping every association it had in the project, SharePoint may find the schemas of the second list confusing.

One user found the solution was to set the type of the second list to 1000, and tick up as you add even more lists with possibly confusion inducing schemas.

(h/t this thread)

List Field Default Values

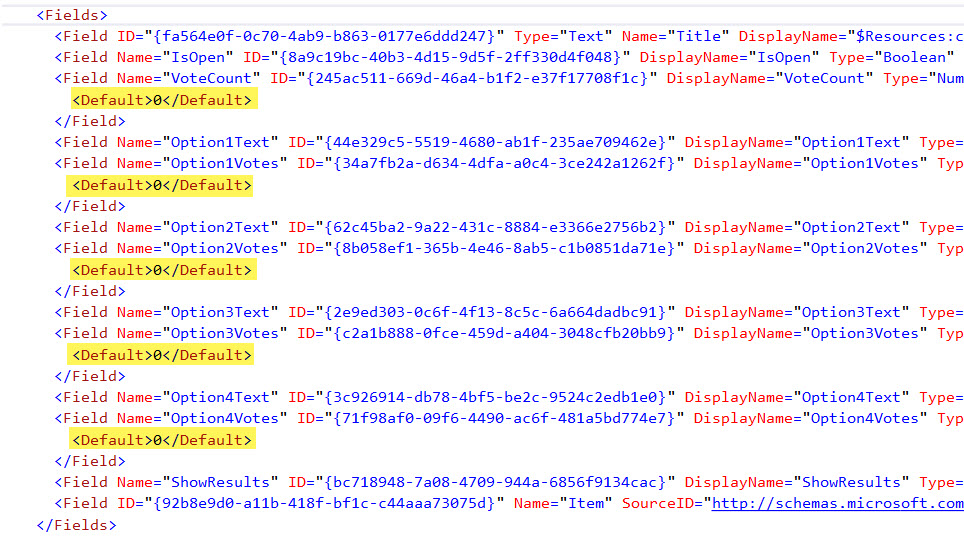
It’s not that there’s an issue with setting default values for your list fields, its just that when the UI is so comprehensive as it is in Visual Studio, it can be perplexing to need to do something on the code-level, especially setting a default value of a field which is standard procedure.

To do this, you have to edit the schema of your list, and add a sub-element <Default> within the <Field> element:

sharepoint-addin-quirk-default-list-field-values.jpg

(h/t to this thread)

Hiding list fields from the New, Edit, and View forms

Not every field of your list should be shown on every form, unless you want to give the user that sense of vague formlessness so common in modern art today. But to hide the field, you have to specify a series of values in the list Schema.xml.

Go tho the <Fields> element, and find the fields within that you want to show or hide, by adding the following (True/False) properties:

  • ShowInNewForm
  • ShowInEditForm
  • ShowInViewForms


HOW DO I GET THE STUPID SITE PATH TO MY ADD-IN?!

Alas, there are many answers to this on various developer forums, and none of them work.

Basically, your add-in is going to situate itself in an iframe that loads content which is outside of the site it gets added to, so it’s not really aware of some key globals such as _spPageContextInfo, or SP.ClientContext.get_current(), and you can’t add scripts to fix the problem because ultimately…it’s in a separate place.

NOTE: If you need to talk to info that resides on the destination site, your going to need to use SharePoint’s cross-domain ajax functionality, which was beyond my purpose, but you can read about it here.

If you’re simply looking to using SharePoint REST API within your web part’s quarantined site/section/ward, you need to pass in that URL via the web part parameters. SharePoint has a bunch of dynamic parameters called tokens, listed in the second table (Tokens that can be used inside a URL) here, but you have to add them.

sharepoint-addin-quirk-passing-the-app-path.jpg

Once you add them, you can build the REST API calls off of them, especially the {AppWebUrl} parameter. I suppose you could do some text processing on the document.URL string to get this value, but that seems risky, and SharePoint ought to tell you where it put your add-in.

If you’re interested in making calls to the site you’re adding to, you’ll want to make use of the {HostUrl} parameter. This may require some permissions setup in the AppManifest, but that’s further than I went.

Showing a list on your Add-In’s default page

My add-in makes use of a couple of lists, one of which I want to show on that default page, which I figure should be the sort of administrative front-end of the app and provide the user with some web parts to let them perform basic content addition, but don’t expect SharePoint to just give one to you.

You have to edit the elements.xml of the Pages node in the project, and add the following within the Default.aspx page listing:

<?xml version="1.0" encoding="utf-8"?>
<Elements xmlns="http://schemas.microsoft.com/sharepoint/">
  <Module Name="Pages">
    <File Path="Pages\Default.aspx" Url="Pages/Default.aspx" ReplaceContent="TRUE">
      <AllUsersWebPart WebPartZoneID="HomePage1" WebPartOrder="1">
        <![CDATA[
          <webParts>
            <webPart xmlns="http://schemas.microsoft.com/WebPart/v3">
              <metaData>
                <type name="Microsoft.SharePoint.WebPartPages.XsltListViewWebPart, Microsoft.SharePoint, Version=15.0.0.0, Culture=neutral, PublicKeyToken=71e9bce111e9429c" />
              </metaData>
              <data>
                <properties>
                  <property name="ListUrl">Lists/Polls</property>
                  <property name="IsIncluded">True</property>
                  <property name="NoDefaultStyle">True</property>
                  <property name="Title">Polls</property>
                  <property name="PageType">PAGE_NORMALVIEW</property>
                  <property name="Default">False</property>
                  <property name="ViewContentTypeId">0x</property>
                </properties>
              </data>
            </webPart>
          </webParts>
        ]]>
      </AllUsersWebPart>
    </File>
 </Elements>

Now, in the Default.aspx page itself, you can add markup that refers to this element data you just added:

sharepoint-addin-quirk-default-page-webpart

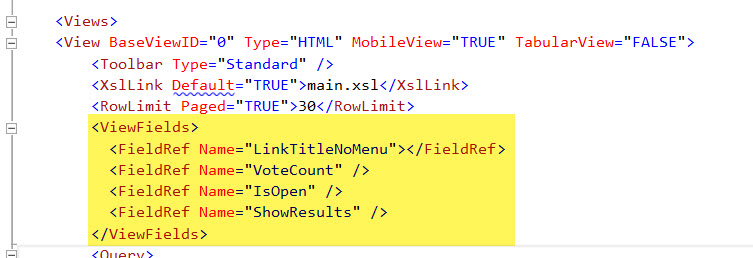
Wait, what’s wrong? You mean you want to see more than just the title field of your list in that web part?

I’m not 100% on this part, but this change worked for me:

Edit the <ViewFields> tag in the Schema.xml of your list where you find a <View> element with BaseViewId=”0″, Type=”HTML”…

sharepoint-addin-view-fields.jpg

Taking Add-In to the Market

I wanted to share, and possible earn some coin, off my frustration developing this supposedly simplistic add-in, but in doing so, I hit the following wierdness:

You’ve got to select at least one Supported Locale in the AppManifest, which was fine with me, I just wanted English to start, but if you just use the UI, it won’t add the setting properly. You need to go into the AppManifest.xml code-view and edit the xml so that it’s en-US (xx-XX).

sharepoint-addin-quirk-locale.jpg

Beyond that, the screenshots simply must be 1366px X 768px, naturally! Which seems a little unfair to little Add-Ins like mine which I had to pad-out with blank space because, seriously, it must be this size.

JSONP with Mendix REST Services

Mendix is an exciting platform because it simplifies something that tends to get overly-complicated: web-facing, record-based systems.

Because of Mendix’s platform ideology of rapid development, it isolates the developer from the guts of the java code it generates and compiles.

The problem is that many of the apps (modules) available from the App Store are not as flexible or feature rich as they might be, and some have the classic problem of backwards compatibility with a rapid-release IDE (in this case, the Mendix Business Modeler).

When Mendix started offering REST services, I took interest because it’s one of the better use cases for the platform, and I found that the REST Service module delivered both consume and publish services, and the setup was intuitive and worked well…with one exception: No JSONP support.

JSONP is a very simple modification to JSON output that simply wraps the JSON object of the response in a function name that you pass to it in a parameter usually named callback.

So we go from

[{"field1":"stringvalue", "field2":100}]

to

passedCallbackFunctionName([{"field1":"stringvalue", "field2":100}]);

Then, on the receiving side, the function named in the query parameters is either automatically invoked by libraries like jQuery (because it detects a parameter named callback in the request url), or manually by calling eval() on the response body.

This can be fixed, but requires an adventure into the java code layer that Mendix generally keeps out of sight.

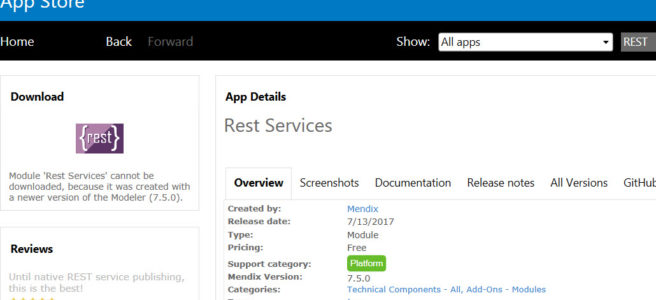
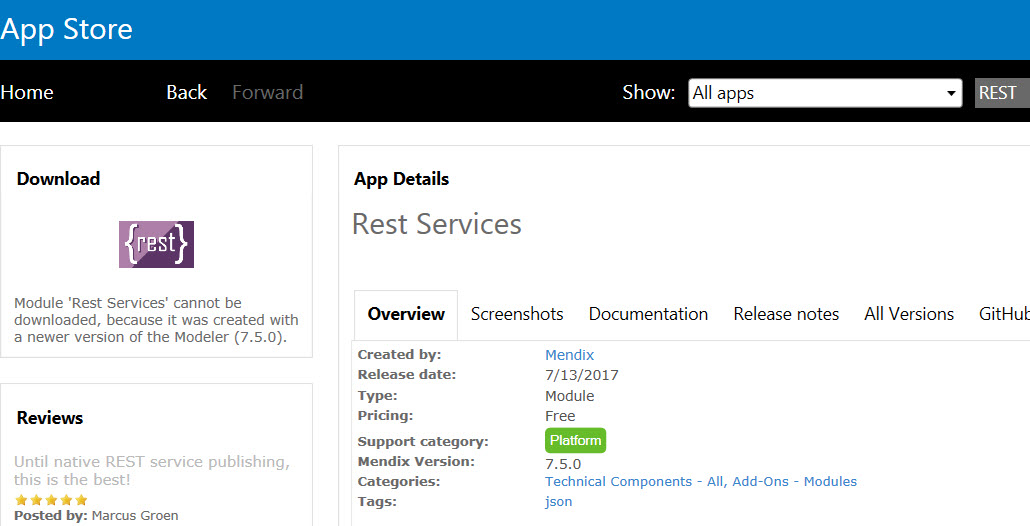
To setup REST in Mendix, first download the Rest Services module from the App Store:

mendix-rest-services-module

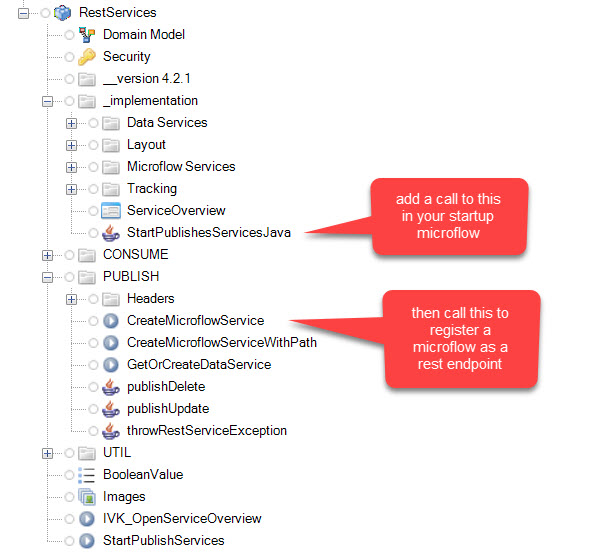
With this downloaded, you will see the following content in the tree view of the module in the Project Explorer:

mendix-rest-module-tree

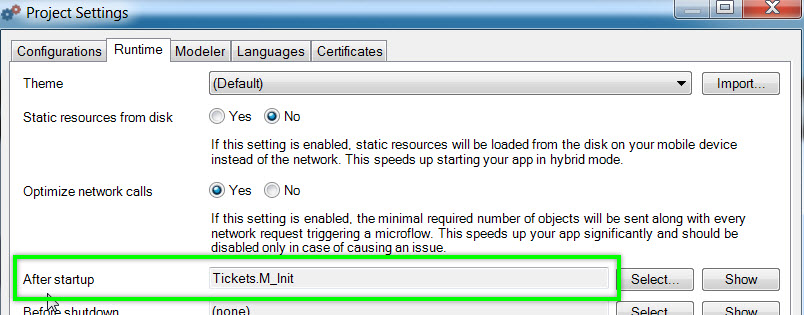
You want to create a microflow to handle the initialization of your REST microflow endpoints, and set that in the Project Settings After startup property:

mendix-project-settings-after-startup.jpg


My Initialization microflow looks like this:

mendix-rest-init-microflow

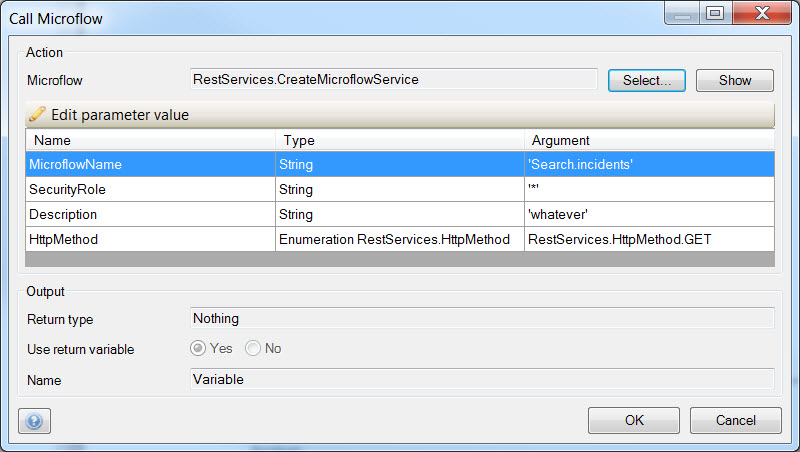
The first activity takes no parameters. The second needs and third need settings similar to the following:

mendix-rest-create-microflow-service-action-settings

So in my module named Search, I am exposing a microflow named “incidents”; giving it a wildcard for security role, which means anyone can access it; being unimaginative with my description; and specifying HttpMethod of RestServices.HttpMethod.GET enum value.

I do this again for another endpoint that serves up records from a entity table of requests.

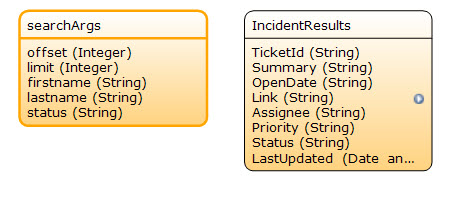
I’m not going to go into the mechanics of the microflows I’m publishing, except to note that they produce JSON based on the fields of a non-persistable entity, which I populate via a persistable entity at the time of endpoint invocation. For this simple ticket system app, my domain model looks like this:

mendix-rest-domain-entities

The search args will be automatically populated, based on the parameters in the query string.

For example, when you hit the running endpoint and specify contenttype=json, you get this result:

http://localhost:8080/rest/incidents?firstname=James&lastname=Gilbert&limit=10&offset=0&status=Open&q=&contenttype=json

mendix-rest-query-results

So the service publishes under the path

http://<your-app>/rest/<microflow>

…But as you can see, this is not JSONP.


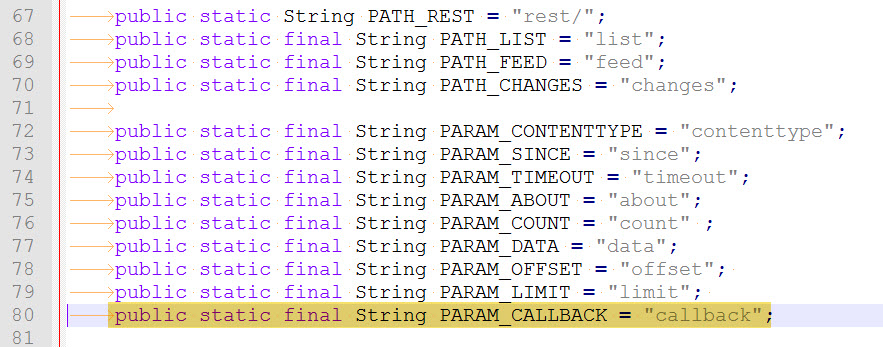
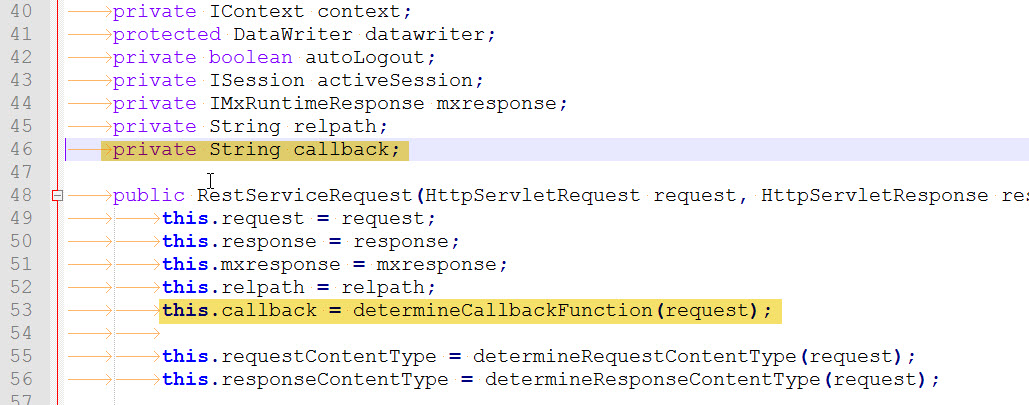
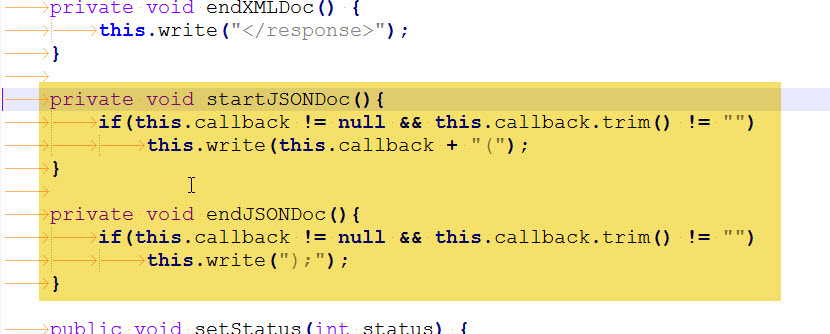
To have Mendix Rest Services offer JSONP support, you only need to make two tiny edits to the files RestServiceRequest.java, and RestServices.java which are added to your Mendix project when you add the Rest Services module.

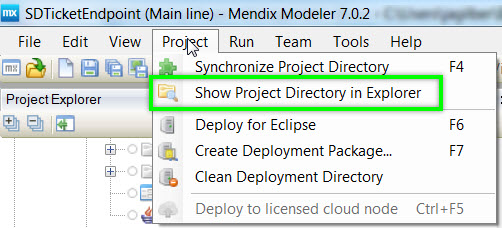
To find this, go to the Project menu, and choose Show Project Directory in Explorer

mendix-show-project-directory.jpg

And navigate to

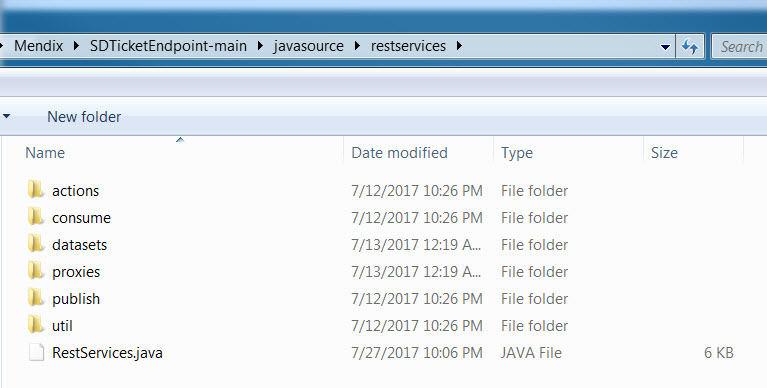
<Your Project Path>\javasource\restservices

mendix-rest-path

There’s RestServices.java, and RestServiceRequest.java is under the publish folder.

Add the following to RestServices.java:

mendix-rest-RestServices-java

And in RestServiceRequest.java, here are the changes:

mendix-rest-RestServiceRequest-edit1mendix-rest-RestServiceRequest-edit2mendix-rest-RestServiceRequest-edit3mendix-rest-RestServiceRequest-edit4

Here’s a zip of all the changes: Link

When you have your service compiling and running locally, you can deploy it to the Mendix Free App Cloud for further testing. NOTE: the service will go to sleep after a period without requests, so as tempting as it is, it’s probably a bad idea to leave it on the free app cloud.

So now you can make ajax calls your Mendix REST service endpoints from jQuery without worrying about Cross-Domain requests, which ajax now blocks.

Here’s a sample of one such request:

var mendixurlbase = "https://<your-hosted-app>/rest/incidents?callback=?";
$.getJSON( mendixurl, { 
    firstname: "James",
    lastname: "Gilbert",
    limit: 10,
    offset: 0,
    status: "Open",
    contenttype: "json"
}) .done(function( data ) {
    console.log(data);
});

Creating and publishing an extension for Visual Studio Code

As far as text editors go, I like Notepad++, it does the job, and there’s little tolerance for frustration with text editors. But good extensions tend to win me over (Firebug for Firefox kept me off Chrome for years).

So I’ve got to hand to to Visual Studio Code; they made easy the extensions area of text editor functionality which is usual esoteric and above the average coders ability.

Start with the documentation, which is extensive, and the Getting Started guide is comprehensive: https://code.visualstudio.com/docs/extensions/example-hello-world

To start, you’ll need to install yo from npm:

npm install -g yo generator-code

Then create a folder for your extension, and cd to it. Run yo from that folder:

your folder path>yo code

…This launches the utility which sets up a basic hello world extension.

You don’t need to setup a publisher prior to running the utility, but I did by following this guide:

https://code.visualstudio.com/docs/extensions/publish-extension#_publishing-extensions

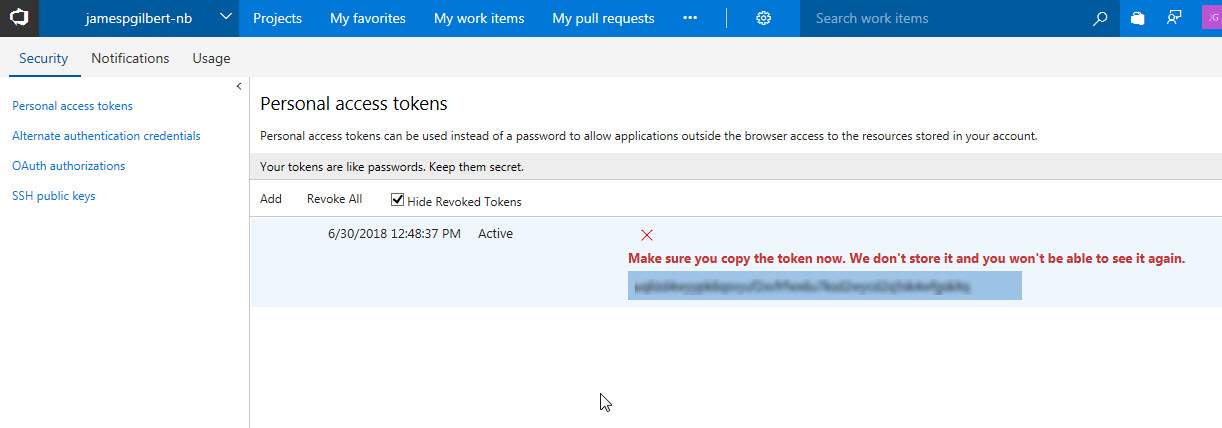
The key take-away is that you will be creating a permission which will have a Personal Access Token (they refer to it in some steps as PAT). When you create this you have to copy it somewhere safe!

vsteam-personal-access-token

With the token copied, go to command line and run:

command line>vsce create-publisher <your-publisher-handle>
Publisher human-friendly name: <your-display-name>
E-mail: <your@email.com>
Personal Access Token: <paste-the-token>

Successfully created publisher ‘<your-publisher-handle>’.

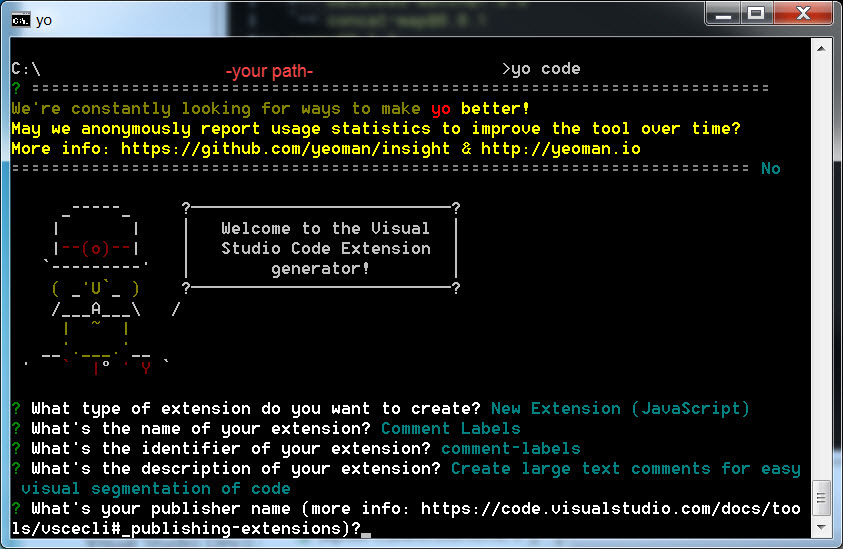
Now with a publisher name and token, you can run yo and fill in the info:

vscode-yo-utility-create-new-pub

This is going to create a bunch of files, but the main ones are package.json, which you will need to edit, and at the very least add:

 "icon": "icon.png",
 "repository": {
   "type": "git",
   "url": "https://github.com/jamespgilbert/comment-labels.git"
 }

NOTE: the url is pointing to my own github account.

The icon can reside in your folder, and it needs to be a 128×128 px PNG file, such as:

icon

You also need to alter the README.md file. Mine is pretty spare:

# comment-labels README

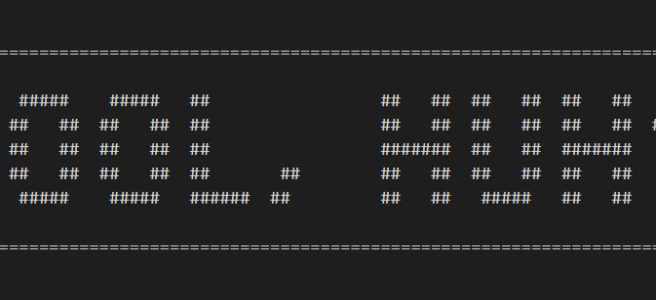
This extension allows you to create big comment label blocks for easy visual separation of code.

## Using

On a blank line in the editor, type the text you want to make a comment label for, and then run Comment Label from the command palette.

![Usage](https://raw.githubusercontent.com/jamespgilbert/comment-labels/master/demo.GIF)

## Known Issues

The command does not support some characters such as slashes and other characters that do not render well in the ascii text format.

## Release Notes

### 1.0.0

Initial release of Comment Label extension.

Notice the reference to the image, I am refering to an image that’s hosted by github because I checked it into my repository. You’ll need to provide the image from a hosted location. It doesn’t need to be github, none of your project needs to be on github, but if you’re using git with your project, you might as well, right?

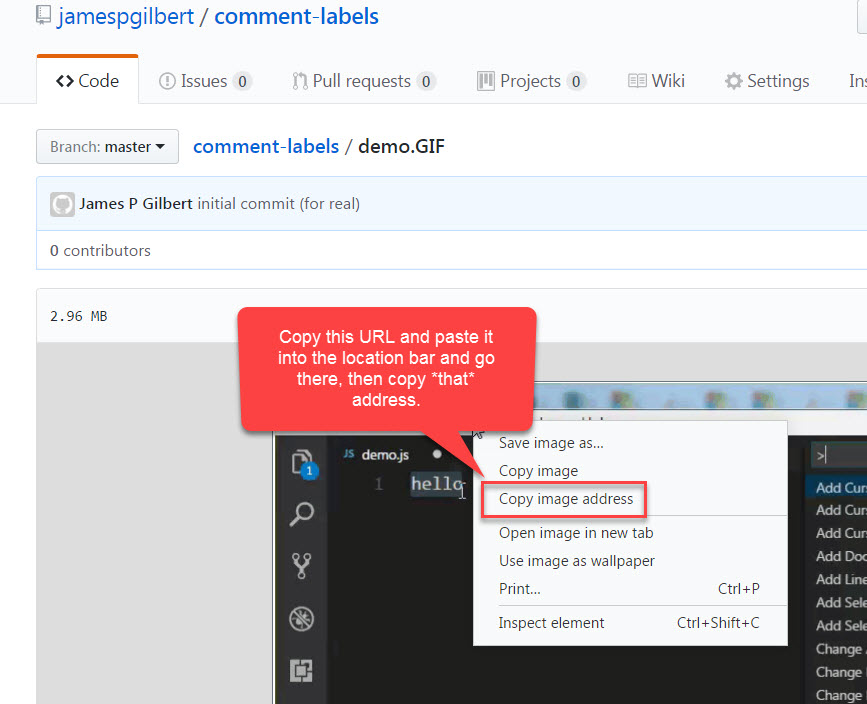
If you use github, you got to reference the file using the raw.githubusercontent.com url, which you can get by browsing to the file on github and copying the location of the image, then pasting that into the browser and going to the location, which will reformulate the url.

In short: it’s not going to be the same address as the one that you can browse to in github.

git-hub-image

Packaging the extension

In order publish, you need to package your extension using another utility called vsce. You can install it via Node.js command line:

>npm install -g vsce

You need to create a package file (.vsix), which you can do with the following command:

C:\your-path\your-extension-folder>vsce package

This will create a .vsix package file with the version number specified in your package.json.

Publishing your extension

Then login with vsce so your extension can be uploaded:

C:\your-path\your-extension-folder>vsce login jamespgilbert
Publisher ‘jamespgilbert’ is already known
Do you want to overwrite its PAT? [y/N] y
Personal Access Token for publisher ‘jamespgilbert’: <paste-your-token>

Authentication successful. Found publisher ‘James P Gilbert’.

Now, to publish the extension to the Extension Marketplace, run

C:\your-path\your-extension-folder>vsce publish -p <your-personal-access-token>

Note: you can’t publish a version that is the same or earlier than a previously published one.

If you want to replace the current version of your extension without upping the version, you’ve got to unpublish it:

C:\your-path\your-extension-folder>vsce unpublish jamespgilbert.comment-labels
This will FOREVER delete ‘jamespgilbert.comment-labels’! Are you sure? [y/N] y
Successfully deleted jamespgilbert.comment-labels!

Then you can go ahead and publish the same version as the now-deleted extension.

Behold the published extension

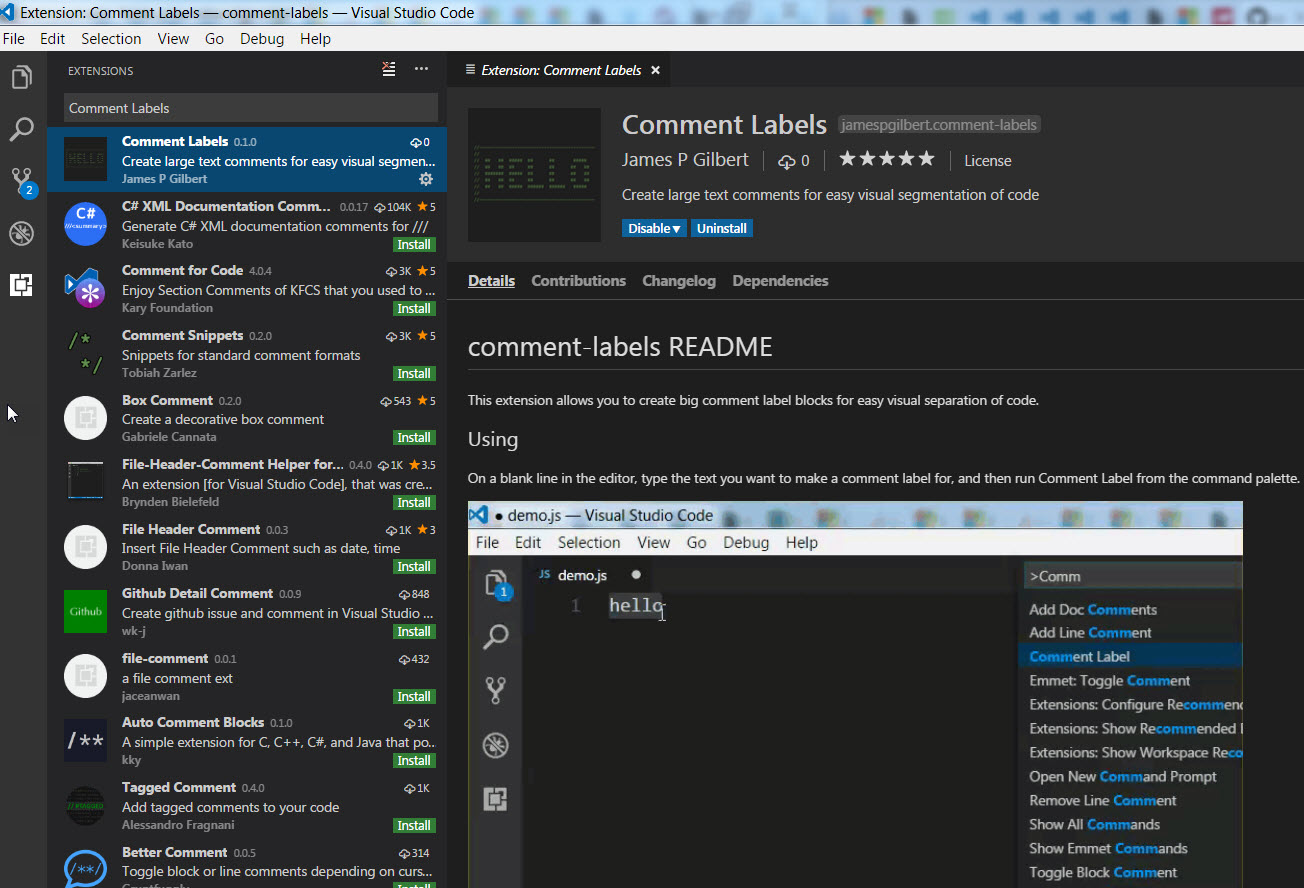
Once published, the extension should show up very soon if not immediately afterwards in the extensions tab in VS Code:

vscode-extensions-tab-with-my-extension

You can see it here too: https://marketplace.visualstudio.com/items?itemName=jamespgilbert.comment-labels

I created animated demo gif using Snagit 13, which allows you to record your computer use and edit out the awkward pauses.