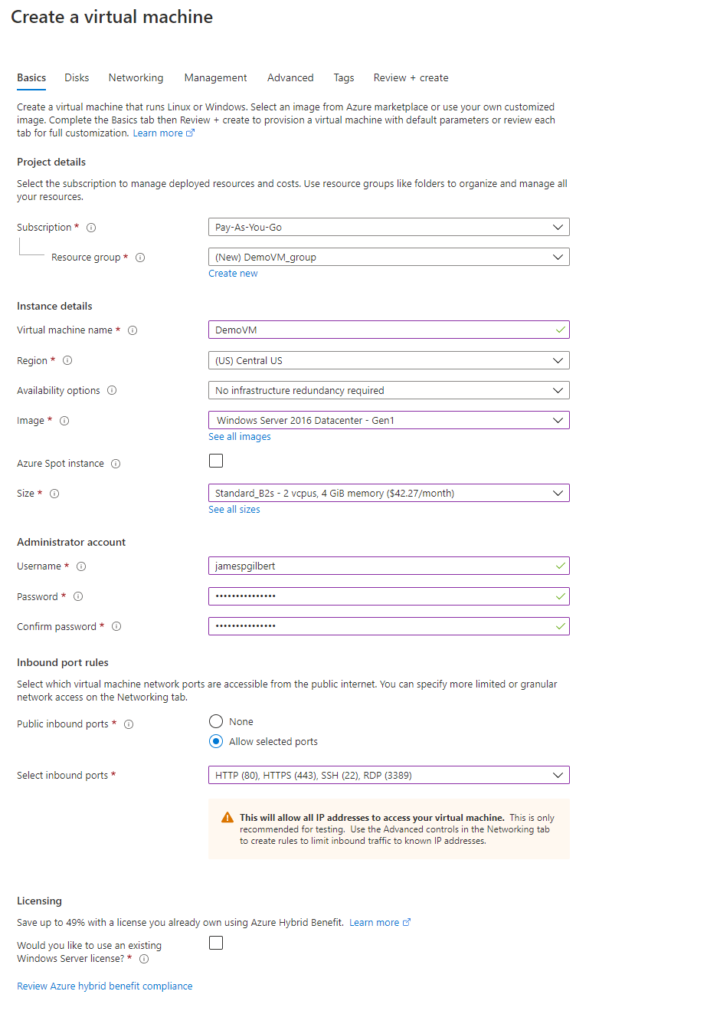
Setting up a VM in Azure is easy…too easy. Probably the trickiest part is finding the most cost-saving options, which are few. I always start with the most shameful offering and upgrade only as desperation demands.
But I found that, try as I might, I couldn’t get away with the basement B1s offering. It simply lacked the memory resources to setup. However, you can always start with B2s and downgrade when the settings are locked in. The main challenge is memory and apps such as IIS are demanding to run.
However, the monthly fee of B2s is currently $42, which is high. You pay hourly for the VM to be on. So if you turn it off, it saves you money. Most servers are always available so that’s not an option beyond development.
The full settings I pick below are as follows:
Windows 2016 Datacenter Gen 1 (Don’t worry it’s just a rebranded Windows Server 2016)
Standard_B2s
Inbound ports HTTP (80), HTTPS (443), SSH(22), and of course RDP (3389) which we need to access the VM!
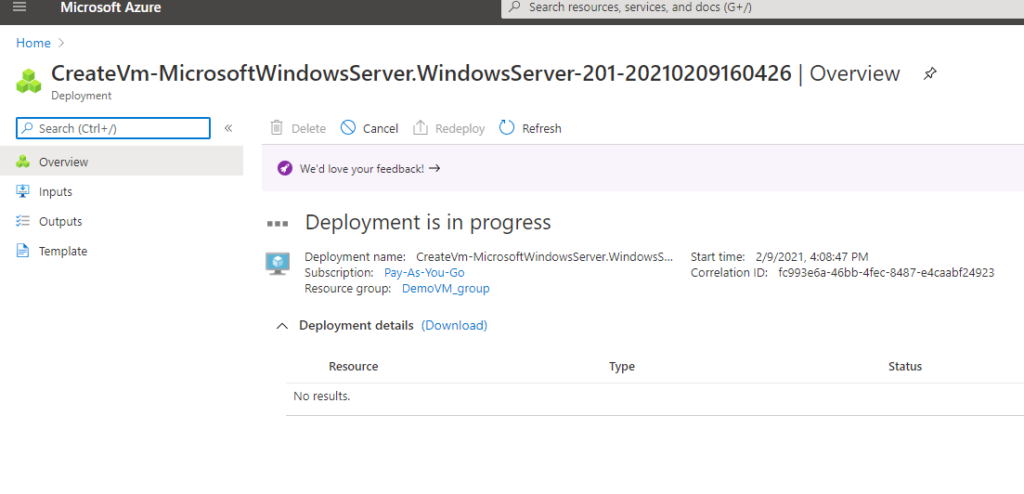
Your newly created VM will deploy and create plenty of Azure notifications in the process.
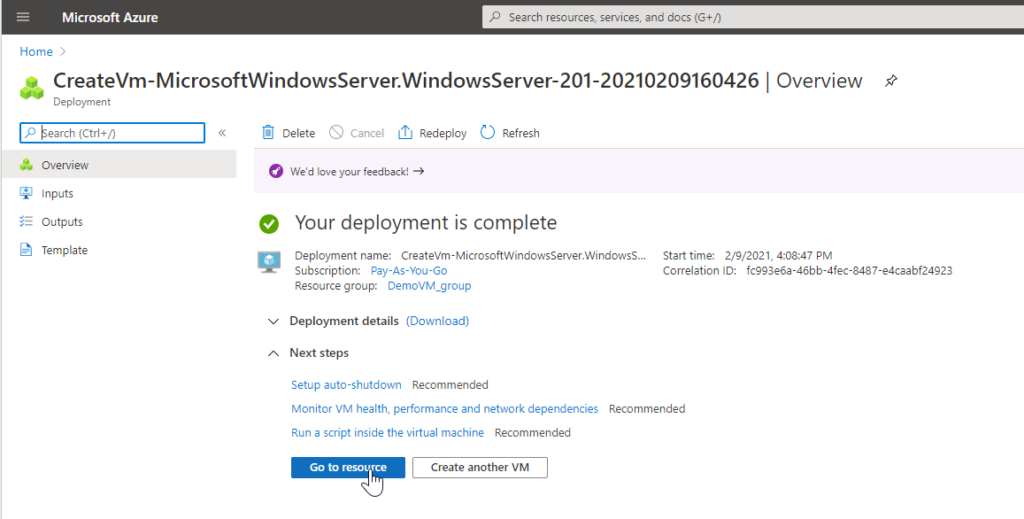
When deployment is complete, go to the resource.
On the resource’s overview page, you can see your VM’s IP (highlighted yellow below). Copy it and otherwise make note of it since we will need it later.
Via the connect menu option, download an RDP connection file which will connect you to the VM with Windows’ Remote Desktop client.
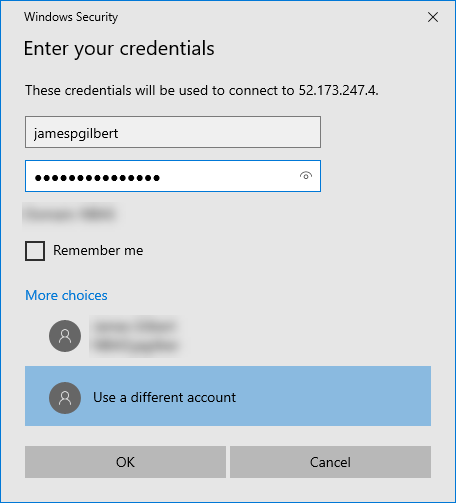
RDP into your VM
Open the RDP file and you will be prompted for credentials. Make sure you are using the option which gives you both the user and password fields (in case you are on a network and the computer assumes your domain or user).
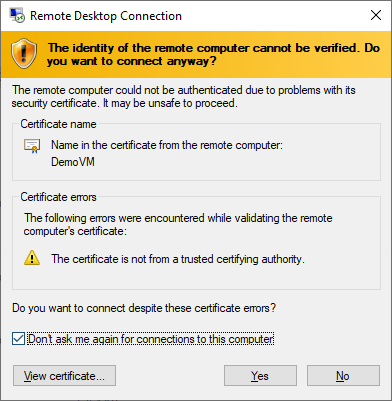
Say okay to all the risky messages about accessing this shadowy entity you created.
It’s okay, we know this guy.
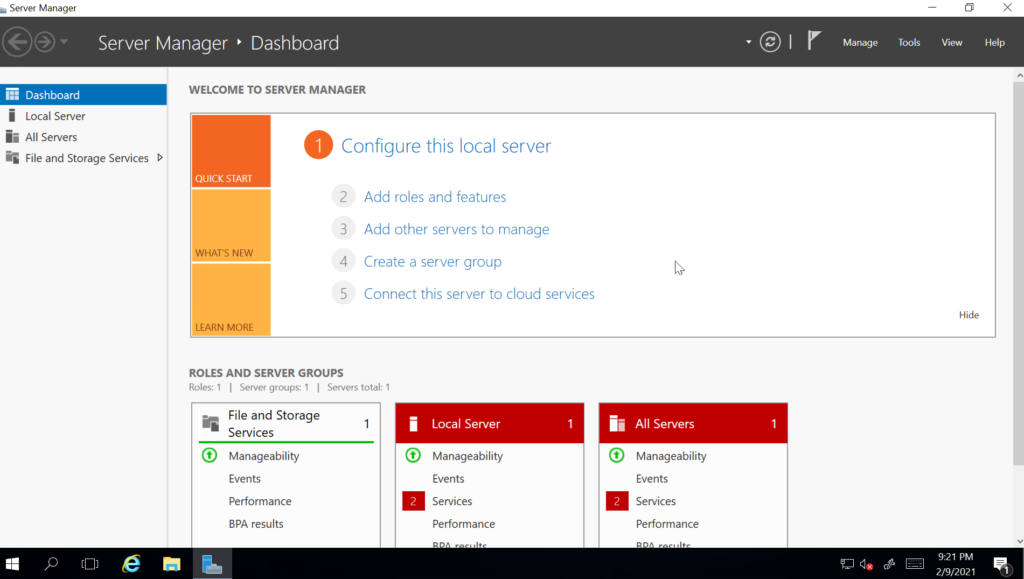
Once connected to your VM and logged into Windows, Server Manager will start.
Setup IIS
The first thing you will need to do is add IIS. To do so, you can click the Add roles and features via that numbered menu or via the Manage menu.
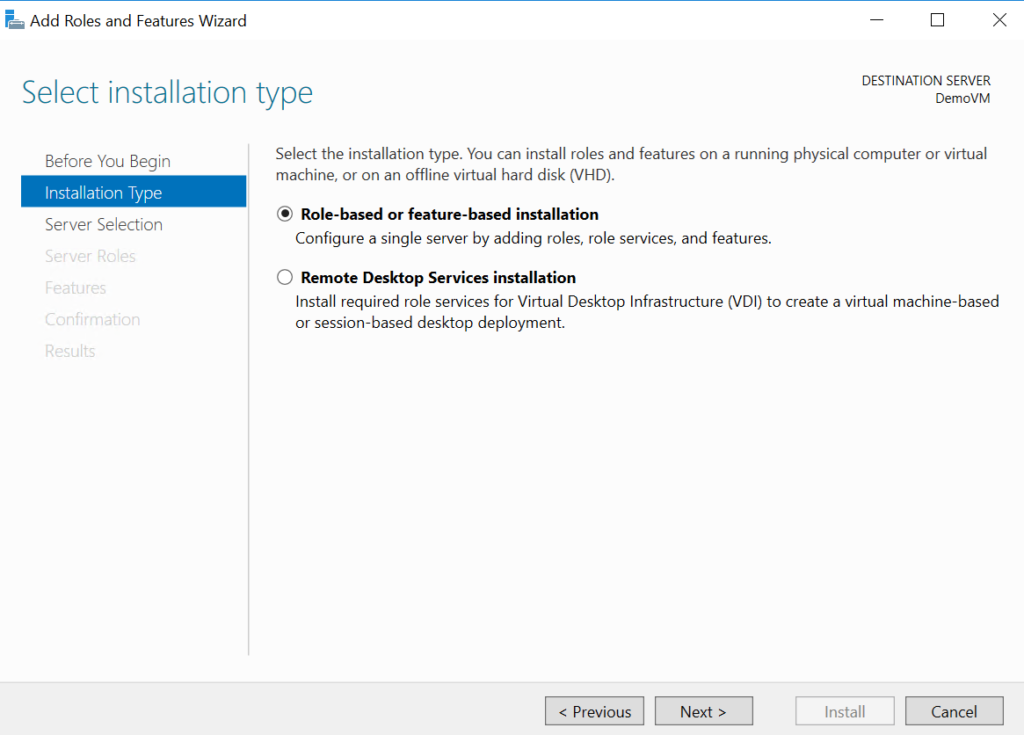
In the wizard, choose Role-based or feature-based installation.
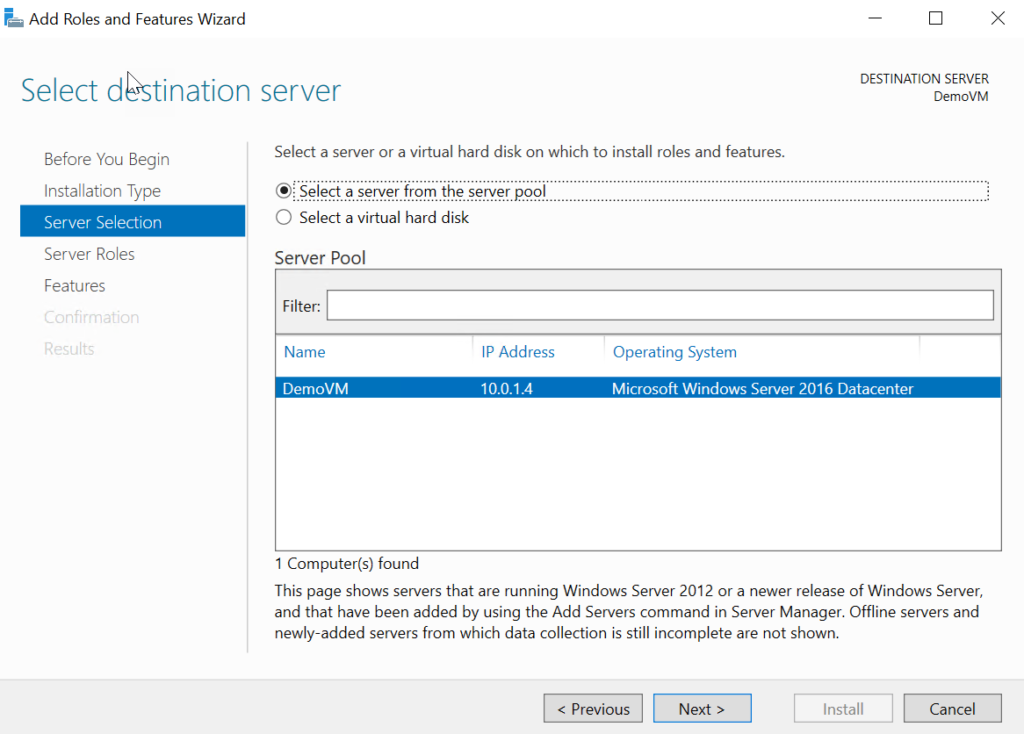
Select your server (it should be the only item).
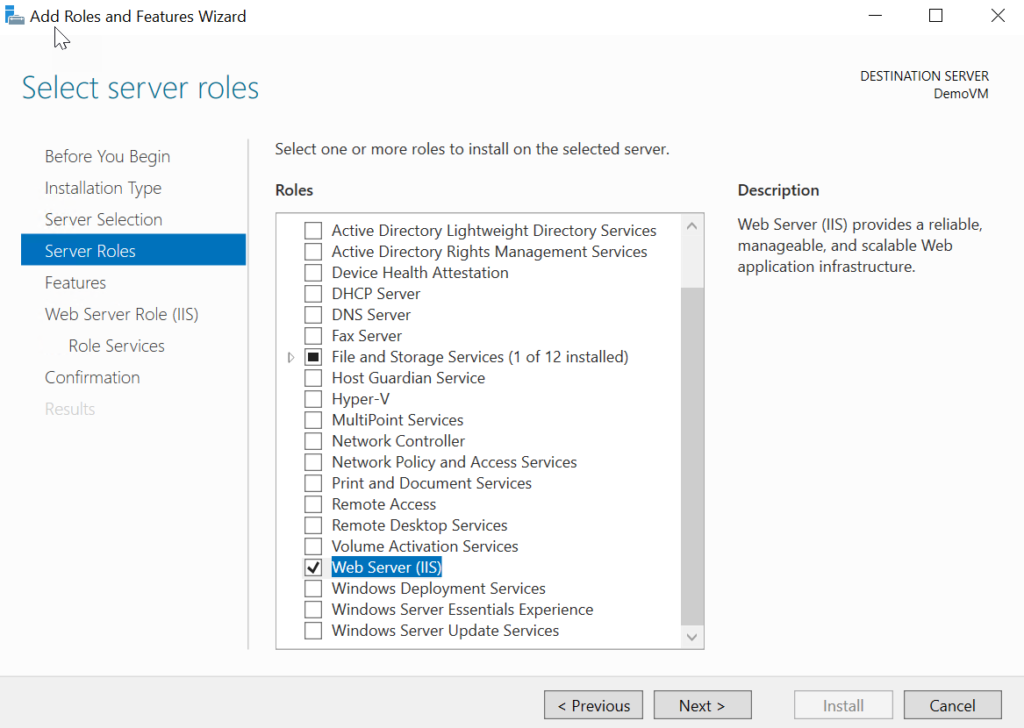
In the following list, simply select the IIS option, which you will need to access.
When you check off IIS, the side bar list changes to include the IIS options. We’ll select these in the next screens.
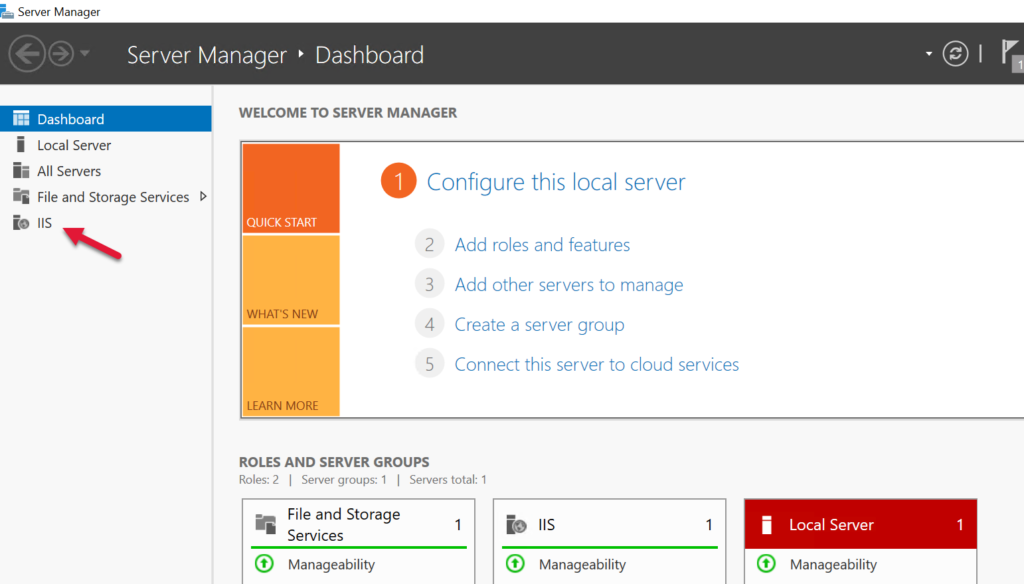
After the install you will see IIS in the sidebar options.
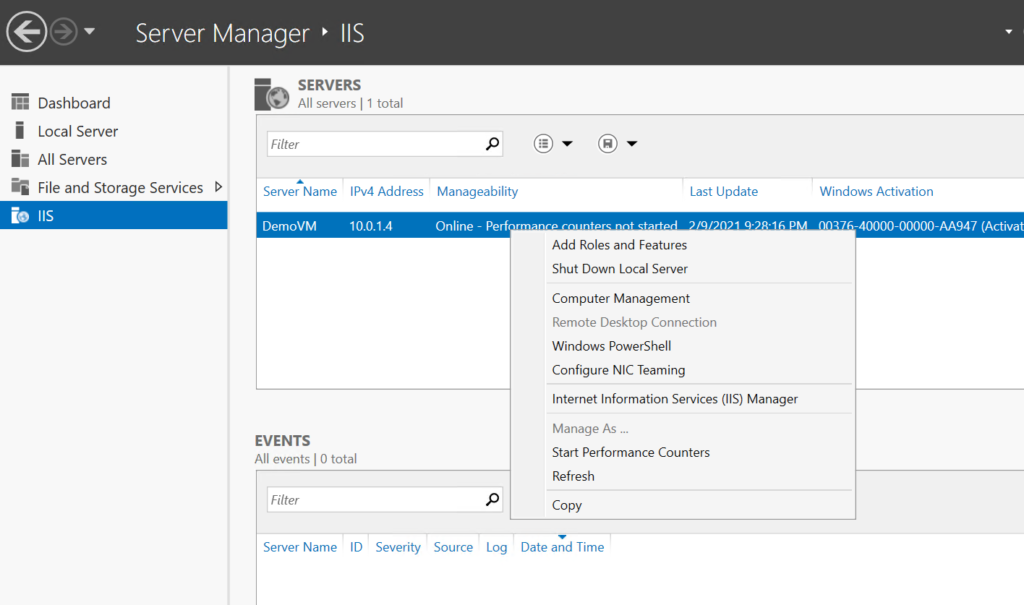
Select IIS in the sidebar and right click on your server to get the context menu, and select from it Internet Information Services (IIS) Management.
Right click on our server and choose
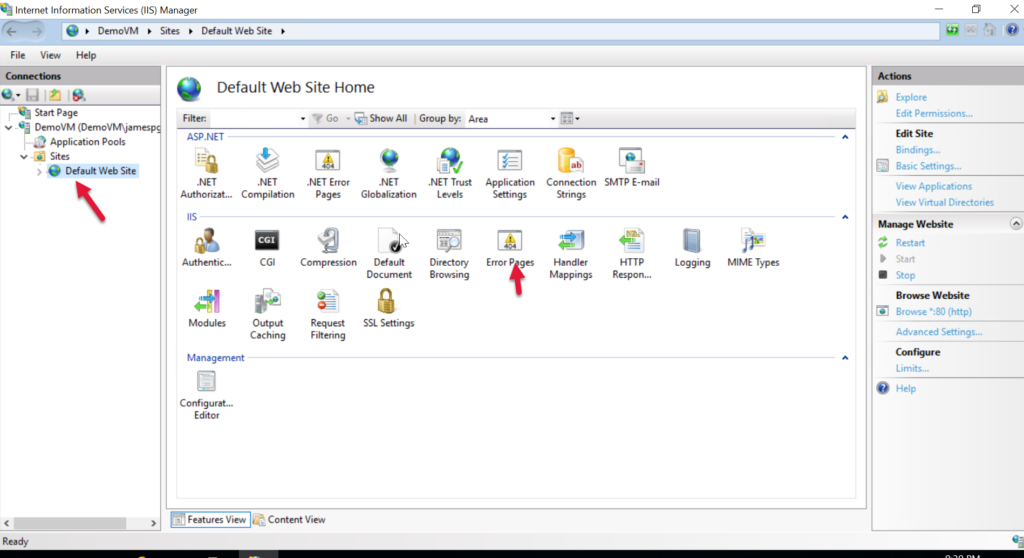
We may want to have more verbose error messages to help us debug the issues related to getting the server running. We can do that via the Error Pages option which appears when the Default website is selected.
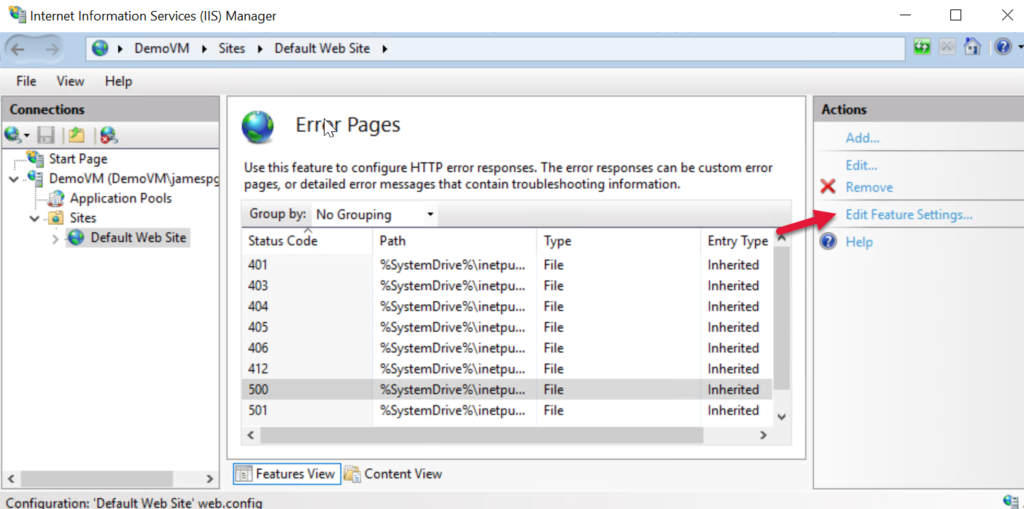
Select the 500 (server) error and choose Edit Feature Settings…
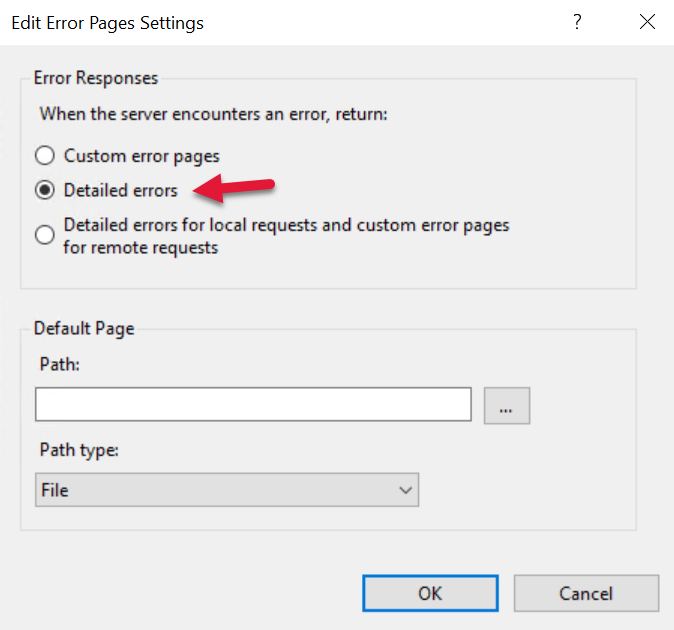
Turn on Detailed errors, because we want to see why something fails when we try to access this VM remotely. You can turn this off when everything is running okay.
Detailed errors for everyone!
Test remote access to the VM
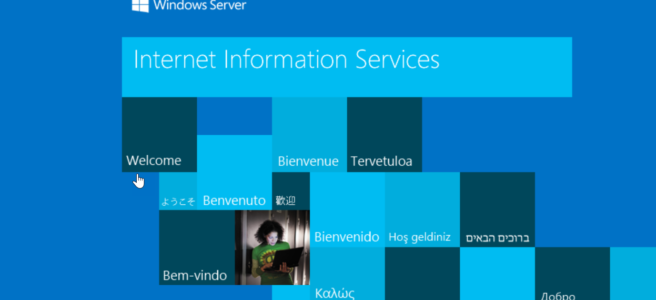
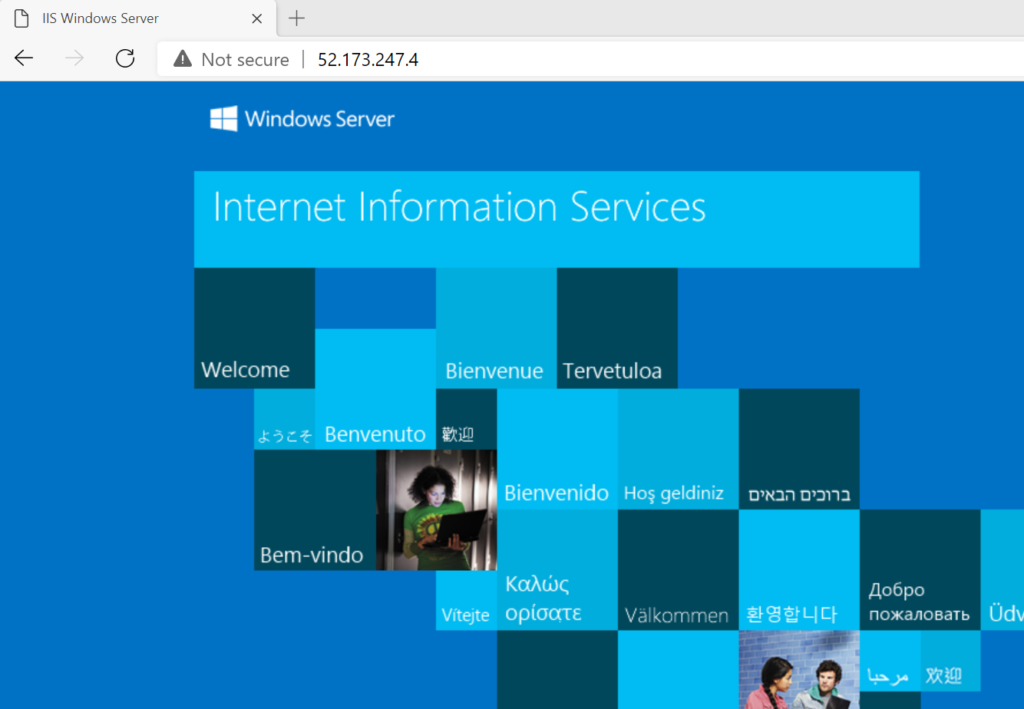
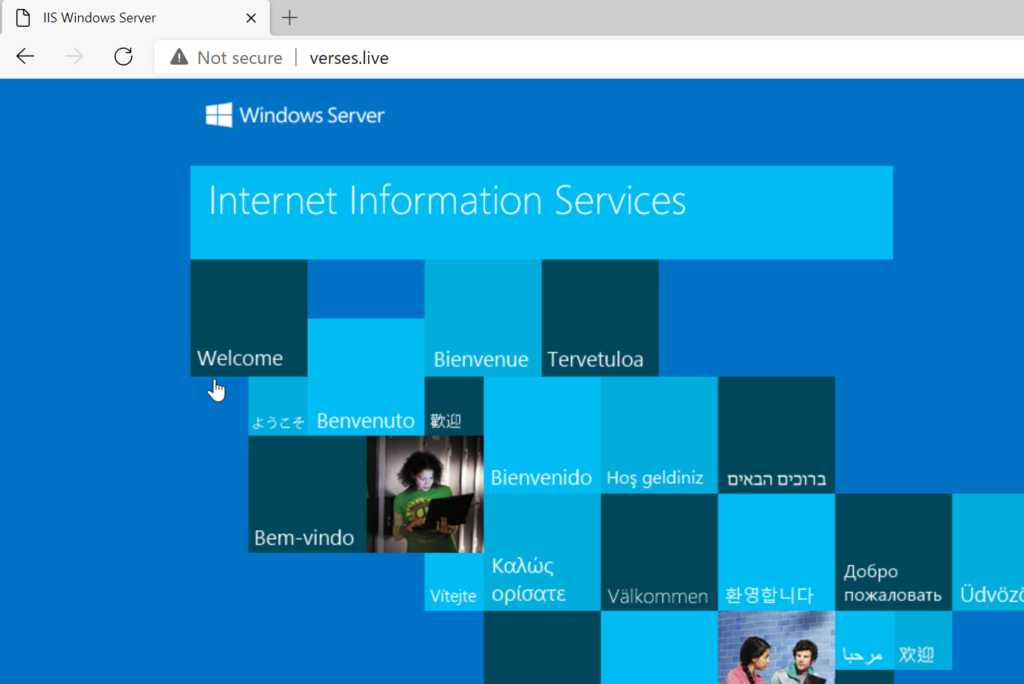
Enter http:// followed by your IP address. You should see the default IIS splash page in drab shades of blue and speaking in tongues:
Blue and insecure but present.
Setup Azure DNS
Now you will need to setup Azure DNS for your VM. To do this, you will need to pay Azure at least $1 more per month (at the time of this writing) by way of a DNS Zone (trampoline and ball pit access not included).
Create a DNS Zone for your domain and put it in your VM’s resource group
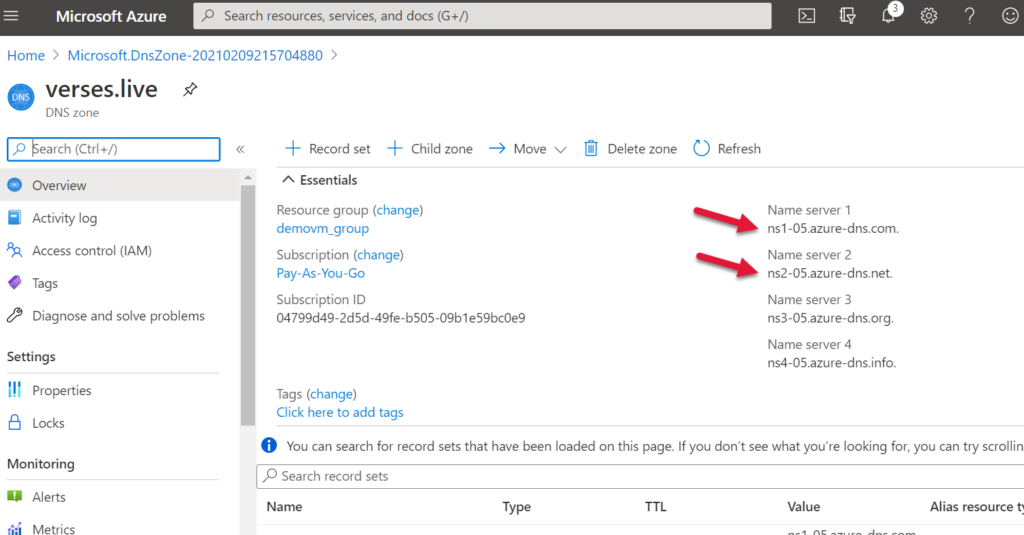
Once the DNS Zone is deployed, go to the resource. You’re going to need the top two name servers listed for configuration with GoDaddy:
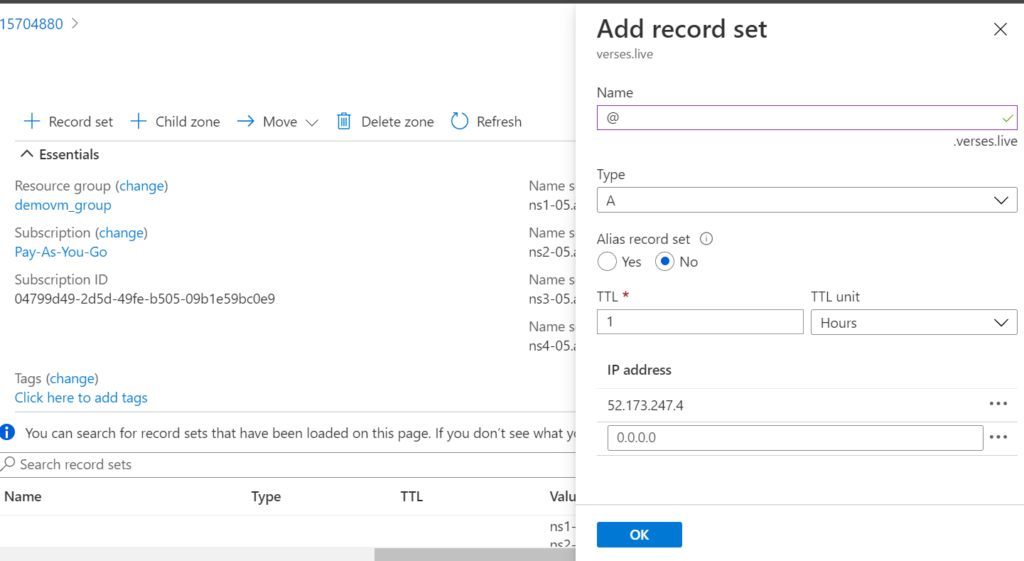
You need to also add a record to this DNS Zone to map it to the VM’s IP Address. You’re create a new A type record for the @ name and fill in the VM’s IP in the address field.
Okay, A$ure is all set…for now.
Link your GoDaddy domain to your VM
Speaking of seedy, money-grubbing establishments, GoDaddy has your domain ready to be linked. You need to setup it’s DNS settings and download the SSL certificate.
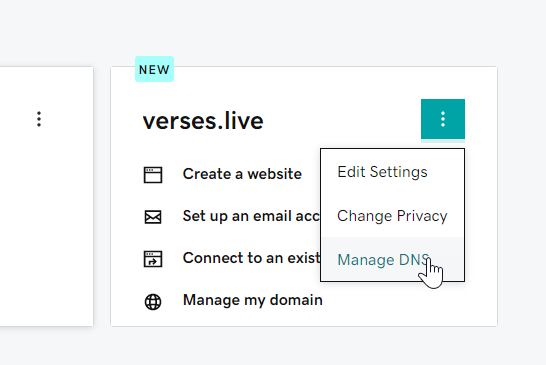
In the domain’s ellipses menu, choose Manage DNS.
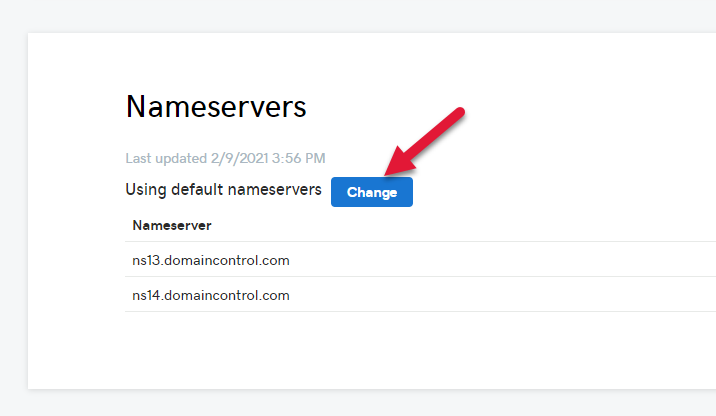
Scroll down past several intrusive product offers to find the Nameservers section and click Change.
All you need to do here is set the name servers to the one’s you copied from A$ure in the prior step above.
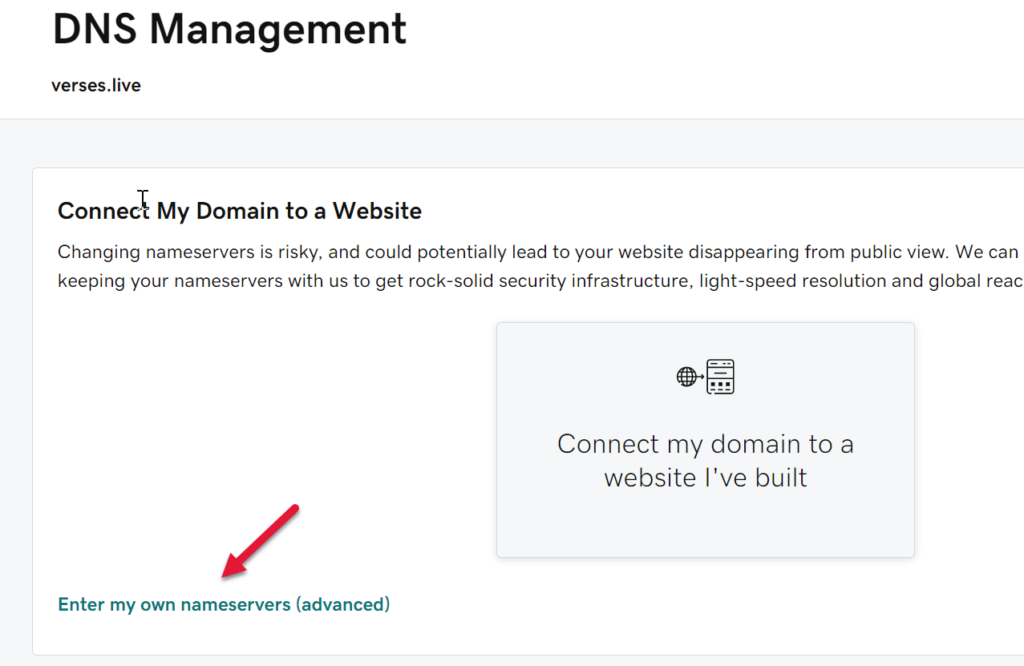
Find the “Enter my own nameservers (ADVANCED MODE, BEWARE!!!)” link under more product promo links and click on it.
Click at your own risk.
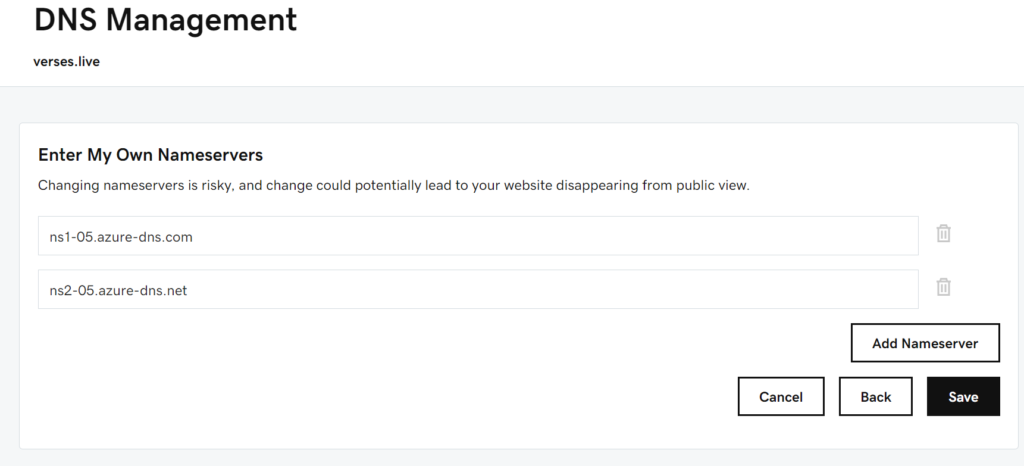
In the next risky screen we must point out that truly, the Internet is rife with peril!
So enter the Azure DNS settings you copied (without the periods at the end of them). At the time of writing this, Azure helplessly includes periods after the name server text so be sure to remove that when you paste it in the following fields, which are RISKY.
Dangerous? Perhaps, but it’s the only way to live.
When these changes are saved, the , all the CNAME stuff will go away because GoDaddy doesn’t manage that stuff anymore, Azure doe$.
Name server changes can take some time to propagate. While you wait, maybe spend some time seeing what charges Azure has been applying your credit card. Azure’s budgeting UI is quite intuitive.
Testing remote access to your domain
Once you’ve finished tabulating your soaring Internet fees, you can check in on your namespace propagation. Enter http:// followed by your domain name and you should see the blue-cubical worldview of the IIS default website:
I got the Blues, ohh let me tell you I have the Blues I’m a guy you can’t excuse, ohh let me tell you I have the Blues – Sam Myers
Mendix is growing as a utility for managing transactional information, and naturally, the business wants to know how those transactions are shaping the business. They’ll want reports, and they’ll even want reports of reports.
If you use Mendix for any capacity in your business, it won’t be long before you are asked to provide reporting capabilities of the data.
A quick note about the Export to Excel option
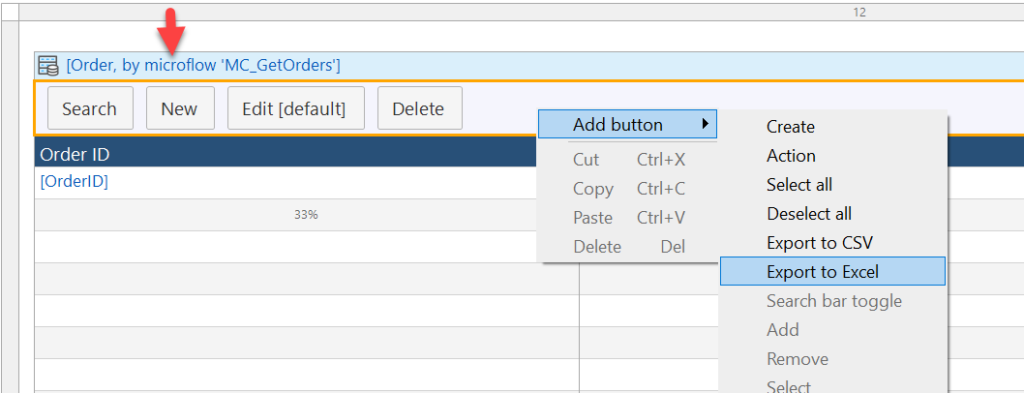
Before I get started with the methodology of preparing data for reporting, it should be noted that the simple Export to Excel function provided by the Data Grid control usually suffices. And it’s the right place to start when the business is unsure of their reporting needs.
To use the Export to Excel function, you need to create a Microflow that gets a list of your objects, and provide that to a Data Grid control as the data source. Then you will see the option becomes available in the context menu of the button bar:
The Data Grid needs to point to a Microflow data source
Once your needs outgrow Excel imports, you’ll want a setup that can facilitate reporting tools with data on demand…
Flatten the data (but not all of it)
The first thing to impress upon you is that it’s a terrible idea to provision your apps data as is. Should you embark on this fool’s errand, you will find that the time saved in getting the data into Tibco Spotfire or Microsoft Power BI becomes time spent trying to untangle it.
One reason is that it is all-but-certain that your app’s data model has associations that do not export well.
Another reason is that some of those tables don’t really belong as separate entities in the sense of reporting. A lot of them could be boiled down to columns on the parent table.
And sometimes the problem is the column values themselves aren’t good for reporting and need to be transformed in some way to be useful for analysis. This could mean applying a filter, or deriving a symbolic value, such as a business quarter, rather than a raw DateTime value.
Finally, there may be additional values you’d like to add to the report that don’t really belong in your app’s data. Maybe it’s as simple as applying a global label to your extract so that it can sit alongside other extracts.
Anyways, I think I’ve made the point that you are not looking to extract the master data–you want to make a copy of that data and flatten it.
You may disagree with me by the end of this walk-thru, after seeing the work we put into it, but experience tells me that producing reports from apps is and should be a task worth additional time and effort, and not simply a switch you flip on. And, once you’ve provided the data for reporting, stakeholders should understand that it requires maintenance and continued effort to change reporting capabilities.
Reporting considerations
We’re looking to stage the data before sending it out. This entails a few considerations:
How often does the data need to be reported on? Usually, the business will agree to daily if steered in that direction. There is rarely a need to have more reporting than daily. Weekly should be fine for most uses, but the business will not always agree to that.
What tables is the business interested in? Don’t ask this question out loud, ask it to yourself as a developer, what are the main tables in the app. Then be prepared with that list if the business asks you what they can get. But it really makes no sense to export everything your app stores.
How far back is the business expecting to see the data? This has implications for the performance of preparing the data. If the data accumulates over a year’s time and you don’t put any limits on what you’re pumping out for reporting, you will face performance issues when you prepare the data. A year’s worth of data is usually acceptable, but it depends on the situation; you could be dealing with a large mass of data that was never reported on. In any case, you want to find ways to limit what you’re preparing for export.
In terms of how often the business wants the data for reporting, we’re going to use a Scheduled event in Mendix to make that happen. Similar to Schedule Tasks in Windows, AKA crons or cron jobs, you want to be doing this in the off hours of the day because making a copy of the data is not a cheap operation.
Data Staging
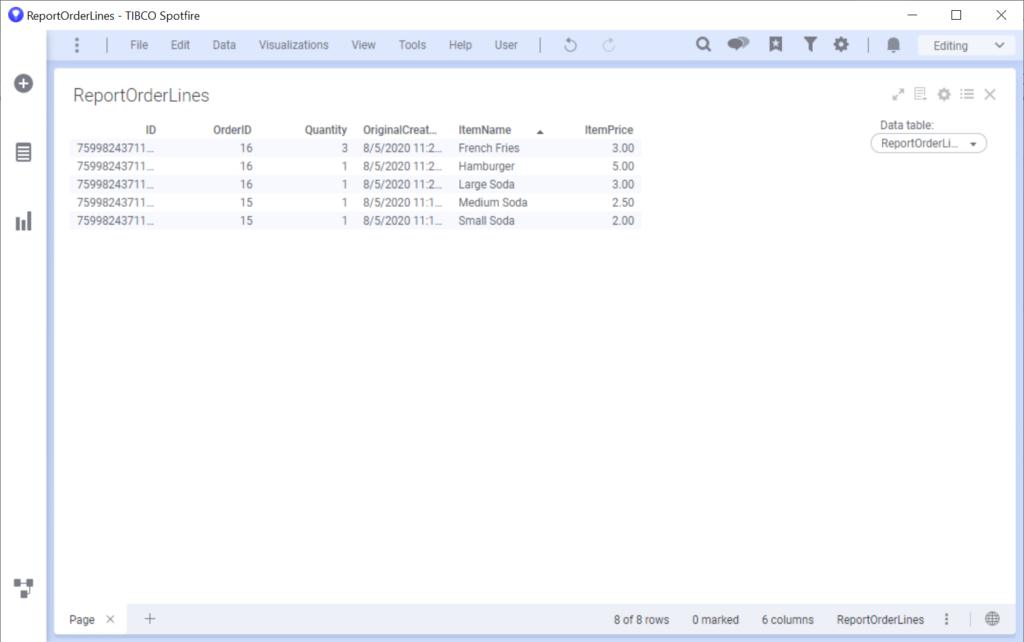
For this example, I am going to return to my Burger Stand App, which had Orders, OrderLines, and Items. It’s a very simple use case, but it’s suitable for our purpose.
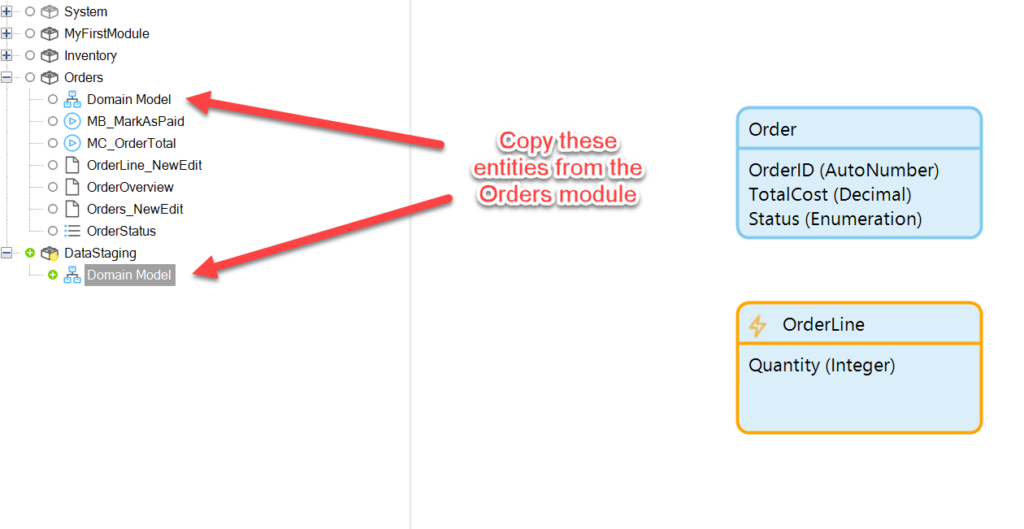
We’ll house our data for reporting in its own module. Let’s call it DataStaging.
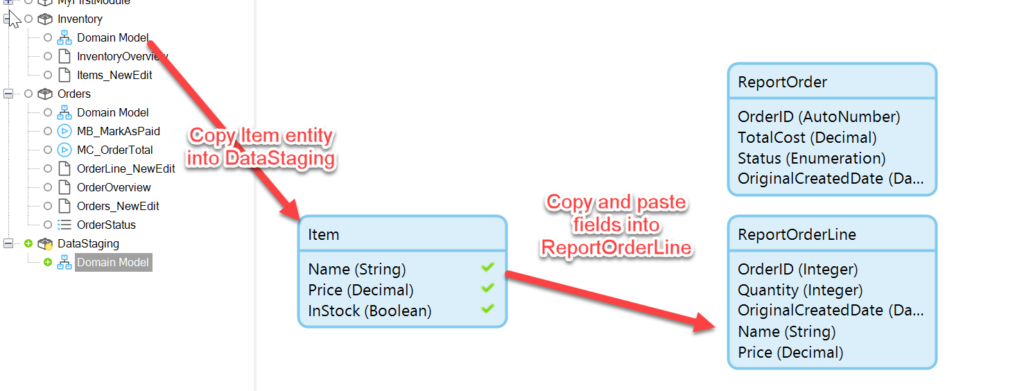
We want to copy the entities of interest out of their modules and into the new DataStaging module:
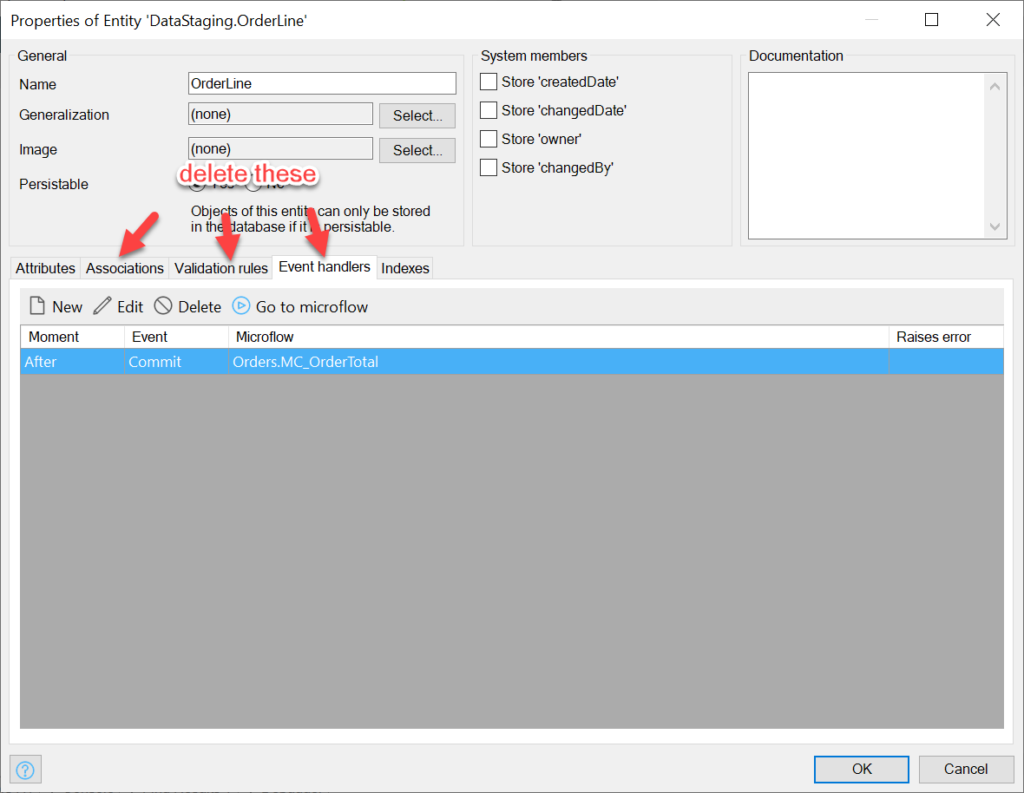
There should be no associations, validation rules, or event handlers in this module; we will delete all of these from entity copies:
Delete Associations, Validation Rules, and Event Handlers
Then we will rename the entities to help distinguish them from the original data. I like a convention here, like Report<EntityName> or CopyOf<EntityName>.
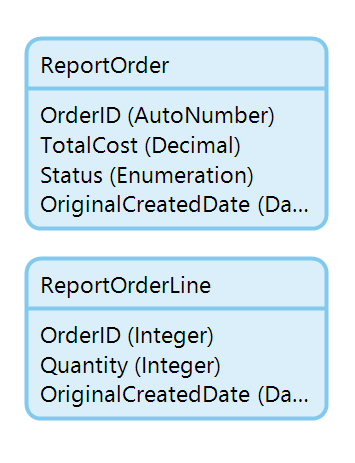
We also need to provide an ID field so that we have a way of reforming the associations in the reporting tool. If a main entity table already has a unique identifier, it’s all set, but the children entities will need a field to refer to their parent entities, and it should be of the same type as the parent Id (string, long, etc). So I am going to add ‘OrderID’ to my ReportOrderLine entity:
We’re also interested in the createdDate field of the original data, so we have to make a copy of that field in our copy entity because Mendix won’t allow us to set an entity createdDate field directly.
Your staging entities should look like this:
In the app, each OrderLine refers to one Item entity. This is a good opportunity flatten data by copying the Item fields into the ReportOrderLine entity.
It’s easiest to simply copy the Item entity into the Data Staging module, and then copy and paste the relevant fields (Name and Price) to the ReportOrderLine entity:
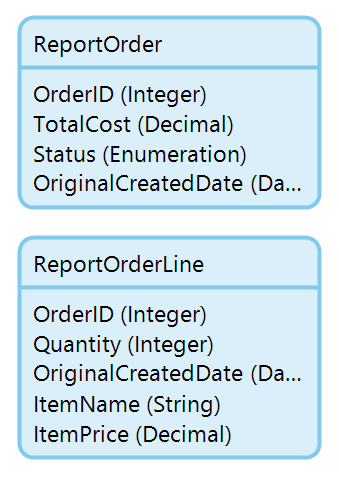
Once the fields are copied, they should be renamed to ItemName and ItemPrice. Then the Item entity can be deleted from the module.
Finally, change any AutoNumbers to Integers.
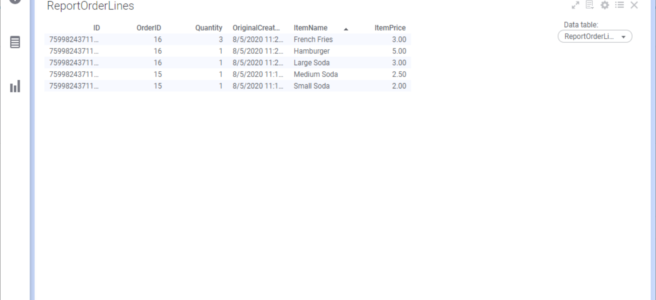
The result:
Flattened.
Copying the data to our flattened model
We’ve prepared a model for our master data to be flattened into, and we need to perform they actual copying of the data. We will make a Microflow that can then be scheduled to run at a interval.
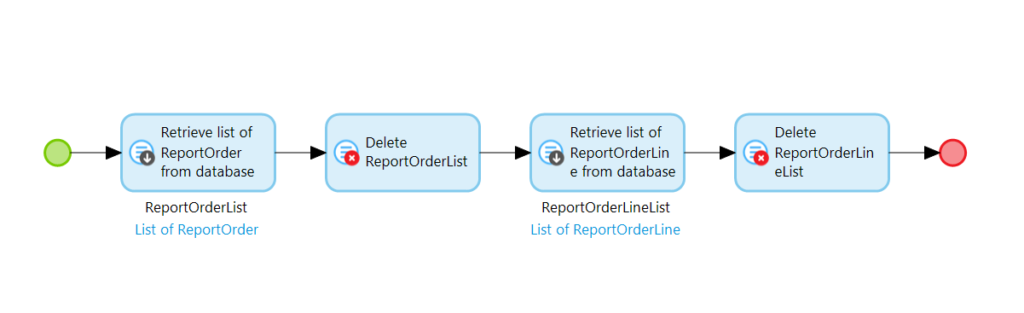
In our new DataStaging Microflow, MF_PrepareReportData, the first thing we need to do is clear out existing report records.
Note: the only reason you would not want to remove them is if there is a need for the report data to always be available, and the absence of data during the brief time when the new data is being prepared is not acceptable to the business. In this case, you would need to iterate through the existing report data and change it, instead of removing it out-right. But that’s a lot more work, so hopefully you won’t need to provide for this scenario.
We can remove the existing records by first retrieving all of them from the database with a Retrieve action:
…and then deleting them with a Delete action. We do this for both ReportOrder and ReportOrderLine (for every report entity you have):
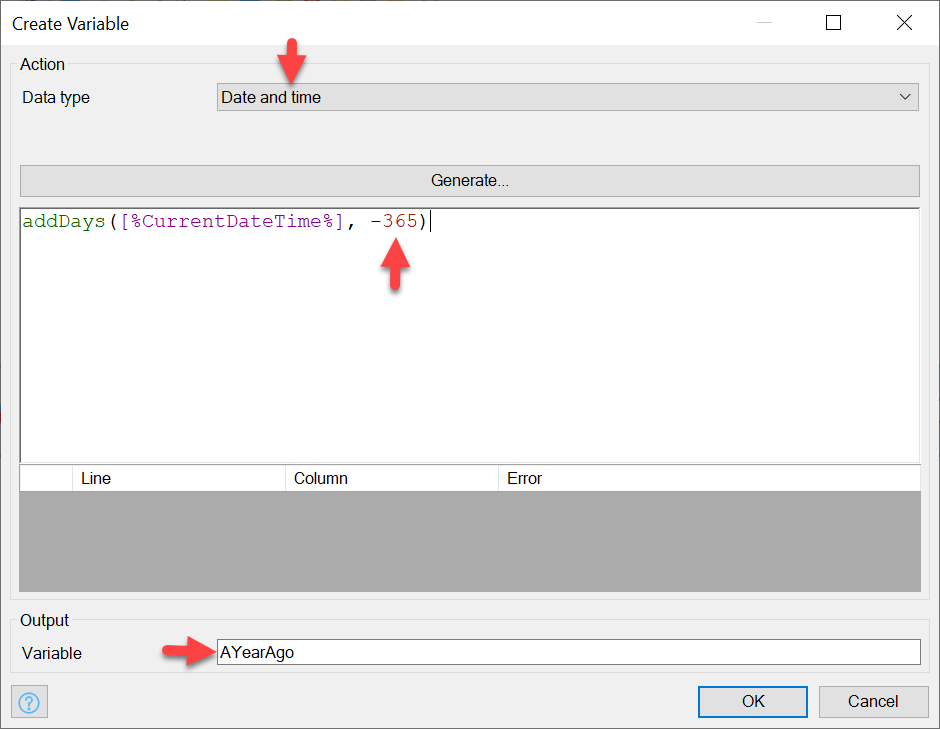
Now, we’re going to retrieve a year’s worth of Orders. To do this, we first create a variable with the Create a variable action, and then set it to be a date time type with the following value, which is the current time minus 356 days:
[%CurrentDateTime%] is a system defined dynamic value which holds the current time
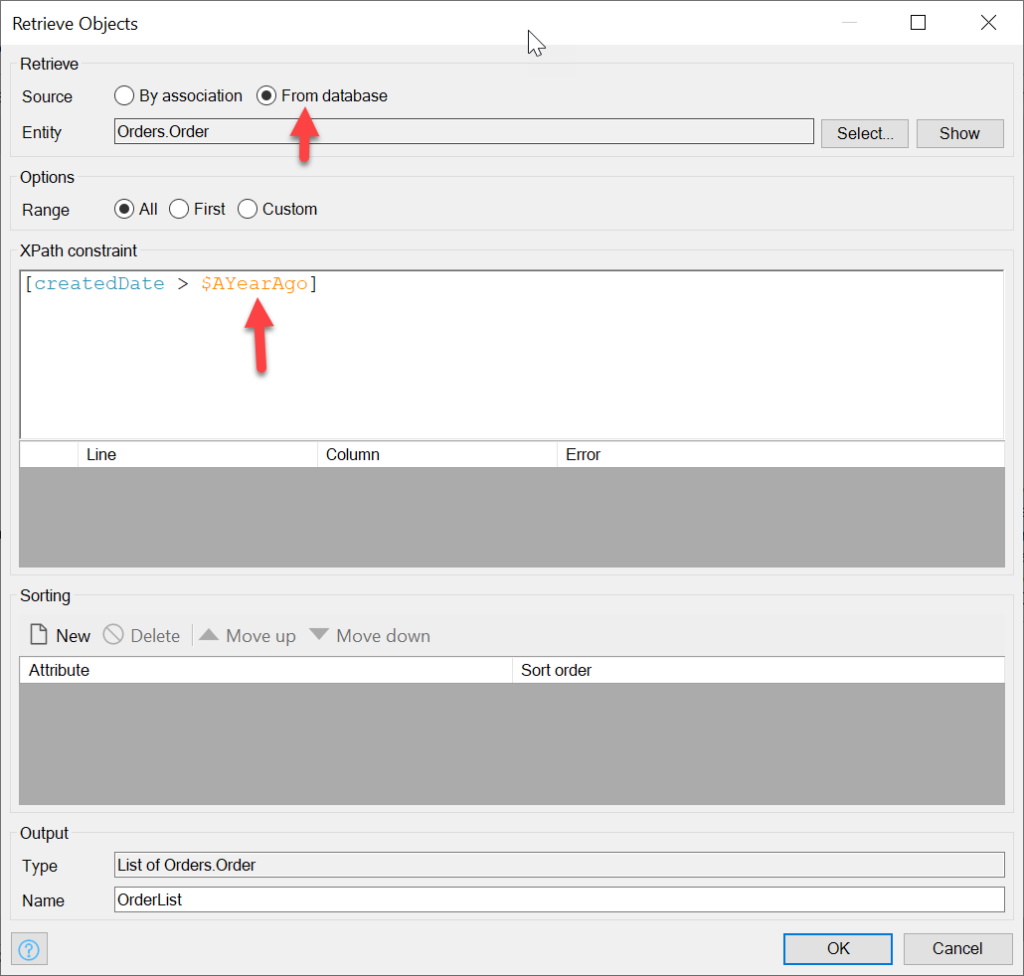
Now we use this new variable in the XPath expression of the Retrieve action of Orders:
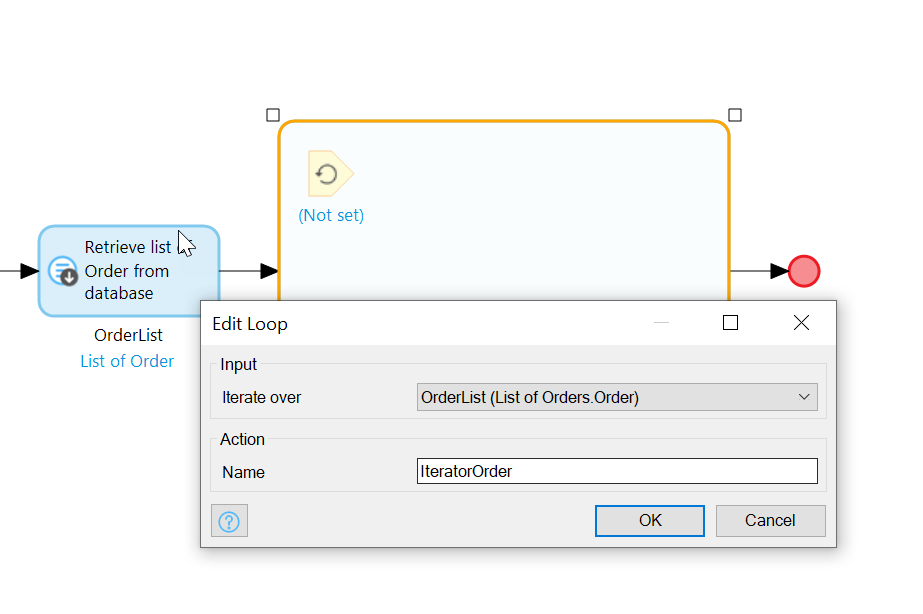
We will loop through the resulting list of Orders, and for each one, create a ReportOrder. Add a loop from the toolbar and set the Iterator variable to point to the OrdersList which you created with the Retrieve action:
Iterate over the year’s worth of Orders
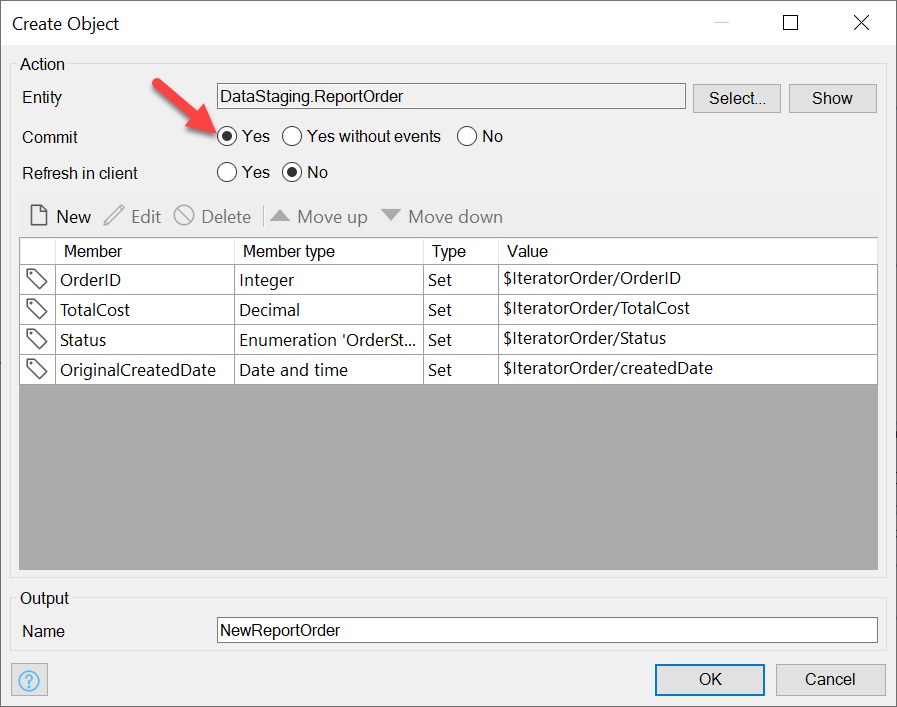
For each Order, we create a ReportOrder, and we’ll need to copy to each field the corresponding Iterator’s field (make sure to Commit the new ReportOrder):
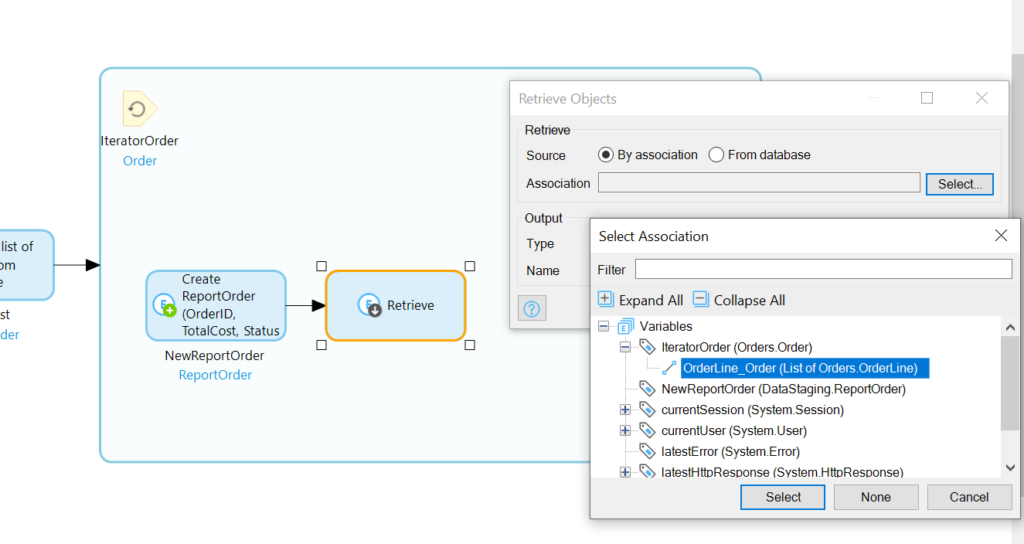
We also need to add logic within the same loop for the OrderLines; we need to use the context of the IteratorOrder to retrieve associated OrderLines. Additionally, we need to retrieve the item for each OrderLine since those fields will be going straight into our ReportOrderLine record.
In short, we need to make our loop bigger.
” We’re going to need a bigger loop.”
In our newly renovated loop, we’ll add a retrieve following the Create activity, and we’ll set it to retrieve by association the OrderLines associated with IteratorOrder:
With the OrderLines of the IteratorOrder retrieve, we’ll need to loop through those:
It’s just a loop within a loop.
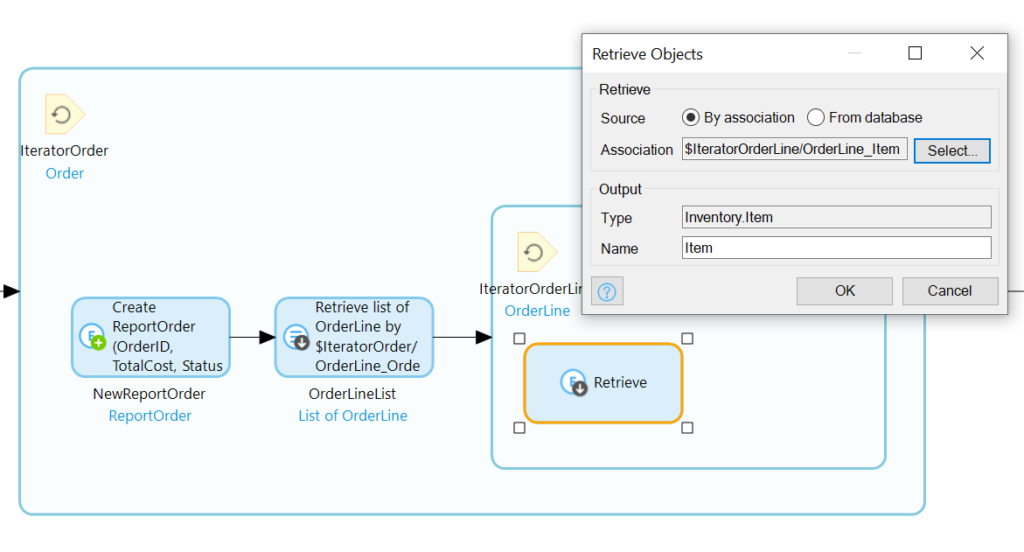
Inside the sub-loop, we need first to retrieve the associated Item:
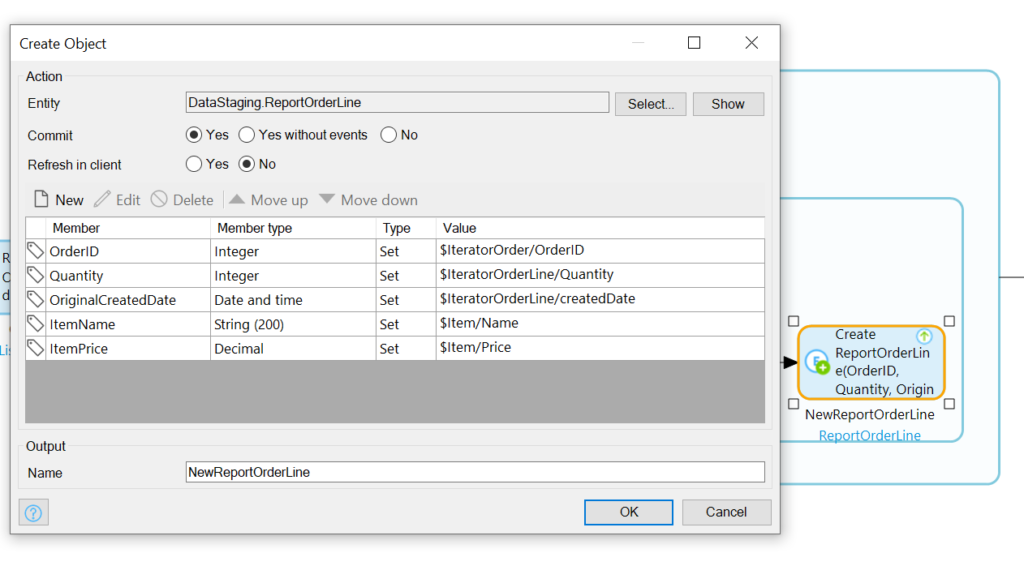
Now we’ll stuff the info from IteratorOrder (the OrderID), IteratorOrderLine (the Quantity), and Item (Name and Price) into a new ReportOrderLineRecord:
Remember to choose the Commit option
Phew! We’re done with the Microflow.
Testing the Microflow
Before we schedule the Microflow, we ought to, perhaps, and I’m only thinking out loud here, maybe considering testing it?
Additionally, it makes a huge amount of sense to have a button somewhere that can trigger this function, in case the business has an urgent need run a report.
We can add such a button on an Overview page in our DataStaging module:
When you click the button you will need to leave the screen and return to see the data it produces because we did not cause any refresh in clients in our Microflow logic.
Scheduling the Microflow
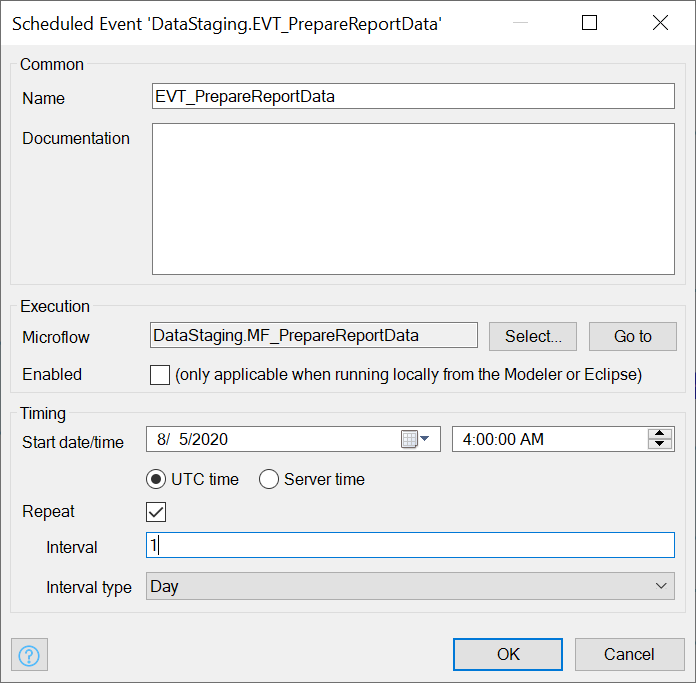
We want the Microflow to run daily. In Mendix, this can be achieved with a Scheduled Event.
You can add a Scheduled Event to your DataStaging module by right-clicking the module and selecting Schedule event from the ‘Add other’ menu.
The key fields are the name of the event (I like the EVT_ naming convention), the Microflow to call (it’s going to be our MF_PrepareReportData), and the interval (repeat 1 Day). And note the timestamp too, set it for off hours. I’m on -4 hours Eastern Daylight Time, so I’ll set it to 4 AM UTC to have it run at midnight:
Enabling the Event on Mendix cloud
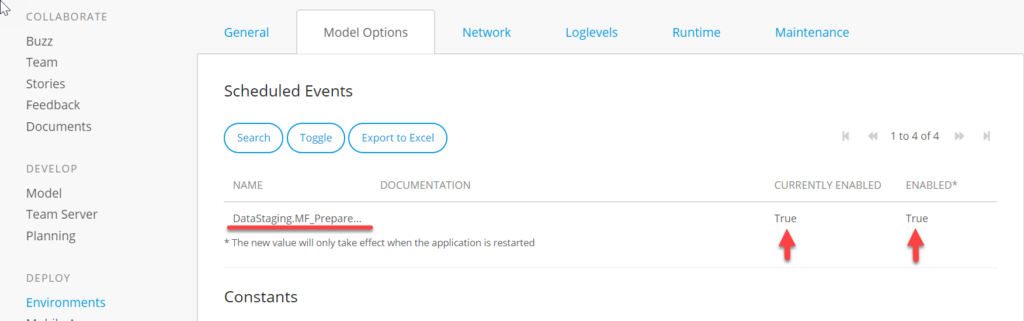
It’s critical to ensure that this scheduled event is enabled once the app is deployed to Mendix Cloud.
You can find this setting under Environments, and then choose Details of the environment, and go to the Model Options tab:
You should see your Microflow and it should be Currently Enabled
OData
The out-of-the-box OData resource offered by Mendix works well for options such as Spotfire.
It’s simple enough to setup, too.
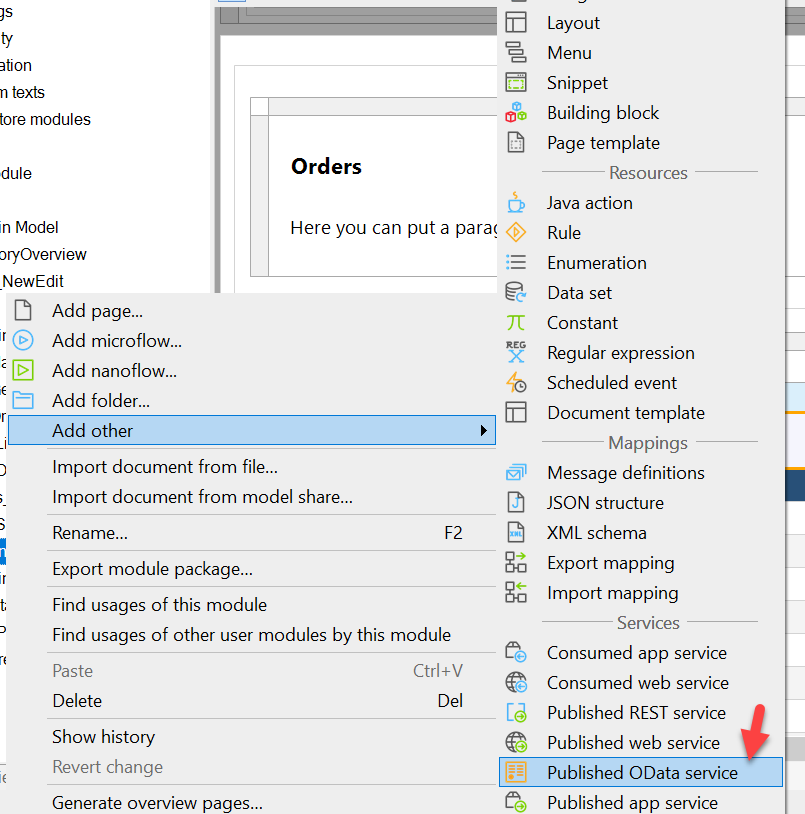
We need to add a OData Published Resource, via the Add Other resource menu:
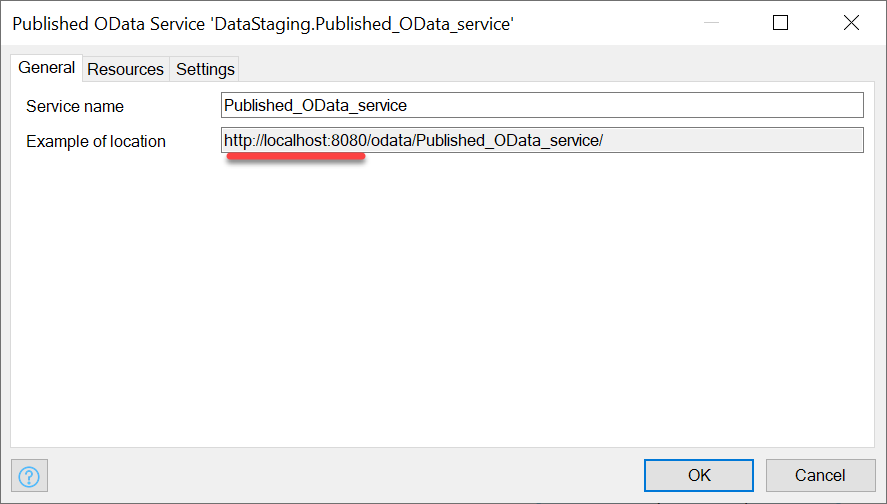
This resource needs a few configurations.
The General tab of the settings will show you an example of the URL to access in order to get at the data. It’s important to point out that this URL will depend on where you deploy your app (Localhost, Sandbox, Test, Acceptance, or Production enviroment):
What else should the service name be?
Since I’m just working locally now, I’m going to be using the URL as is. Probably you will want to use the production URL of your app, followed by the /odata/<Published OData service name>.
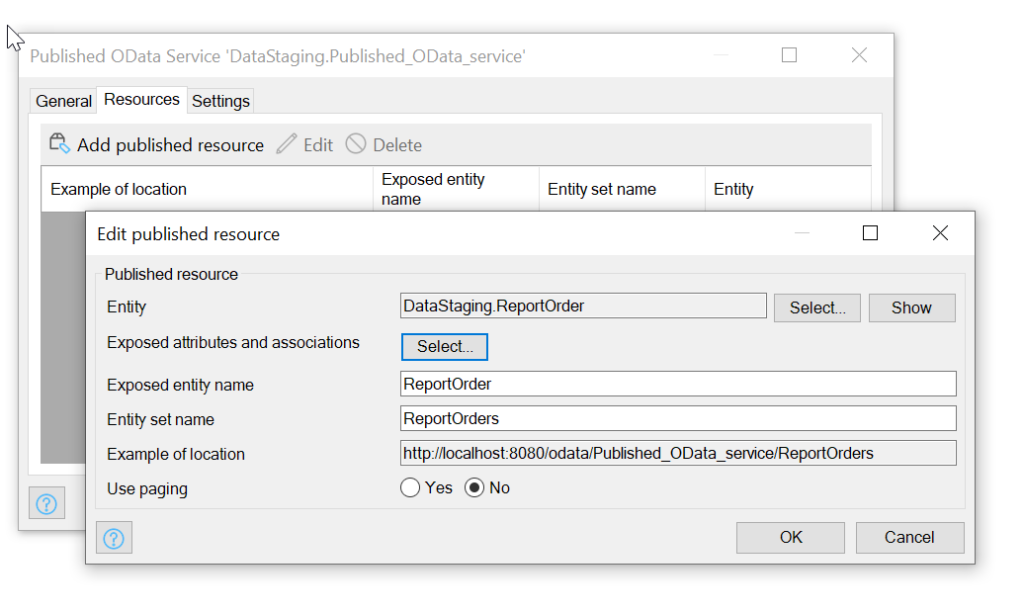
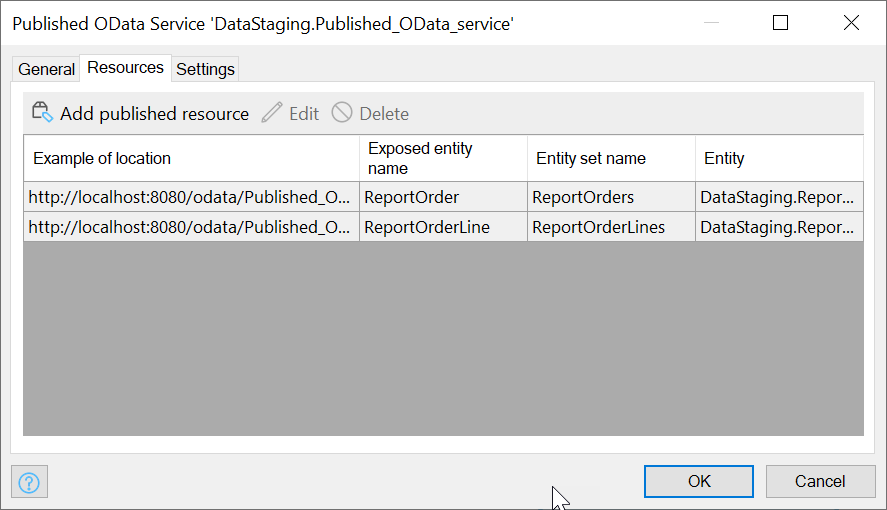
In the Resources tab, you have to specify that you want to publish the ReportOrder and ReportOrderLine entities by adding them as Published Resources:
With both DataStaging entities added
When the app is running, we can provide this OData URL to Spotfire or other reporting suites.
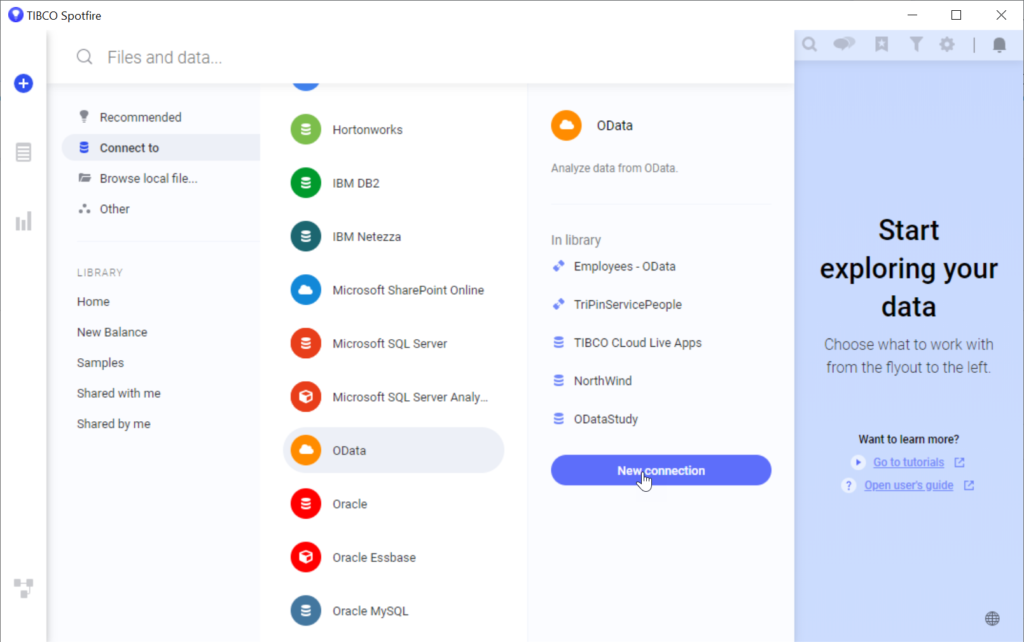
Looking at the data in Spotfire
Using Spotfire is well outside the scope of this little article, but I wanted to show you the fruit of our labors.
In Spotfire, you want to add a new Connection and choose the OData option:
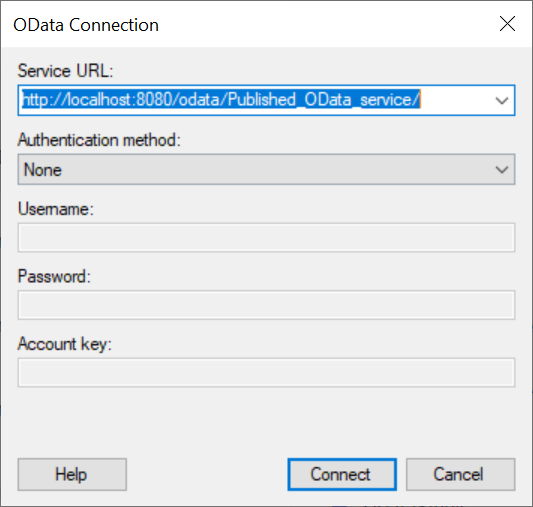
In the next step you’ll provide the OData URL of your Published OData Resource, and also any credentials you setup in the Security tab of the Published service settings:
I’m just using all localhost for this example
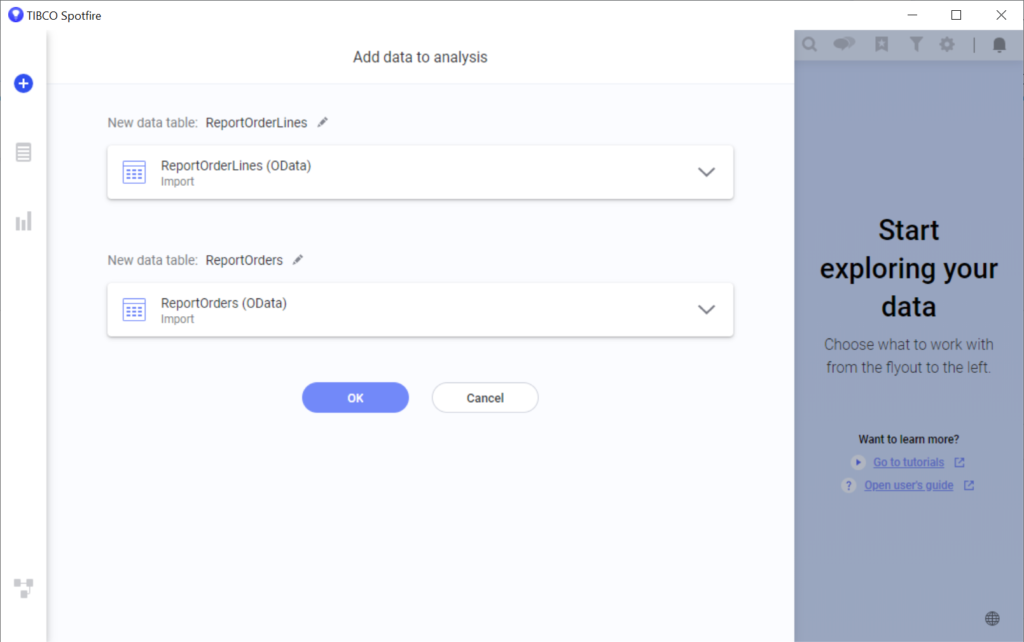
If your connection is working you will be given a list of tables to pull from. Since we went through the effort of distilling our data to only the tables and info we want to report, this step is quite easy: choose all of them:
We can create a report by adding the data tables to our analysis:
Where we left off in Part 2: we had the base functionality for taking orders. But our fledgling burger business is not going to last long if we aren’t ringing up customers for the right amount.
Calculating the total cost of the order
In most cases, you want to do the calculation on the Event’s of a entity (create, commit, delete, rollback). This saves the performance hit of using a calculated attribute which gets its value on the fly, when it’s retrieved for display.
However, for our purpose here, we’re going to take the easy route and use a calculated field.
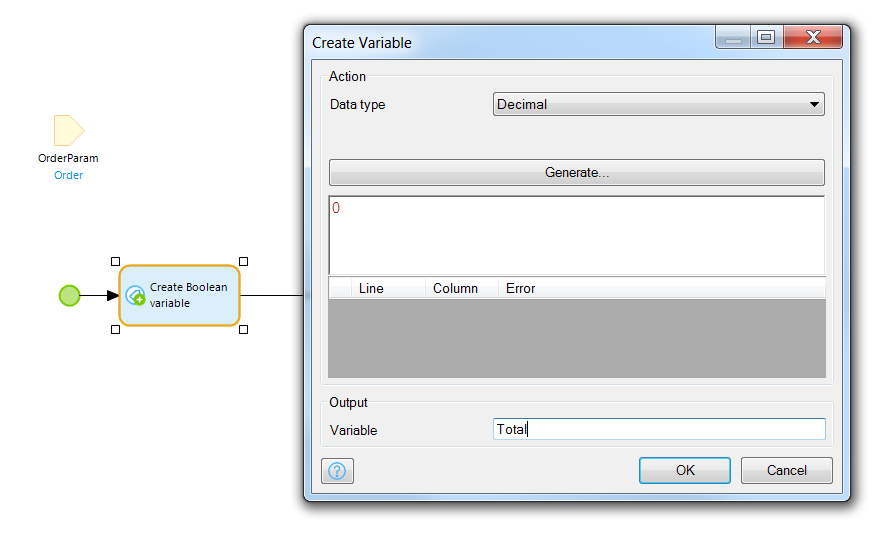
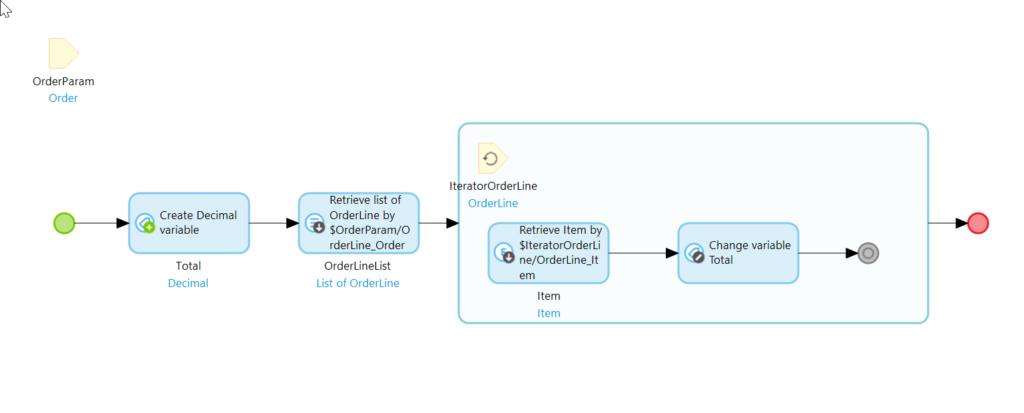
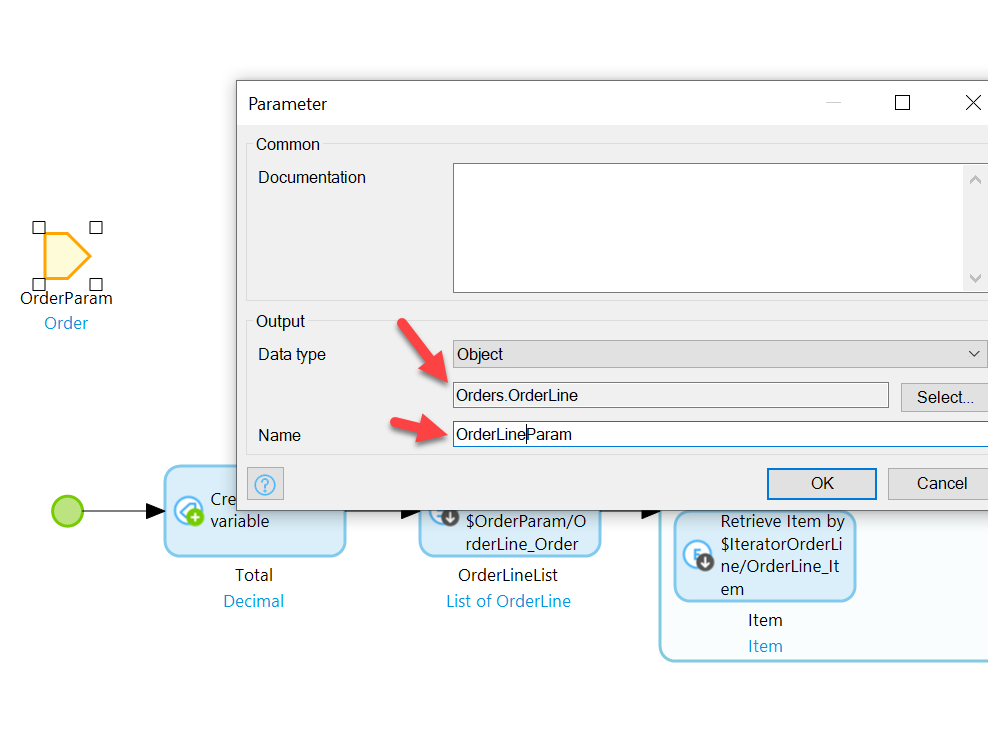
Create a new microflow in the Orders module called MC_OrderTotal. Add a parameter for Order in the same way we did for the earlier microflow.
Add an action to the flow and set it’s type to Create a Variable.
A settings box will pop up for the action where you can specify the Data type (set it to Decimal), give a default value (set it to zero), and name the variable (name it Total):
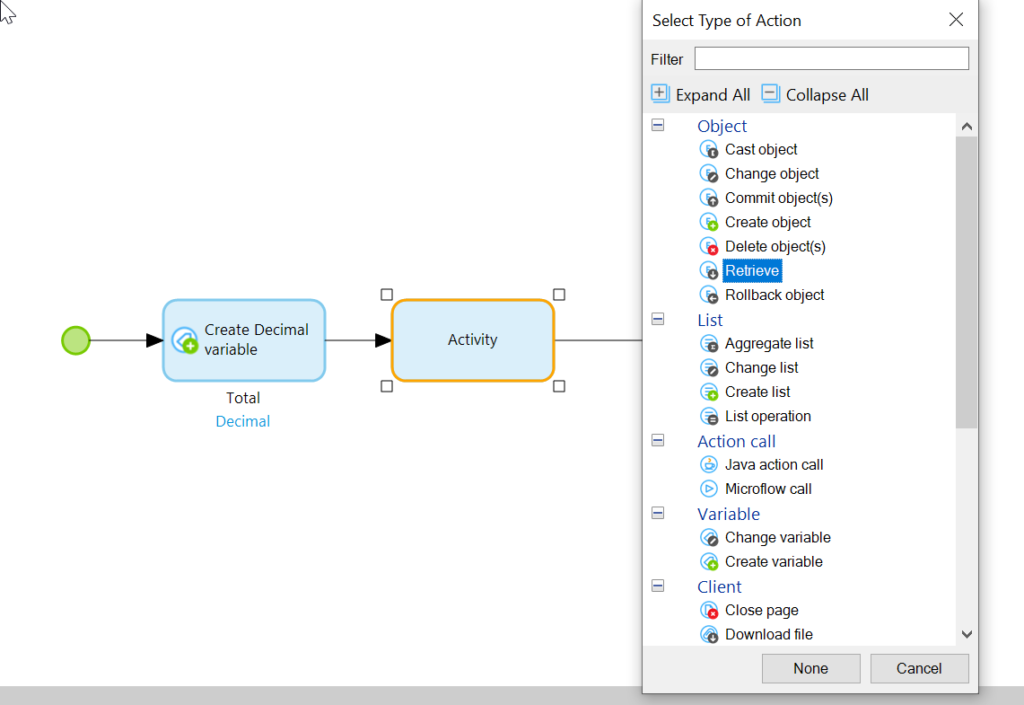
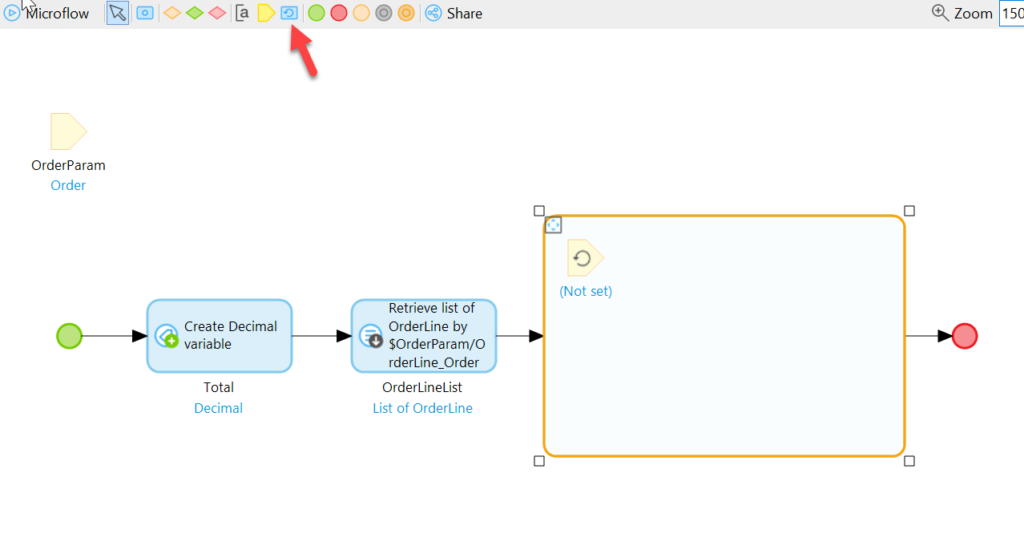
Now we need to do a calculation on multiple items. That means we will need to first retrieve them with a retrieve action, and then loop through the items and run up the total (insert cash register ka-ching! sound effect here).
Retrieve Action
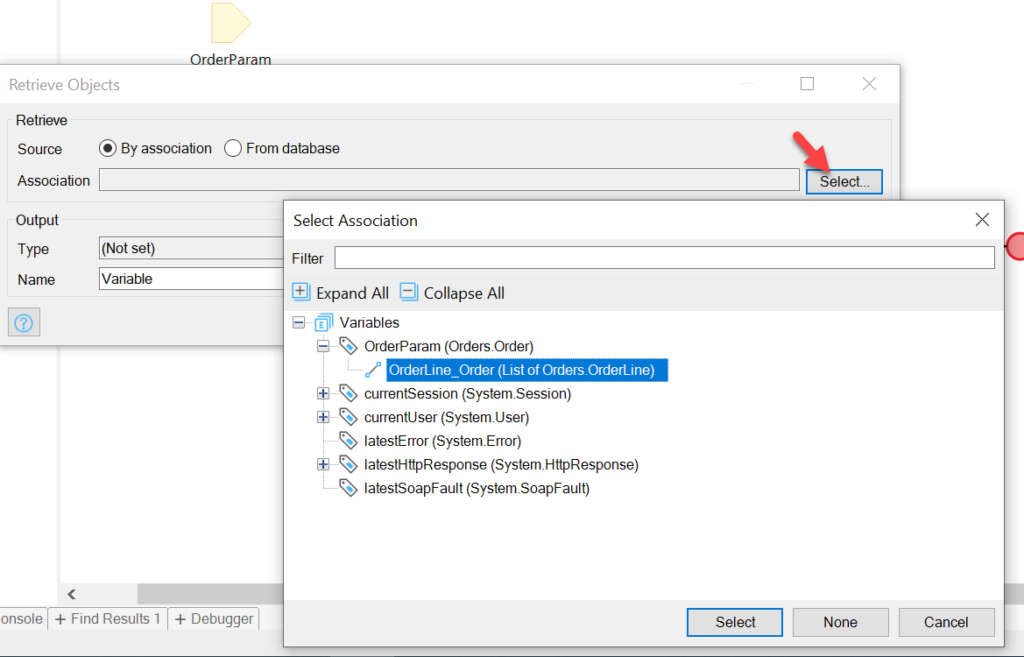
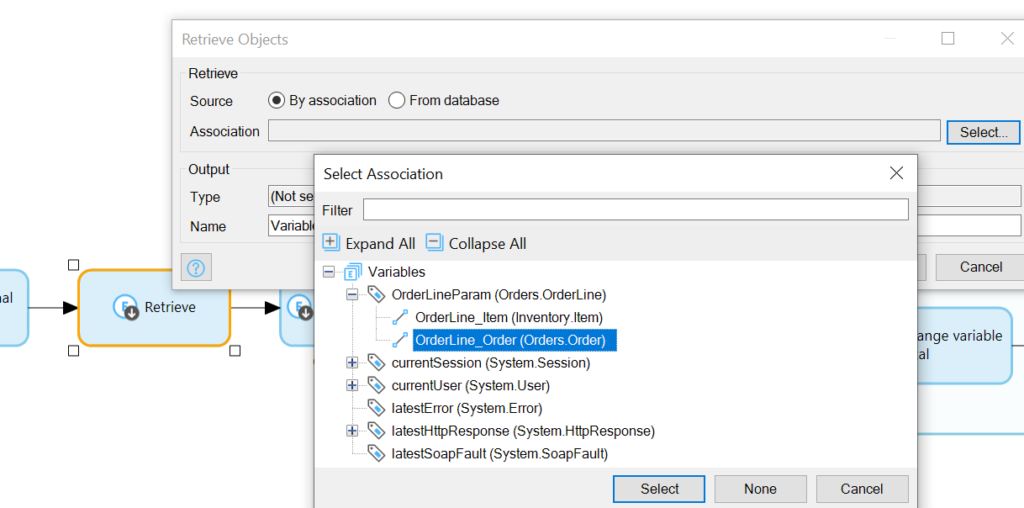
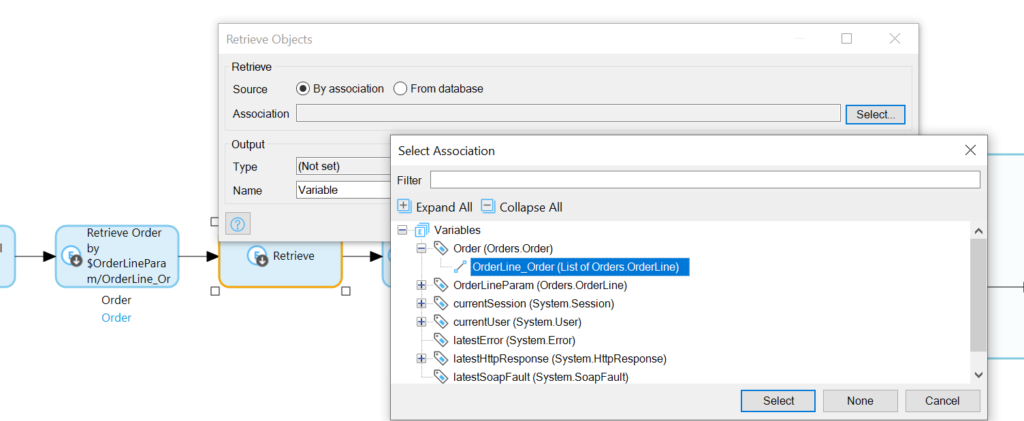
What to retrieve? Well, we’re going to need the items associated with the orders, which means two retrievals.
For the first, select the OrderLine->Order association to get at the OrderLine:
Find the Association under the OrderParam variable
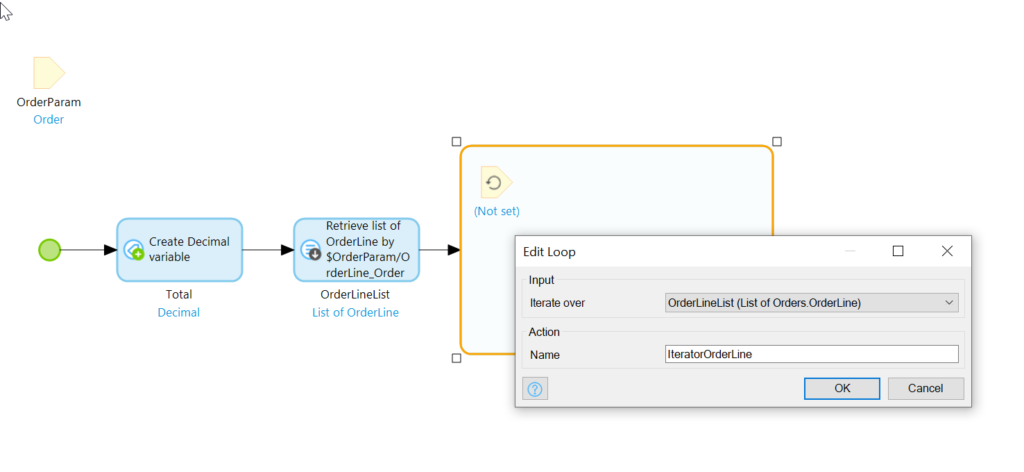
Next, add a loop:
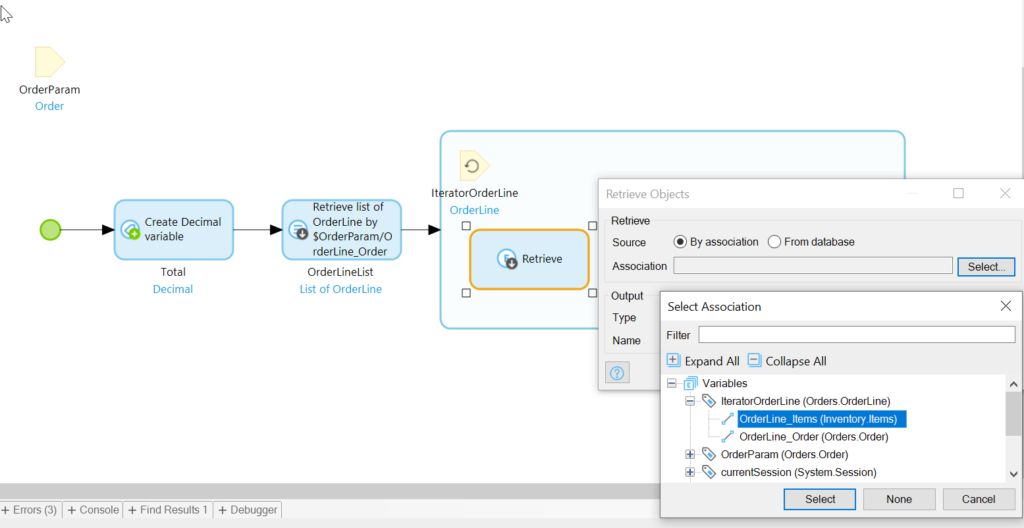
We will iterate over the OrderLineList, retrieve the Item associated with each, and add it’s price * the OrderLine quantity to the Total.
Now add a Retrieve Action inside of the Loop area:
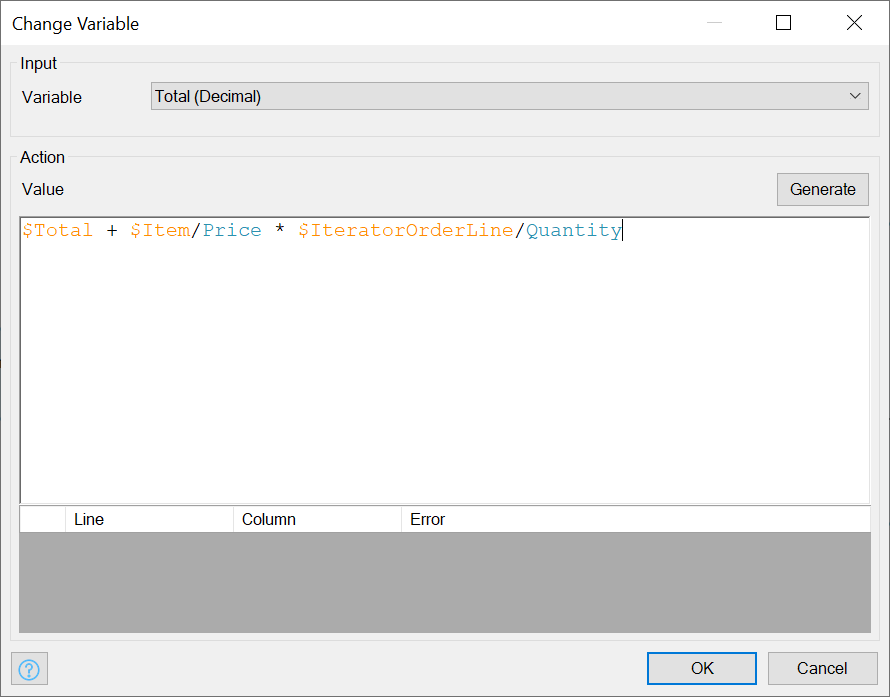
Now add a Change Variable Activity and provide it with the folowing formula:
I don’t know if it’s necessary, but it’s good to put a Continue node following the Change Variable Activity.
Your Microflow should now look like this:
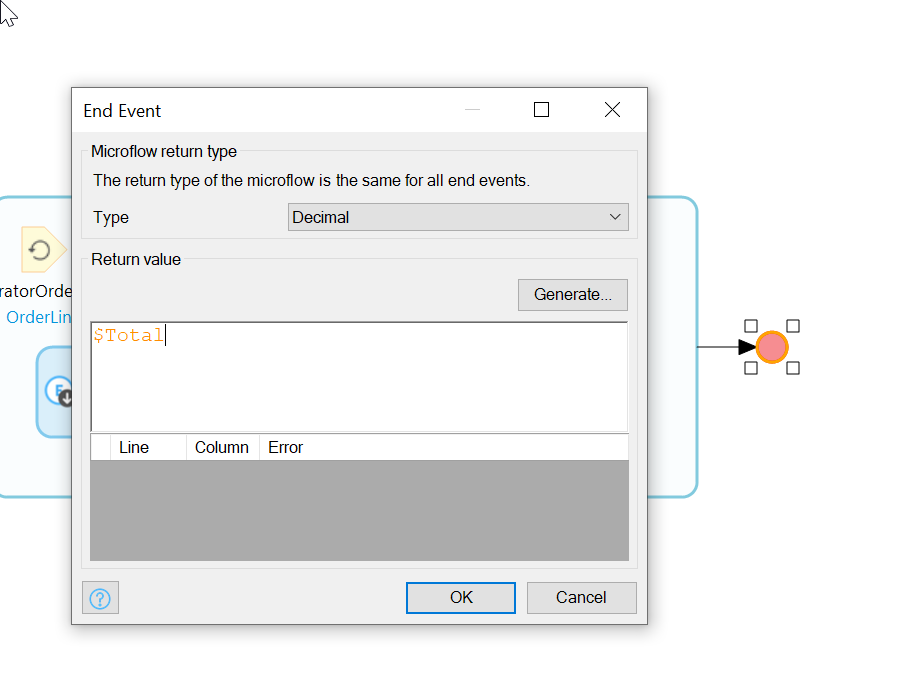
Lastly, we need to return the Total that we calculated.
To return a value, double click on the red Microflow endpoint and fill out the fields:
Type: Decimal, Return value: $Total
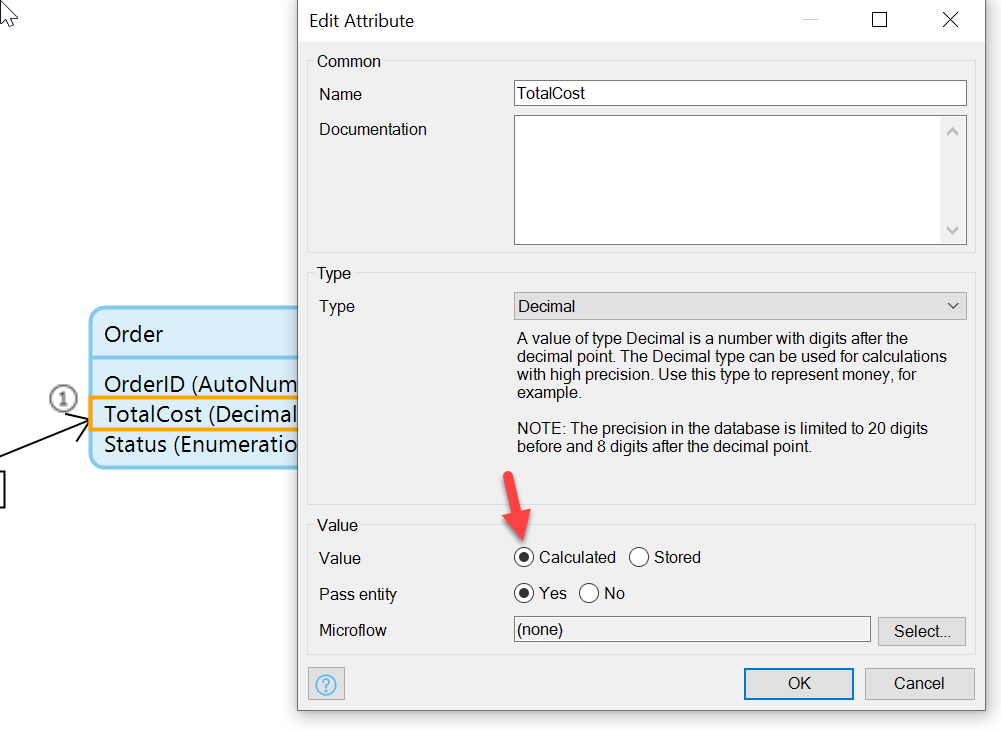
Making a calculated value field
We’re going to make use of the calculation by editing the TotalCost field of the Order entity.
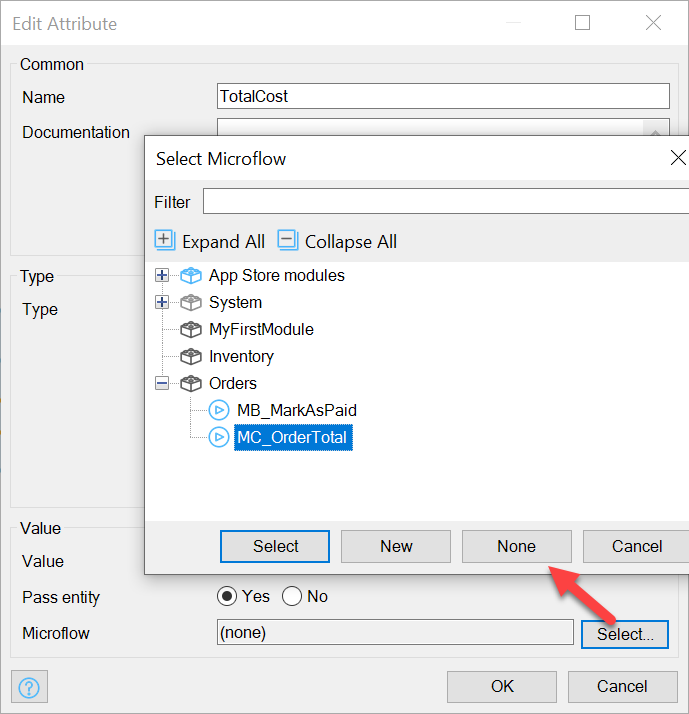
In the Orders Domain Model, double-click on the TotalCost field and choose Calculated in the Value area of the properties:
Next, select our MC_OrderTotal Microflow:
Now the field will indicate to you that it is a calculated value and not a stored one:
This means that the database will never have the value stored, it will always produce the value when the UI requires it.
Note: the advantages to a calculated field is that it simplifies logic requirements where a field is only needed for display and not for tracking. However, in almost all cases, it is better to have a stored value.
With the entity field wired to the Microflow, you will notice there is now at least one error in your project; the Modeler will complain that it can’t use a calculated value as a search field:
The value proposition of a calculated field is rapidly diminishing.
We’ll just delete it from the search filters.
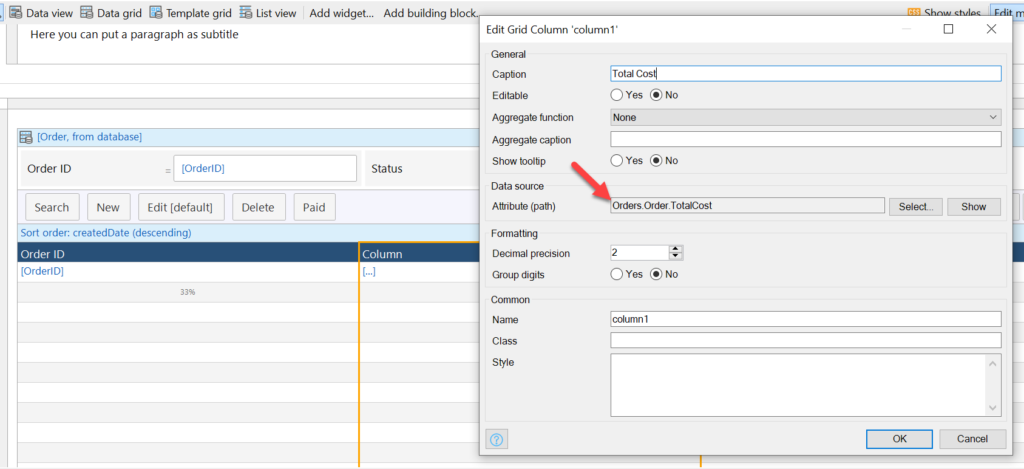
Add the calculated value to the Data Grid as a column:
Data source: attribute Orders.Order.TotalCost
Run it:
Everyone’s favorite status
Data constraints
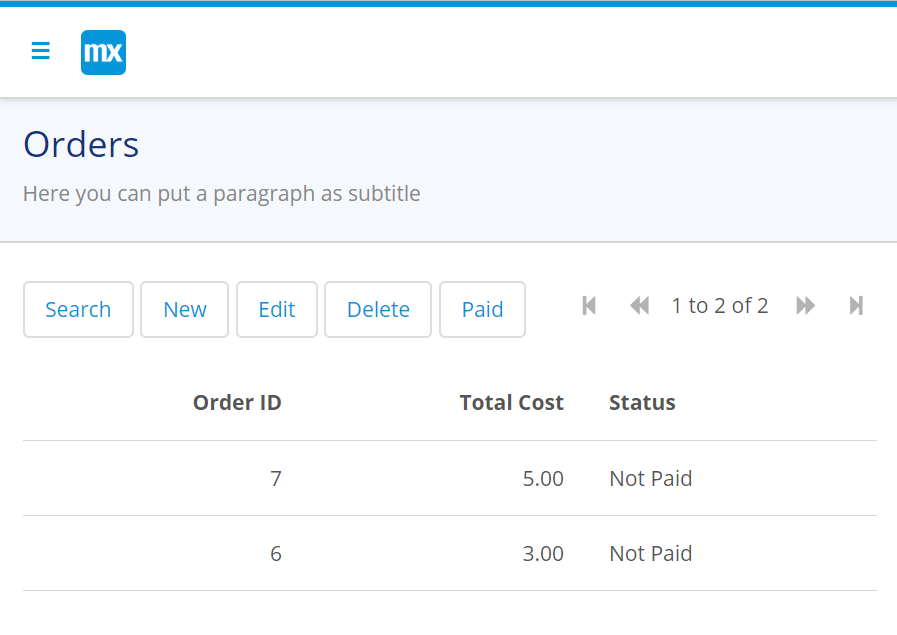
After your first few orders, the buzz of getting paid for sub-standard cuisine will fade and your low-paid employee (yourself) is getting confused by the number of orders on the screen. So the manager (also yourself) asked if you could show only orders that are not paid.
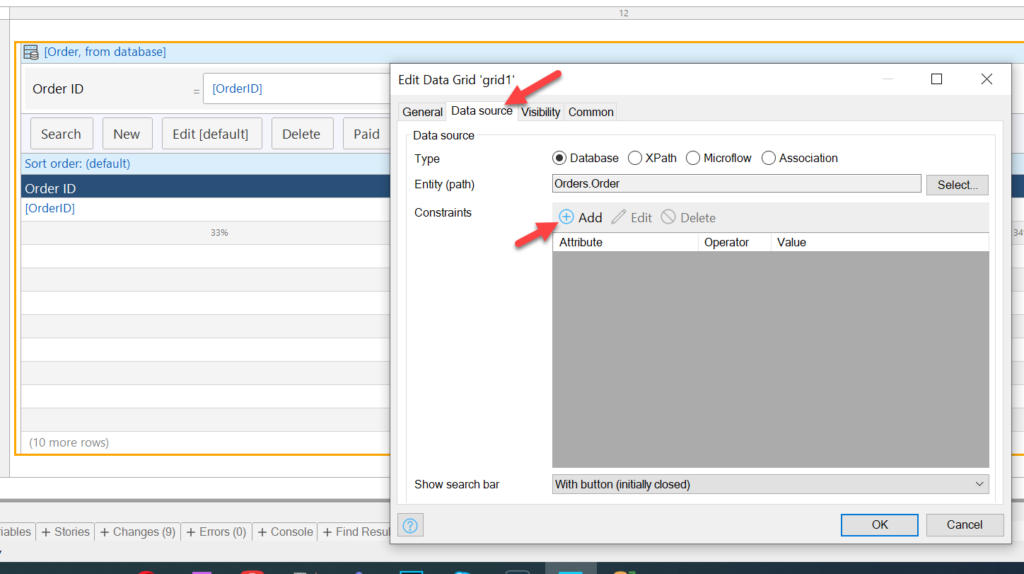
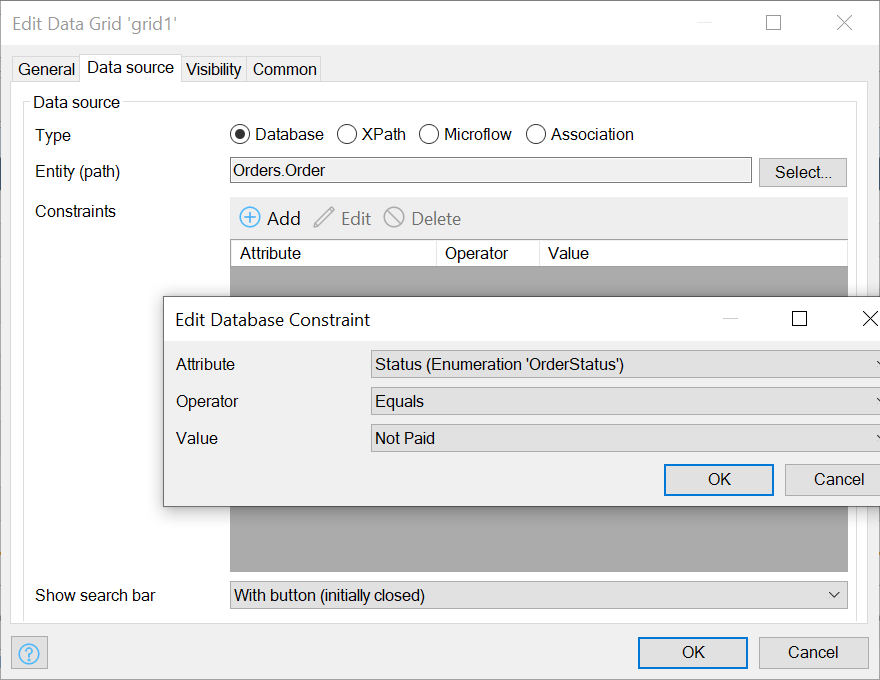
It’s easy. Just double click on the Data Grid which shows the orders (on the title part of the control), and go to the Data source tab. You will see the option to add a constraint:
In the pop-up, choose Status, Equals, and Not Paid:
Everyone’s least favorite status.
This is all you need to do to constrain the visible orders to Not Paid only.
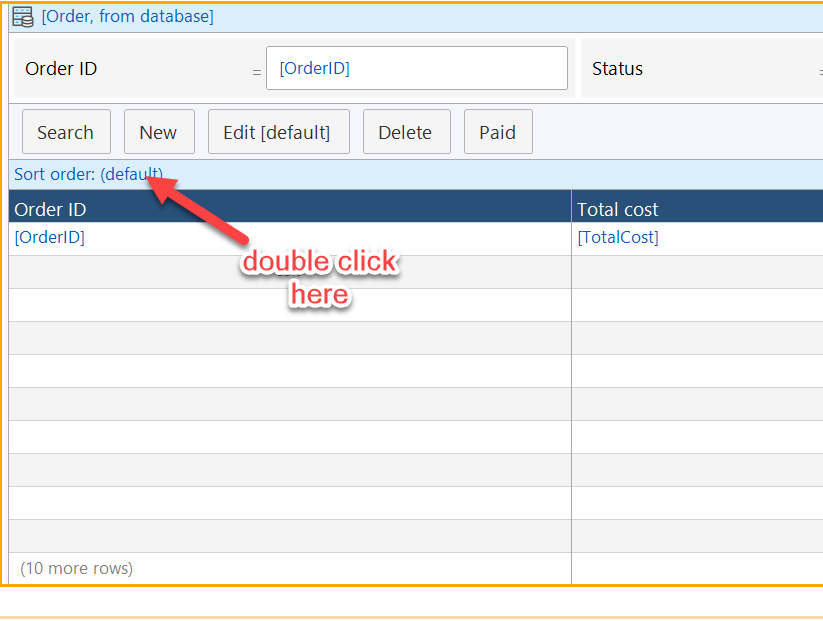
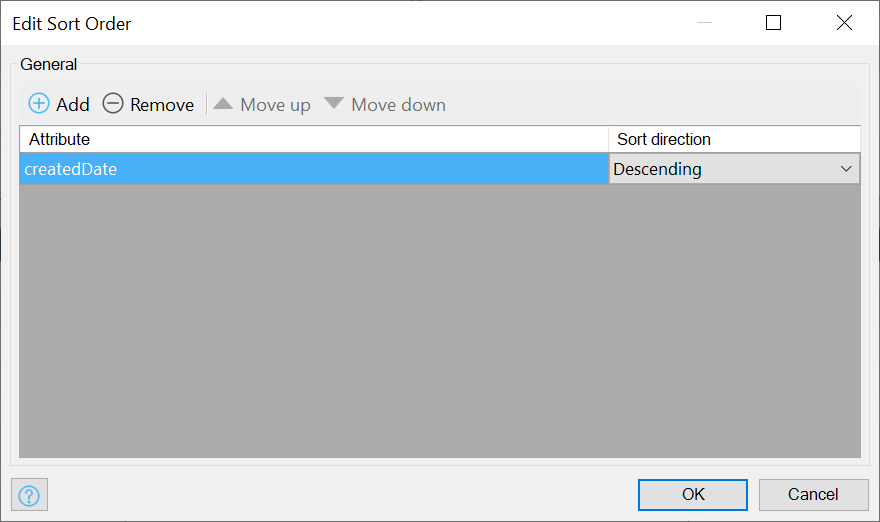
Let’s help the manager (yourself) even more by making the grid default sort on the time of order creation.
Go back to the Domain Model of orders and double click on your Order entity. In the properties, check the createdDate option:
This field, along with changedDate, owner, changedBy, are all available via the Mendix platform as opposed to adding manually. They are always available to select here, you simply have to tell Mendix you want to track them.
Back on the Orders Overview page, double-click on the Sort order of the data grid which appears under the action bar:
Add the following:
And run it:
A Better Total Cost
Our subtotal field is easy enough to use, but we want to store the total in the database because, as you know, prices may vary.
For record keeping, we want to capture the data from the associated data that may be subject to change.
We can make the field better with a simple change the field to a stored field and rework the logic slightly.
The event we are interested in is the creation of an OrderLine. When this happens, we want to recalculate the total cost and refresh the UI. So the OrderLine creation will cause the Order to update.
Modify the Total Cost Microflow
Back in our MC_TotalCost, we want to change the incoming parameter type to OrderLine.
We are now handling an incoming OrderLine
Now we need to retrieve the Order that the incoming OrderLine is associated with:
Now, we get all the OrderLines associated to this order, which will include the one we passed in to the Microflow:
Make sure that the loop iterator is aligned to the OrderLineList we just made an Action for.
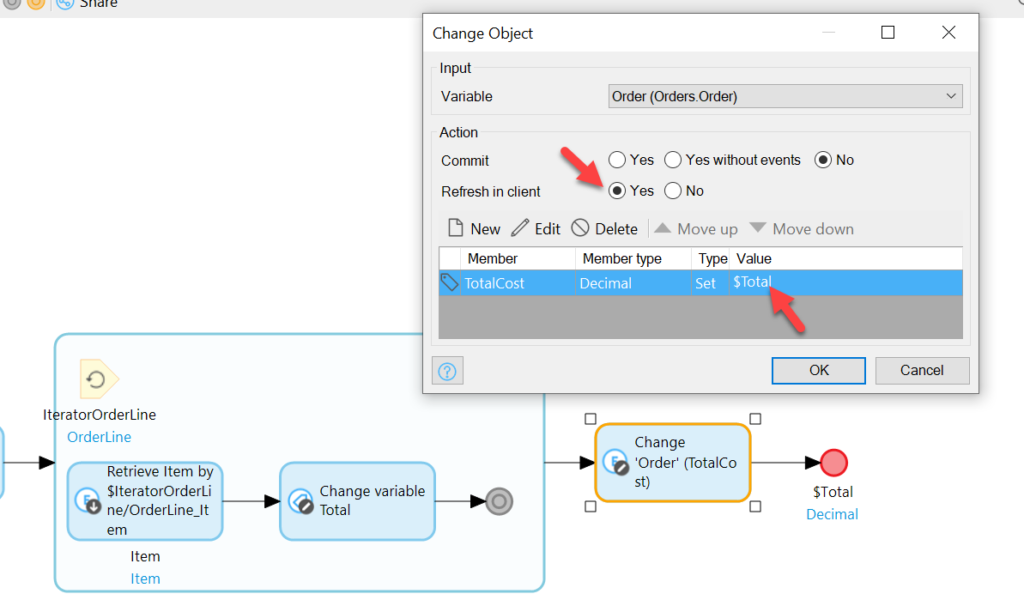
After the loop, change the Order with the summarized value:
Set the Refresh in client option to Yes
Overall, the Microflow should now look like this:
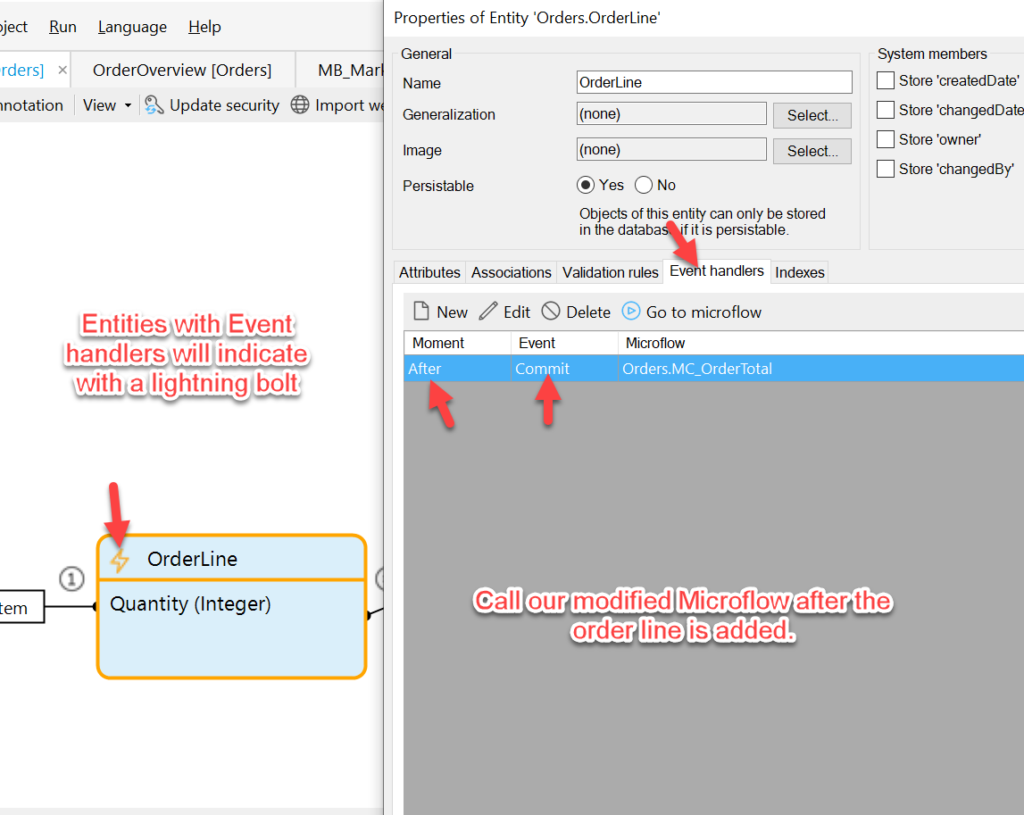
Back in the Orders Domain Model, double click one OrderLine entity, and add an Event handler for After/Commit that calls our MC_OrderTotal.
The tiny lightning bolt indicates our excitement!
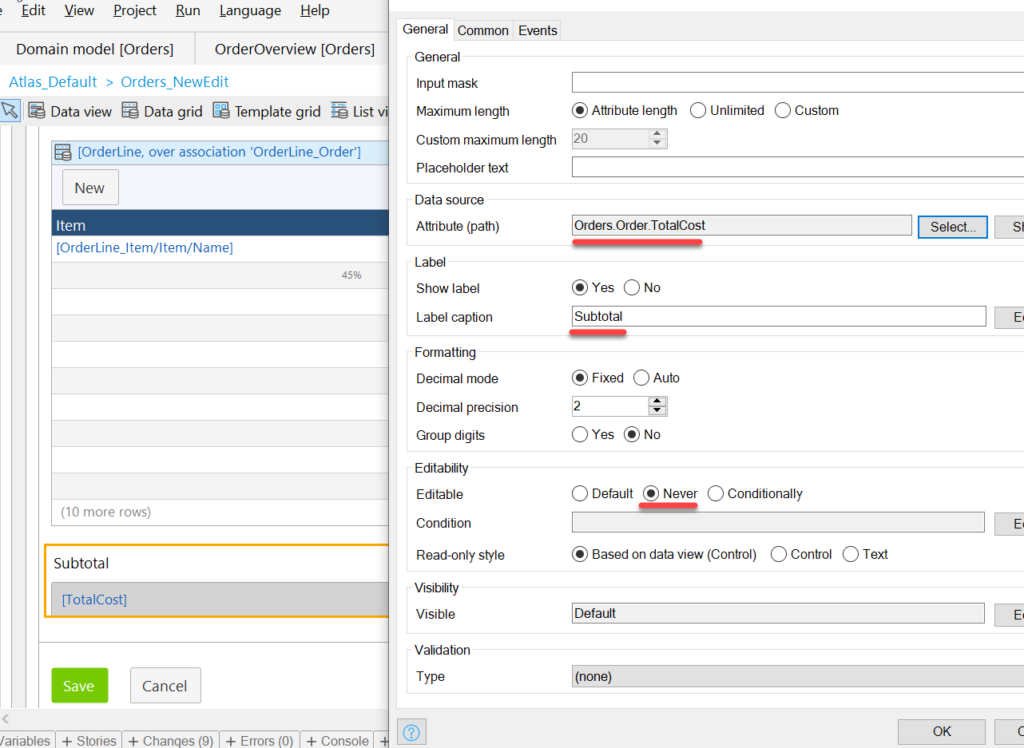
Okay, now let’s put it to use by showing a Subtotal on the New Order page:
Find Textbox under the widget
Provide the following settings for the textbox: Attribute = Orders.Order.TotalCost, Editable=Never, and give it “Subtotal” as a caption.
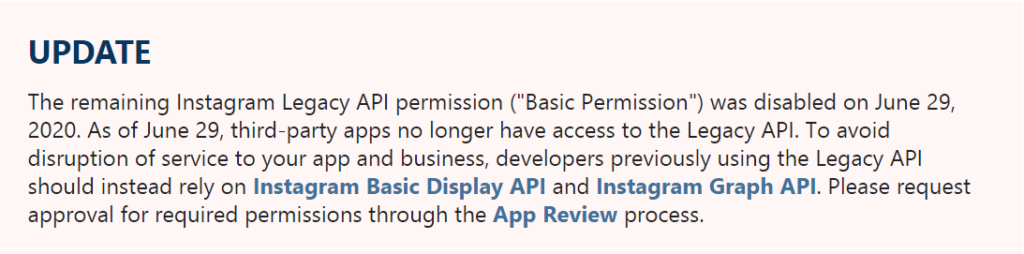
On June 29th, web developers and admins of the world were reminded that Facebook owns Instagram. The legacy API methods to simply get the dang content of an Instagram user were disabled, and the new Facebook-entangled API was required. And, depending on your employer, you were, at that time, also reminded of the importance of Social Media to your company, or you weren’t because it’s not important.
To fix the feed, you will need the following:
A Facebook Account (see how they pull you back in?)
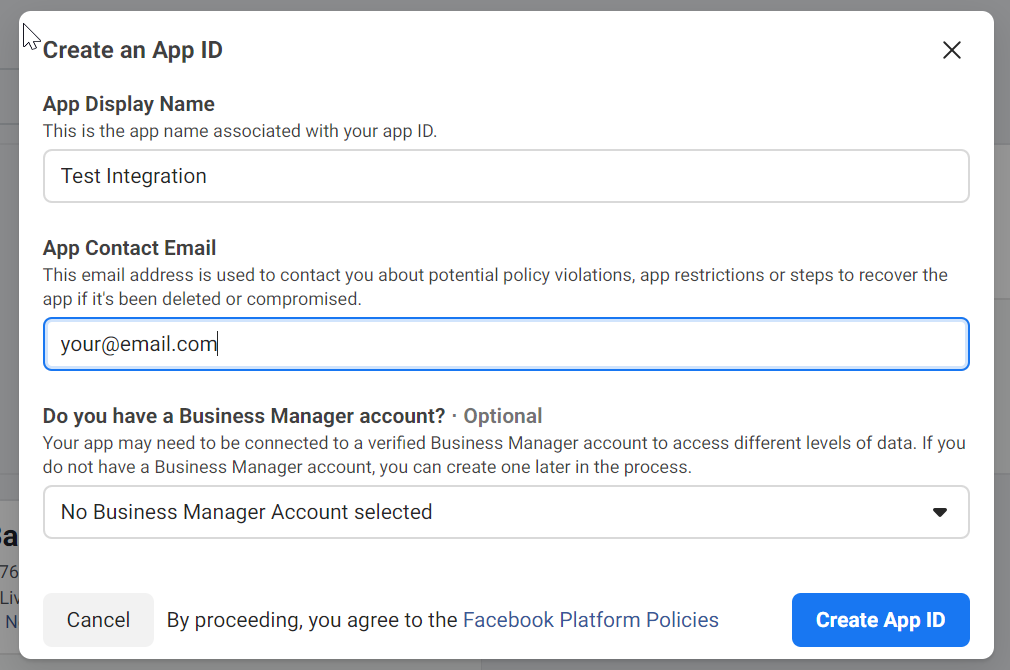
Enrollment of your FB account as a Facebook Developer
In the options pop-up, choose For Everything Else:
Enter the app name and the email address that FB will contact if you turn your app into malware.
Users of more…established (top-heavy) companies will likely have a Business Manager account to select in the 3rd field of this pop-up, in which case you need to select that here in order to access the content later.
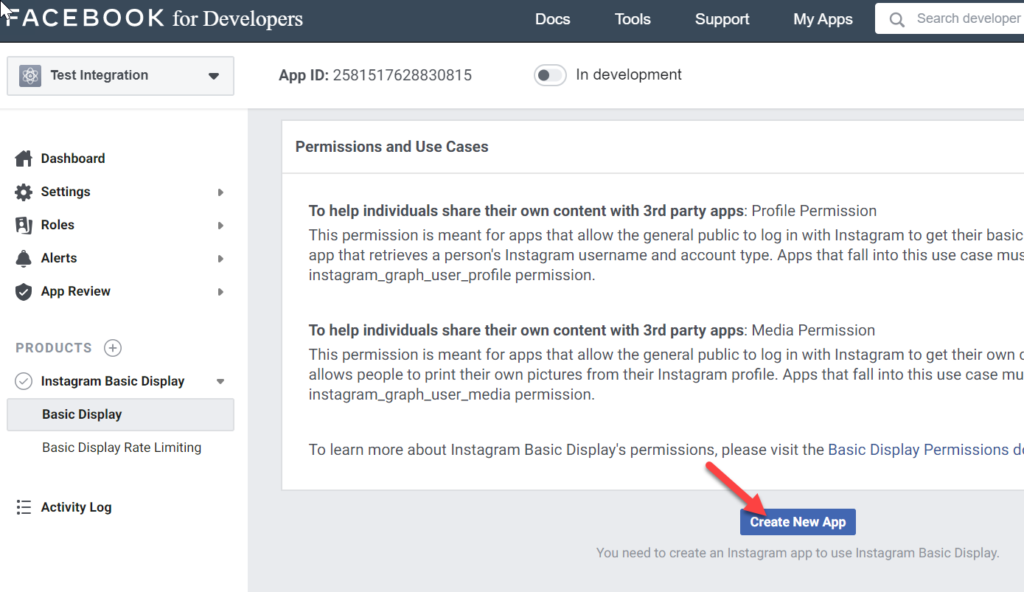
Now, in the dashboard of the app you just created you will need to select a product. We will click the Set Up button for Instagram Basic Display:
Basic…yes, basic like a fox!
Go to the Basic settings of the App:
Now, watch how complex Basic becomes…
What website you enter is not important, because it will just be redirect there to give you a token, but how you enter it is important because the way it is entered in later API calls needs to match the way you enter it here. Be sure to Save Changes via the blue button at the bottom right of the page.
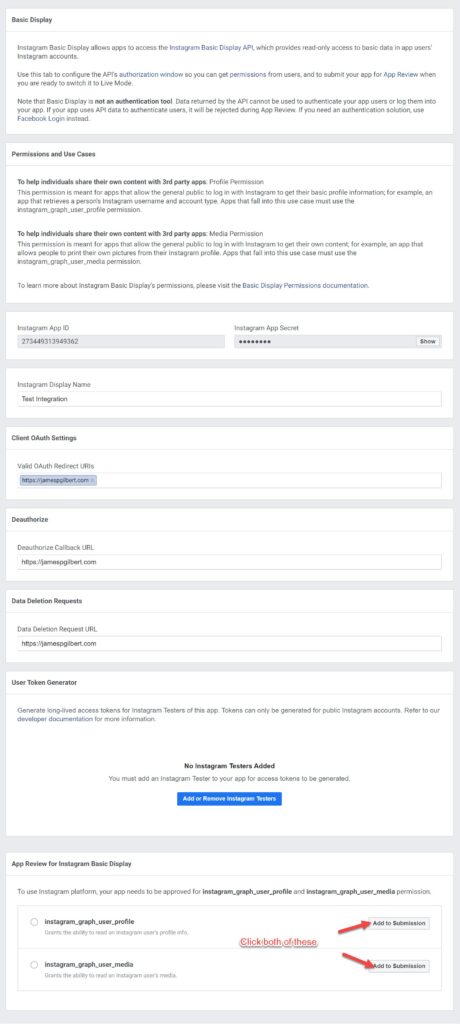
Next we are going into the Instagram Basic Display product we created to create…an App! Yes, it’s an App within an App, so let’s just call it the sub-app.
I don’t know if it matters what we call this sub-app, but I gave it the same name because it was existentially easier to consider:
Our creativity is failing us.
Fill in the sub-app’s settings, providing the same URL as Website Platform URL that you provided earlier. You can see I left a slash off of my entries and it didn’t matter.
Also, click both Add to Submission options to give the Sub-app access to your content; Instagram_graph_user_profile, and Instagram_graph_user_media. Our app will never be submitted for review but the API will still complain without these.
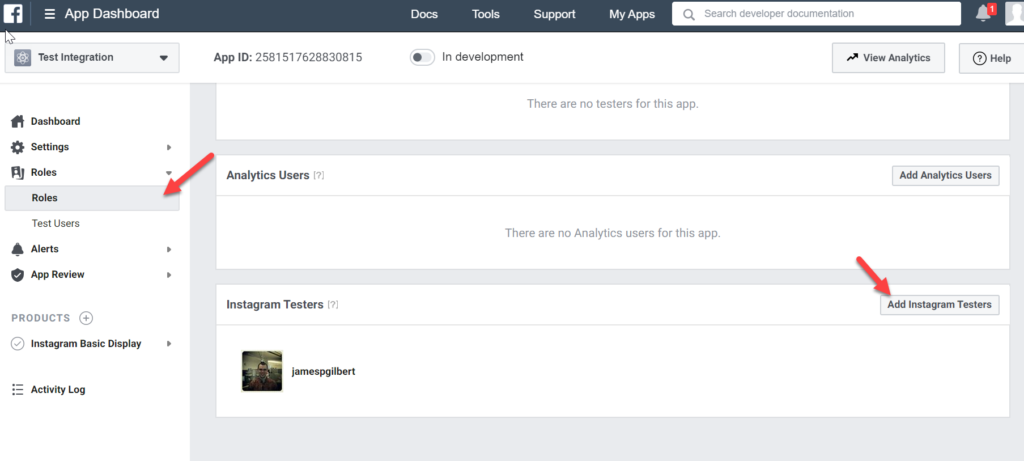
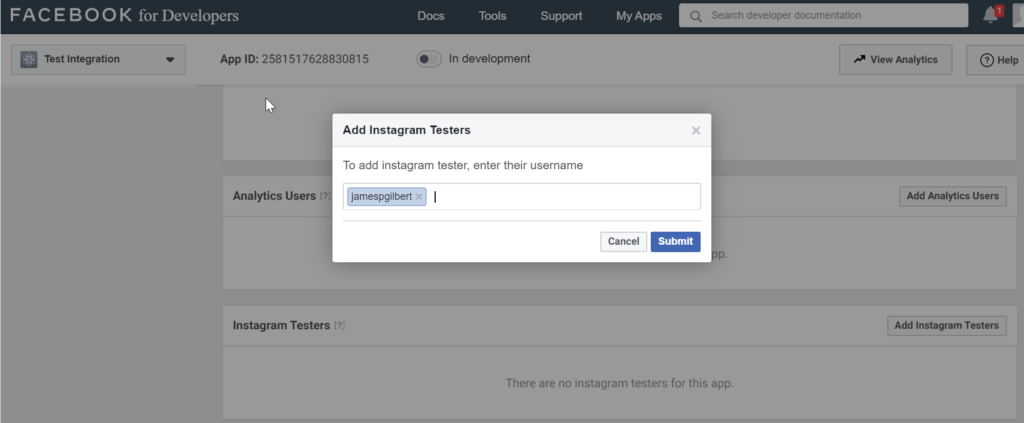
Back in the sidebar of the app (not the sub-app), click Roles to add an Instagram Test User; this will be used as the account that receives the invitation to use the app.
I would simply add the Instagram user of the account you want to get the feed from. What’s more Basic than that?
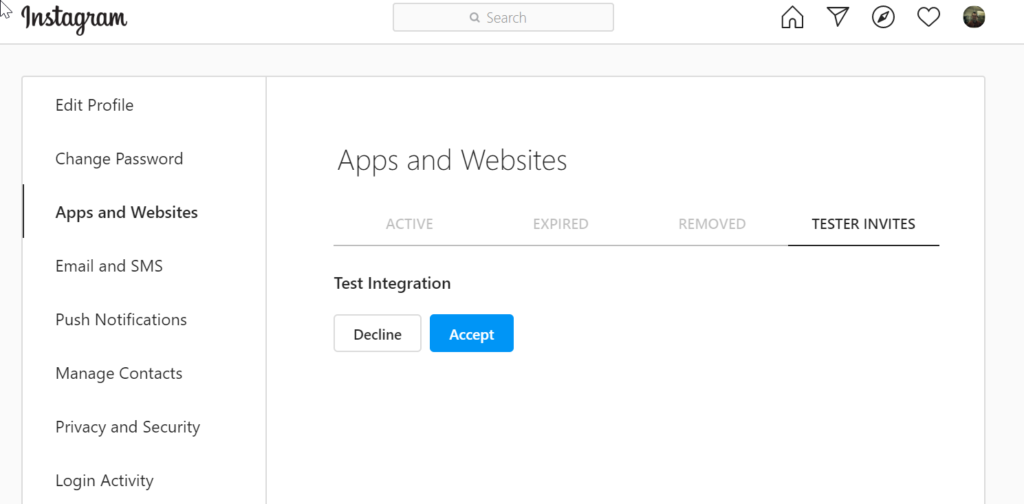
Log into the Instagram account, and under Settings, find the Apps and Websites option, and then the Tester Invites, and accept the invitation:
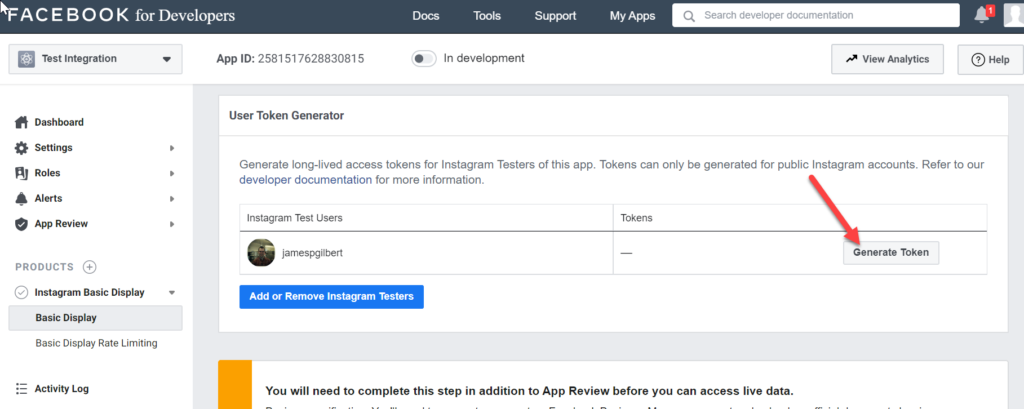
Once the Instagram Test User is added, you can generate an access token under the Basic Display option of the sidebar, which shows the sub-app’s info and settings:
A light at the end of the tunnel?
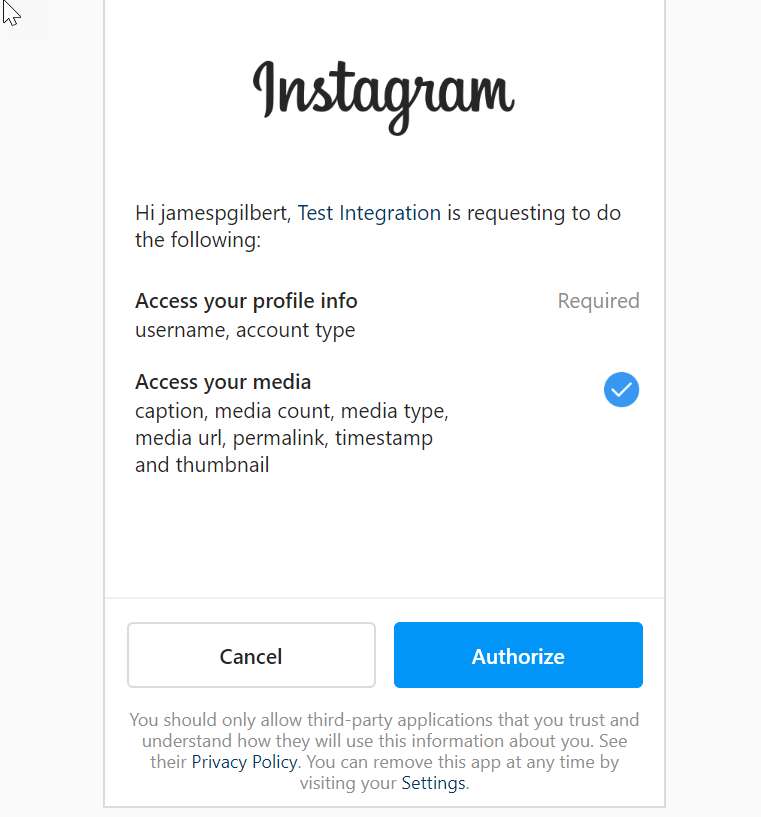
When you click the button, an Instagram login pop-up will appear, and you will have to login the Instagram account and permit the access:
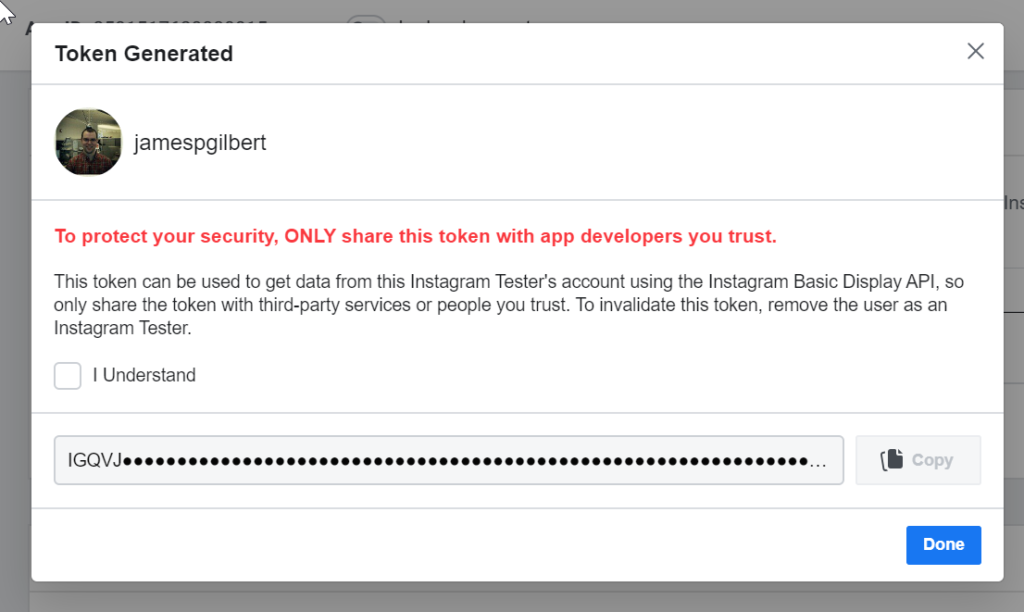
Once that’s done, you will FINALLY see the Access Token in the following pop-up, which will make you tell the computer you understand that this is a Security Matter of Great Importance to access what is most likely a public facing page, before you’re allowed to see and copy the token value. Put the value in a SAFE!!/convenient place.
No biometrics required?
With this token, you can get are the data of your Instagram, but you will need first to get your user id. This can be retrieved via the following call:
…This call will return a single piece of data: your Instagram User ID, which you can then provide to calls to get content, such as retrieving recent posts:
https://graph.instagram.com/[YOUR HARD-TO-FIND USER ID]/media?access_token=[YOUR SUPER-SECRET ACCESS TOKEN]
…This call will return the id’s of latest 10 posts from the Instagram account.
The media of each post needs to be retrieved from another call:
https://graph.instagram.com/[THE RETRIEVED POST ID]?fields=id,media_type,media_url,username,timestamp,caption&access_token=[YOUR SUPER-SECRET ACCESS TOKEN]
…This call will return the media_type; IMAGE or VIDEO; and the media_url to finally show some content from you likely-public facing Instagram page.
Oh, the comments and like counts aren’t supported by the Basic Display API. It’s possible to get this info via the Facebook graph, but that’s beyond the scope of this walk-thru.
Out-of-the-box page view tracking is dead simple to get working with every Web Analytic tool I’ve used, and Microsoft’s Application Insights available via the Azure platform is no different.
This will get you tracking good metrics on any page view, which you can find best in the Logs section of the Application Insights “blade” in the Azure portal.
SharePoint scripting considerations
For SharePoint, if you want more, and you certainly do because the user data is very rich, it’s a little trickier to setup.
Script firing order is perhaps the least straightforward thing in SharePoint and perhaps this is changing in 2016(?), but usually, the developer is tasked with accounting for the disjoint manner in which scripts are loaded.
In most cases with SharePoint scripts, it’s basically a given that you’ll be layering your function calls under the arcane SP.SOD.executeFunc or SP.SOD.executeOrDelayUntilScriptLoaded functions to handle the unordered loading. For example:
In the above, we use the script to declare a script dependency for the object that whats to be utilized in the subsequent function…MESSY!
SharePoint’s namespace challenge
The reason the code snippet is defining a script reference on the fly probably relates to the fact that it is trying to bypass the load order of other scripts and track the page view ASAP. But there’s a problem…
SharePoint uses a script dependency convention of namespaces which disallows JS objects to be defined if they already exist.
The problem for our script then is that both SharePoint and the script referenced by the tracking snippet define a Microsoft object, which is going to cause a collision if App Insights script does so first, and guess what, that’s what it’s trying to do.
The only way around this is to download the script being referenced in the snippet (in my case it is, https://az416426.vo.msecnd.net/scripts/b/ai.2.min.js) and modify the definition of the Microsoft object which occurs early on in the script…
There’s a way around all this load-order chaos, you can track user properties along with page views. It can be accomplished with a call to SharePoint API endpoint GetMyProperties, with that response then provided to the trackPageView function. The endpoint can be accessed at the following address (keeping in mind that subsites may precede the /api/ part):
The following code snippet makes use of the Azure documentation sample, but with the following modification: I remove the page track call, and put it inside the return callback for a request to SharePoint API endpoint GetMyProperties.
var sdkInstance="appInsightsSDK";window[sdkInstance]="appInsights";var aiName=window[sdkInstance],aisdk=window[aiName]||function(e){function n(e){t[e]=function(){var n=arguments;t.queue.push(function(){t[e].apply(t,n)})}}var t={config:e};t.initialize=!0;var i=document,a=window;setTimeout(function(){var n=i.createElement("script");n.src=e.url||"https://yourserver.sharepoint.com/SiteAssets/js/ModifiedAppInsightsScript.js",i.getElementsByTagName("script")[0].parentNode.appendChild(n)});try{t.cookie=i.cookie}catch(e){}t.queue=[],t.version=2;for(var r=["Event","PageView","Exception","Trace","DependencyData","Metric","PageViewPerformance"];r.length;)n("track"+r.pop());n("startTrackPage"),n("stopTrackPage");var s="Track"+r[0];if(n("start"+s),n("stop"+s),n("addTelemetryInitializer"),n("setAuthenticatedUserContext"),n("clearAuthenticatedUserContext"),n("flush"),t.SeverityLevel={Verbose:0,Information:1,Warning:2,Error:3,Critical:4},!(!0===e.disableExceptionTracking||e.extensionConfig&&e.extensionConfig.ApplicationInsightsAnalytics&&!0===e.extensionConfig.ApplicationInsightsAnalytics.disableExceptionTracking)){n(""+(r="onerror"));var o=a[r];a[r]=function(e,n,i,a,s){var c=o&&o(e,n,i,a,s);return!0!==c&&t""+r,c},e.autoExceptionInstrumented=!0}return t}({
    instrumentationKey:""
});

window[aiName]=aisdk,aisdk.queue&&0===aisdk.queue.length;

jQuery.ajax({
    url: "/_api/SP.UserProfiles.PeopleManager/GetMyProperties",
     type: "GET",
    headers: { "accept": "application/json;odata=verbose" },
    success: function(data){
        var userinfo = {};
        userinfo["Department"] = true;
        userinfo["Office"] = true;
        var properties = data.d;
        if(properties.UserProfileProperties.results != null && properties.UserProfileProperties.results.length > 0)
        {
            for(var p in properties.UserProfileProperties.results)
            {
                if(userinfo[properties.UserProfileProperties.results[p].Key])
                userinfo[properties.UserProfileProperties.results[p].Key] = properties.UserProfileProperties.results[p].Value;
            }
        }
        appInsights.trackPageView({name:document.title, title:window.location.href, properties:userinfo});
    },
    error: function (xhr) {
        console.error(xhr.status + ': ' + xhr.statusText);
    } //End error method
}); // end of Ajax call to GetMyProperties
…This approach does not depend on SharePoint script loading order. Even the jQuery use not necessary since it can just as well be a standard JavaScript XmlHttpRequest.
In the above code, the desired fields are called out, rather than simply copying all user fields (which you could do), but the point is that you usually don’t want to track personally-identifiable info (PII) with web stats. So in the above snippet, I’m tracking simple the department and the office location of the user by iterating through all available properties and copying those values out.
I recommend doing this even in you want PII because there can be a lot of useless junk in the user properties, and App Insights does change by data volume.
Which brings me to my final point…
What about cost?
A lot of people go with Google Analytics because you can do all this and it’s free. However, GA doesn’t offer all the capabilites of Application Insights, so that’s something to consider. Furthermore, a lot of times companies avoid Google services simply because they have a, shall we say, dodgy reputation regarding intellectual property. So companies will go with Adobe Analytics, WebTrends, or other offerings. And Microsoft’s Application Insights is a contender here.
With Azure, nearly every resource you spin up now has a fee attached. Currently App Insights presently charges $2.30/GB of tracked data. The total cost is depends on the amount of website traffic you get and the content load of your SP site. And typically, SharePoint has a ton of fluffy libraries to load.
I’m going to call a medium trafficked site is one that sees about 1000 visits/day. Let’s pad that figure by rounding up to $3 for easy math, and 30 days in a month; so we have $3 * 30 * 12 = $1080/year using Application Insights.
That’s certainly competitive compared to other platforms. But it should be noted that the reporting aspect of Application Insights has more of a learning curve and probably wants a customer engagement to get a decent dashboard setup for analysis.
With all the various server options available, such as NodeJS, IIS Express, .NET Core offerings, tons of cloud offerings, it’s important to remember that, on the internet today, PHP is still the king and Apache is its throne. This is not to say or enter into the argument if its the best choice, but it is definitely the most economic choice, being entirely free.
So there’s little reason you shouldn’t have a copy of it to run on your local computer instead of browsing through CPanel on a cheap hosting service and doing a Los Angeles freeway’s worth of traffic uploading file modifications. Just run it locally! It’s not that difficult.
There are a lot of vendors who including handy packages such as MAMP, but these don’t gain you much besides the setup I’m about to outline. Also, the experience of configuring and running a local server is worth the time.
Download PHP and Apache
For this guide, I’m using Apache 2.4.41, and PHP 7.3.7. Get the zips for these first:
Extract the php zip into a convenient folder on your local drive. C:\php is a safe bet.
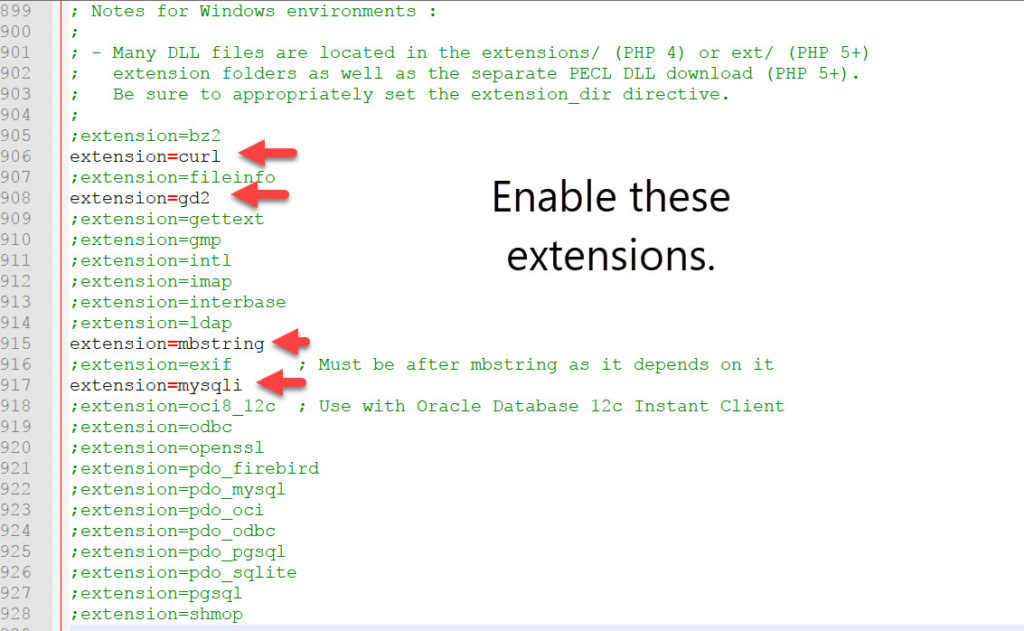
Now, in your new php folder, copy and rename the php.ini-development to php.ini. This will cause the php initialization to use the default settings for development, which is good for localhost work.
In the php.ini file, set the extension_dir to your php folder’s ext subfolder:
Enable the following extensions which will be needed by MySQL, in case you plan to use that. (Note: curl is a very common network request tool, and gd2 is a graphics library which comes in handy for manipulating/drawing images).
Open Control Panel and Go to System and Security, and then choose System (Control Panel\System and Security\System).
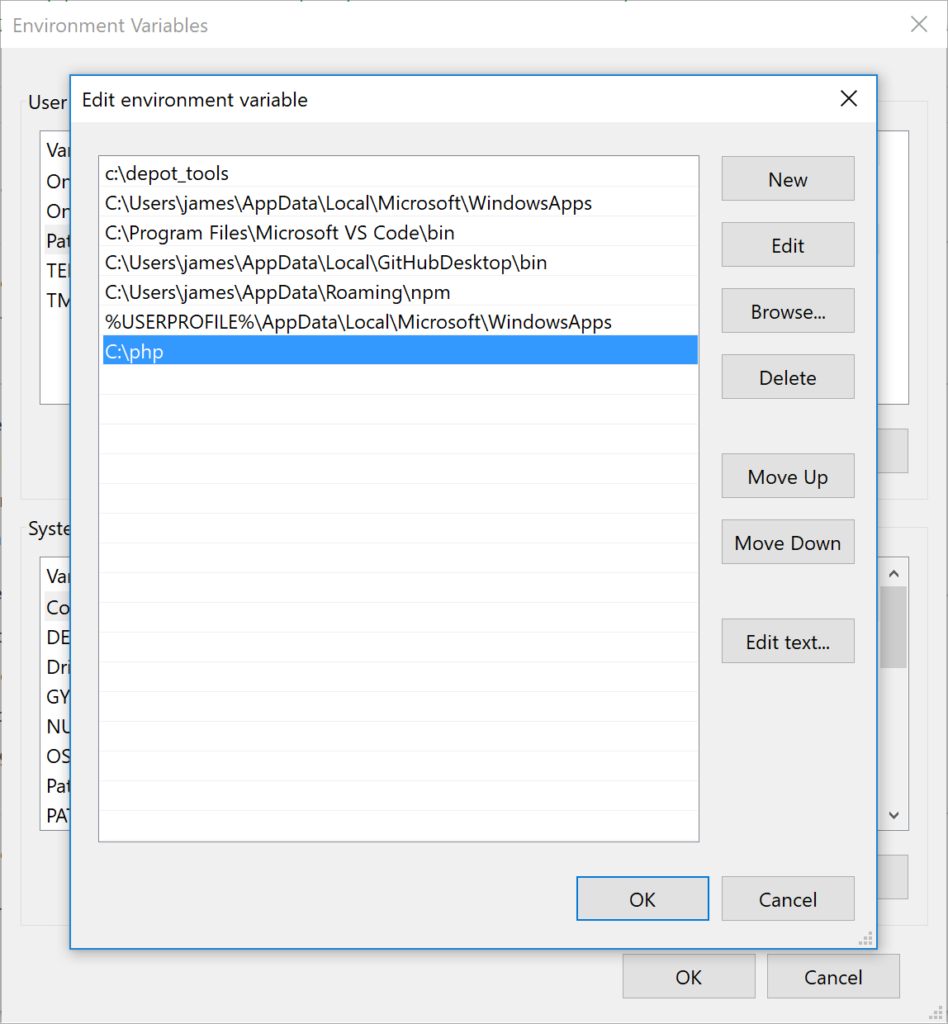
Once there, click on Advanced system settings. In the popup, under the Advanced Tab, click the [Environment Variables…] button at the bottom:
Edit the Path variable in your Environment Variables:
Click the New button to add to the environment variable list, and add your php folder:
Click OK to both pop-up windows to apply the change.
Install Apache
Now extract the Apache zip to your local drive. The zip I link above has two items in the root, a folder called Apache24, and a readme_first.html file, so we can just extract the whole thing to the C drive.
Go to the extract folder (C:\Apache24), open the conf subfolder, and edit the file httpd.conf
In the httpd.conf file, modify the DirectoryIndex configuration. This will tell Apache that index.php is the first file to look for under a folder it is serving up. Notice I’m keeping the index.html file too, but you don’t have to:
Open CMD and run httpd, which you will find under your bin sub folder of the Apache folder (C:\Apache24\bin\httpd.exe)
You may have to allow it throw Windows Firewall on first run:
When this is running, it will won’t write any more to the command line. And if you need to stop it, do CTRL+C. And you will then be prompted if you want to “Terminate Batch Job (Y/N)?”, and the answer is Y.
Both the start-up and shut-down can take a moment. Be patient especially with the shut-down and wait for the terminate prompt.
Testing PHP
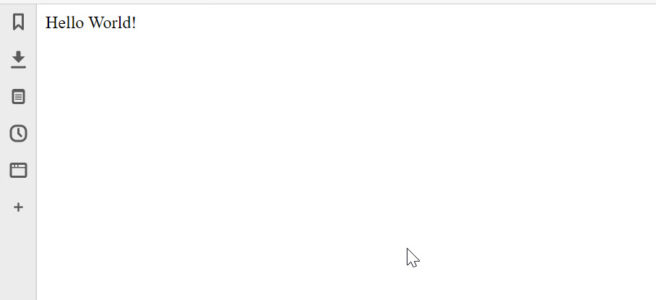
The hello world you can use to test your new PHP/Apache setup is the following dirt simple php file:
<?php
echo "Hello World!";
?>
Put this in a text file and save it as index.php in your Apache htdocs folder (C:\Apache24\htdocs\index.php)
Now when you open “localhost” in your browser, if everything installed okay, you should see This:
And the best part is, once you know your PC’s network IP address, you can visit your hosted content from your phone, tablet, other computers etc. Just run ipconfig from the Command Prompt, and look for this piece of information:
So in this case if you browse to http://<Your IPv4 Address>/ on one of these devices or another computer, you should see “Hello World!”.
In the first part, I covered the essentials to getting started with the rapid web application development platform known as Mendix.
We’re going to expand out the app we started in the first part, and explore new concepts with it, such as Attribute Associations, Data grid columns, and Microflows.
Let’s get going!
Orders module
It’s good to divide your app up into different functional areas using modules. Modules incur no performance hit or overhead, they are simply a grouping of the various functional parts of your app.
Each module will have its own domain model, but that doesn’t mean we can’t reference entities in a different module’s domain model, it simply helps us organize something complicated: our application.
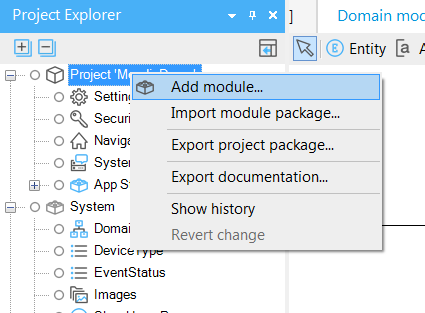
To create a new module, right click on the Project node in the Project Explorer panel:
Name the module “Orders”.
Now let’s open up the Orders domain model and add an order entity with the following attributes:
Note on the OrderNumber attribute, we don’t need to create a unique id for each entity, Mendix does that behind the scenes, and manages all the associations that go along with it. However, in this case, it makes sense to store an additional ID, like a deli counter number so that we have a quick point of reference for our order.
In other cases you may have a unique identifier already as part of your process, maybe its an alphanumeric string. No problem, you can add it and put constraints around it, but Mendix will still store a unique numeric id behind the scenes in the application database.
Note: Mendix uses HSQL as its default database, however, this can be reconfigured to point to another kind of database such as Postgres, etc.
By using the AutoNumber data type, Mendix will create an auto-increment number field and increment it each time it creates a new instance of that entity.
OrderLine
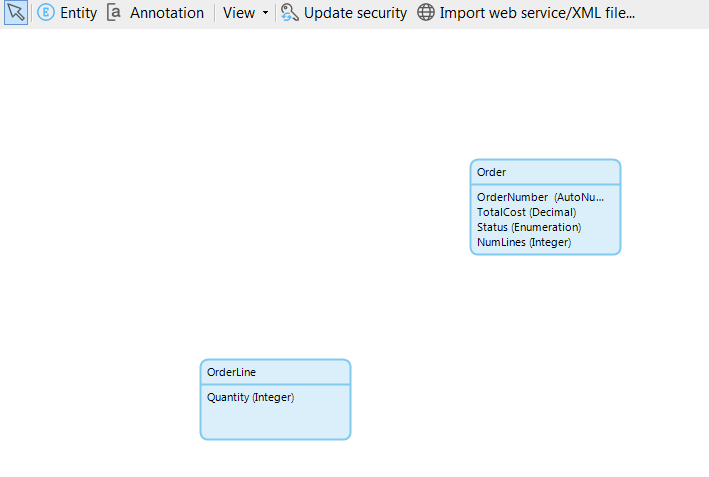
We have an Item entity, and we have an Order entity, and we need to associate the two, but let’s think about this: we need another entity that records the association from the Order to the Item. We need OrderLine because an Order may or may not be associated to an Item, and there will likely be additional data such as Quantity, and other fields that qualify the order’s relationship with the Item.
So lets start with the simplest concept of an order line:
Associating two entities
Obviously, OrderLine is going to be associated to Order, but the direction matters because it implies the child->parent relationship. Since OrderLine is the child of Order, let’s create an association by hovering the mouse over the edge of OrderLine, then clicking and dragging to Order:
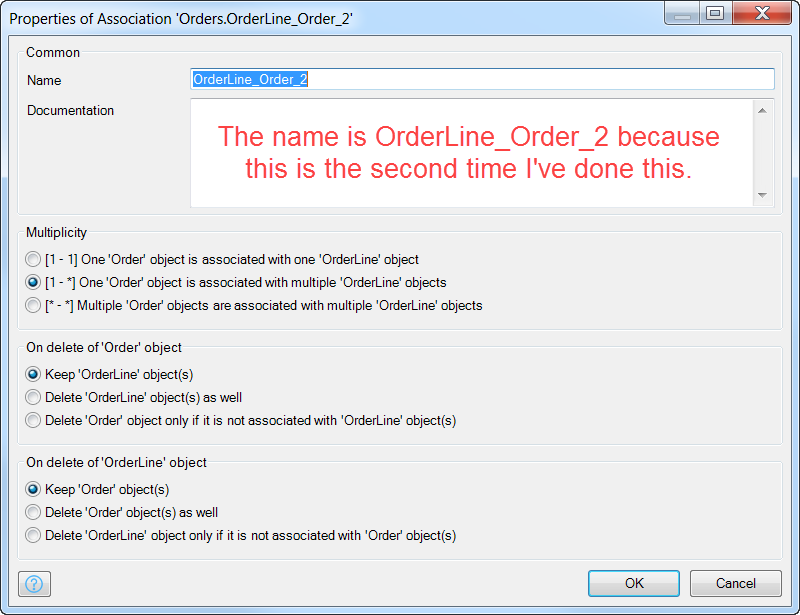
Double click on the name of the association, which defaults to <ChildEntity>_<ParentEntity> (in the case above, it’s adding a 2 because it knows I did this already), and the settings for the association will open in a dialog window:
The Multiplicity of the dialog is the most important part. Since we drew a child to parent relationship, it defaulted to “one Order object is associated with multiple OrderLine objects”, which is true.
The delete behaviors are also worth noting. How should Mendix handle related data when part of that data gets deleted?
Well, it’s usually a better practice not to delete database records. We can always flag them and exclude them, and this is a better way, but if you have a good use-case for actually deleting the records, you will need to consider Mendix’s association deletion behaviors.
OrderLine to Item
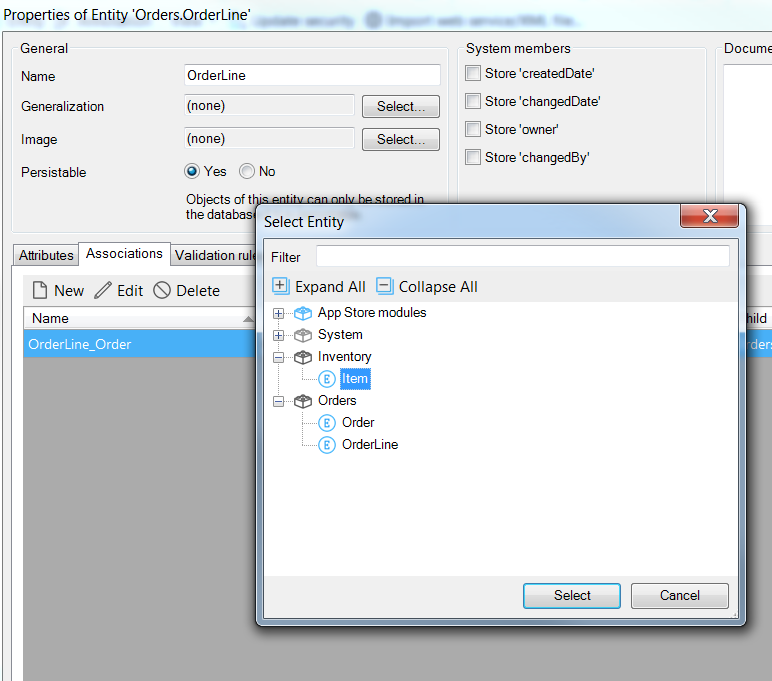
We need another association to our Item entity, which lives in our Inventory Module. This time, many order lines will refer to a single item.
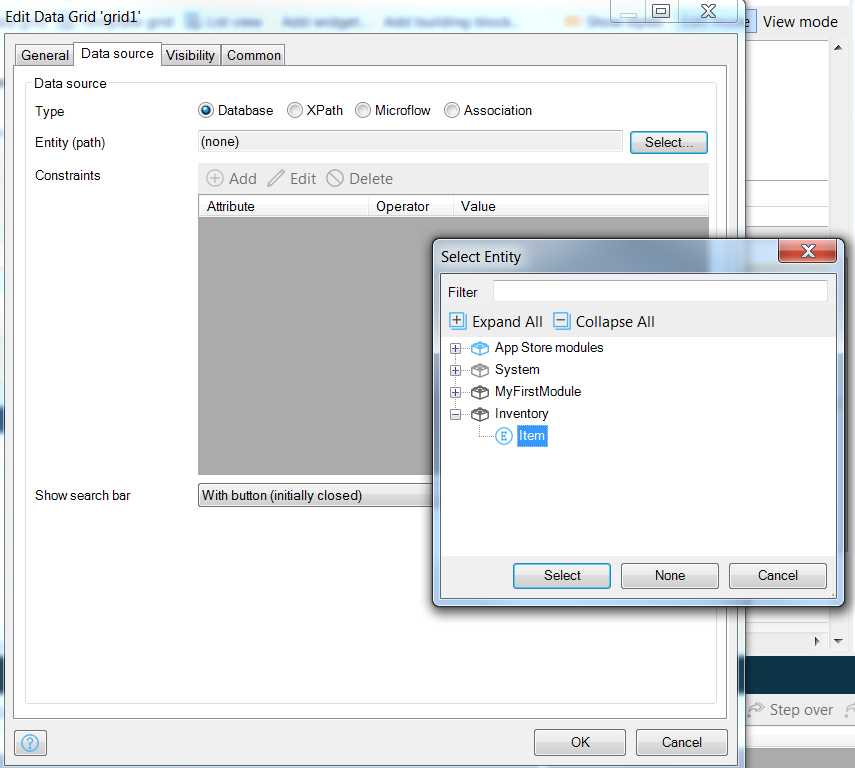
We can’t draw this association as we did above, but Mendix has another way to create associations; double click on the item go to the Associations tab, and click New:
The Select Entity dialog will pop up as soon as you click New, and you can navigate to your Item entity under the Inventory module.
When the new association appears in the Associations list, you can double click on its name and edit the Multiplicity to be [1 – *]:
Our Orders domain model draws a line from OrderLine going off the screen because it is referencing another domain model’s entity:
Simple though it may be, this is all we need to get going on our UI.
A UI for taking orders
Add a new page to the Orders module, and call it Orders_Overview. As before, remove that junk content that it creates with:
Don’t forget to set a page title in the Page properties!
Learn from my shortcomings: if you remember nothing else, title your pages.
Add a Data grid widget to the region you emptied, and associate it to the Order entity:
Double click on the title area of the data grid widget (where it says [Unknown]), and go to the Data source tab to Select the Entity.
Mendix will again offer to populate the Data grid columns for you based on the attributes it finds in Orders, you will, of course, agree, and the result will look like this:
We don’t need all the search fields, just Order number and Status will do fine:
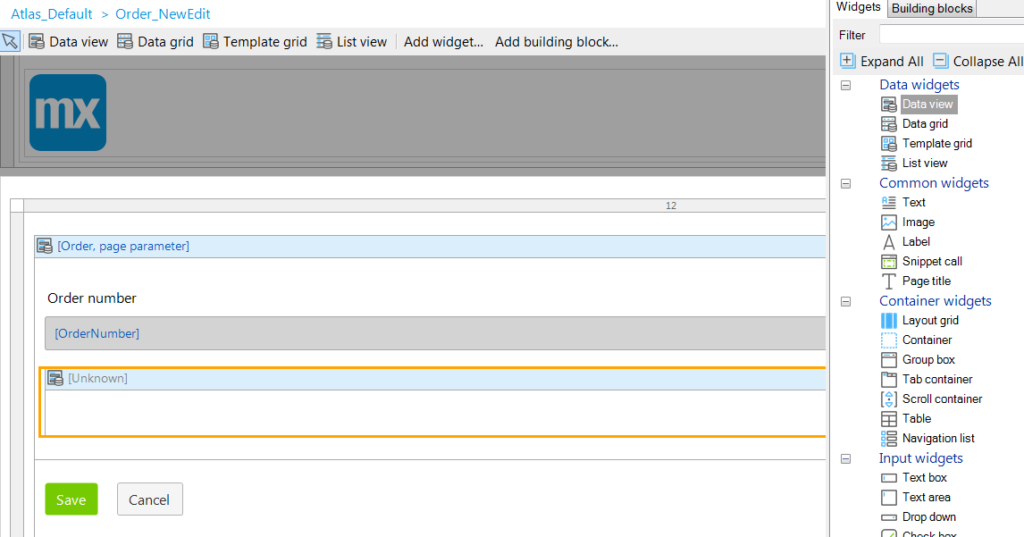
OrderLine’s New/Edit page
Same as before, we want to auto-generate a New/Edit page for order by right clicking on the New button and choosing “Generate page…”
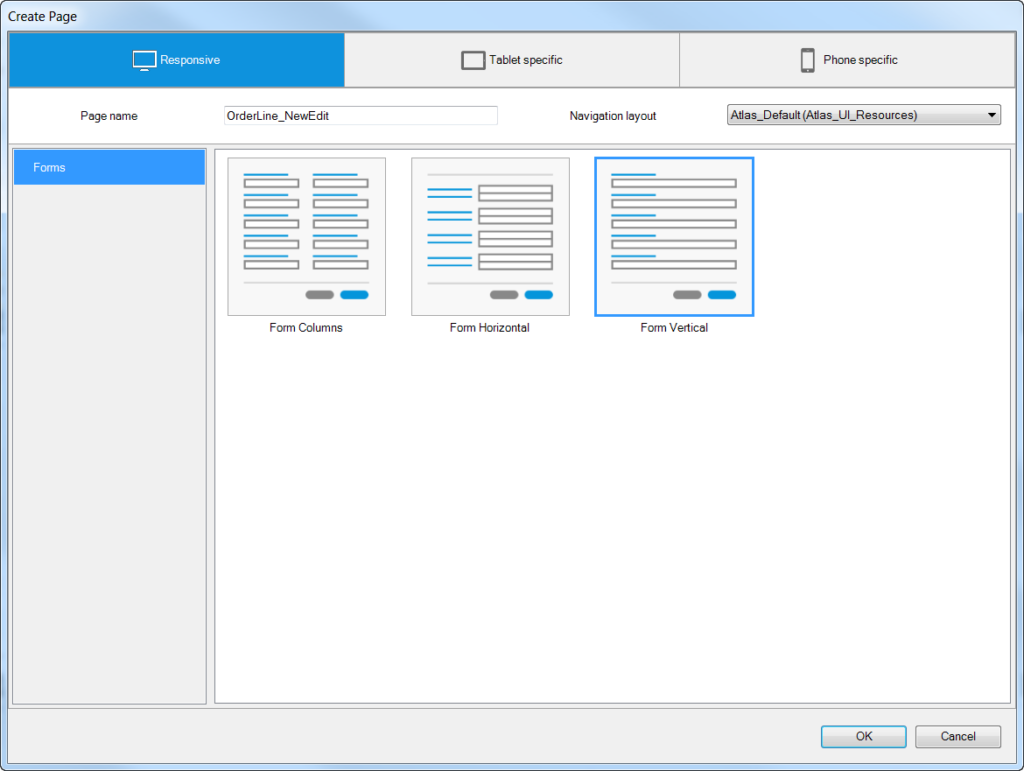
Select from the layout from the dialog’s form options:
I like Form Vertical
Remove most fields from this page except for the OrderNumber AutoNumber (which can’t be edited anyway because its a read only field). And add a data grid.
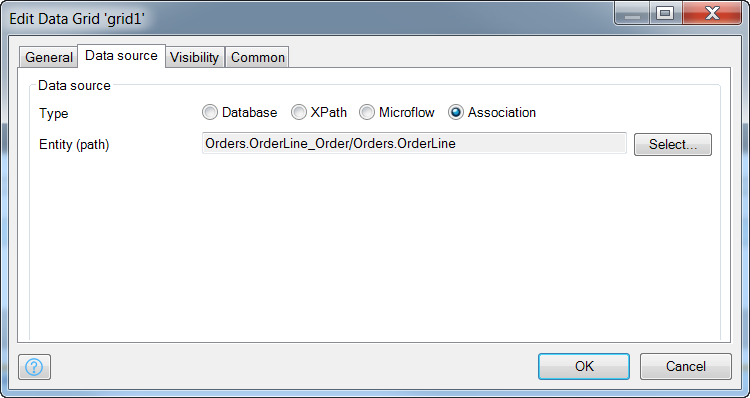
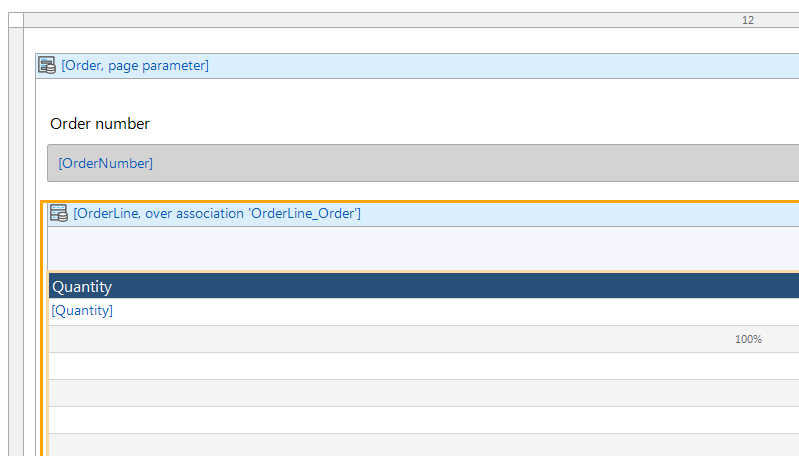
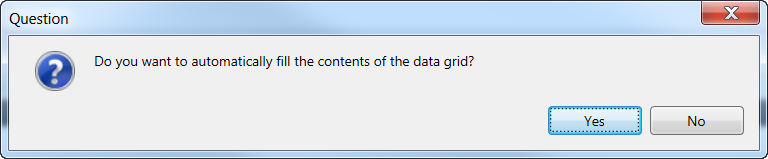
In the data source tab, specify Over Association, and select DataLine, this will instruct the widget to only display OrderLines associated with the Order for which the page was opened (a new order or edited order).
When you click okay, and say Yes to the prompt about automatically filling the grid’s columns, you should see the single attribute belonging to OrderLine, Quantity:
Only one field in OrderLine
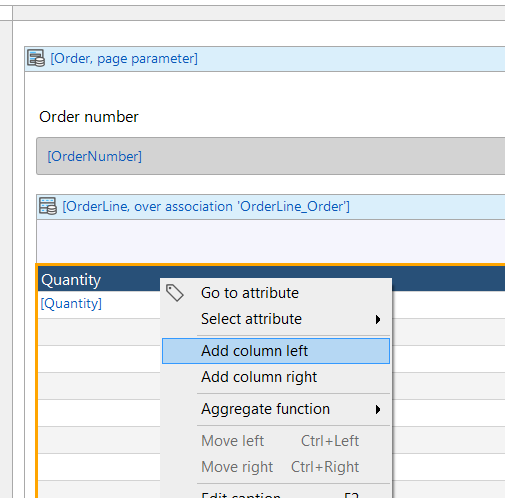
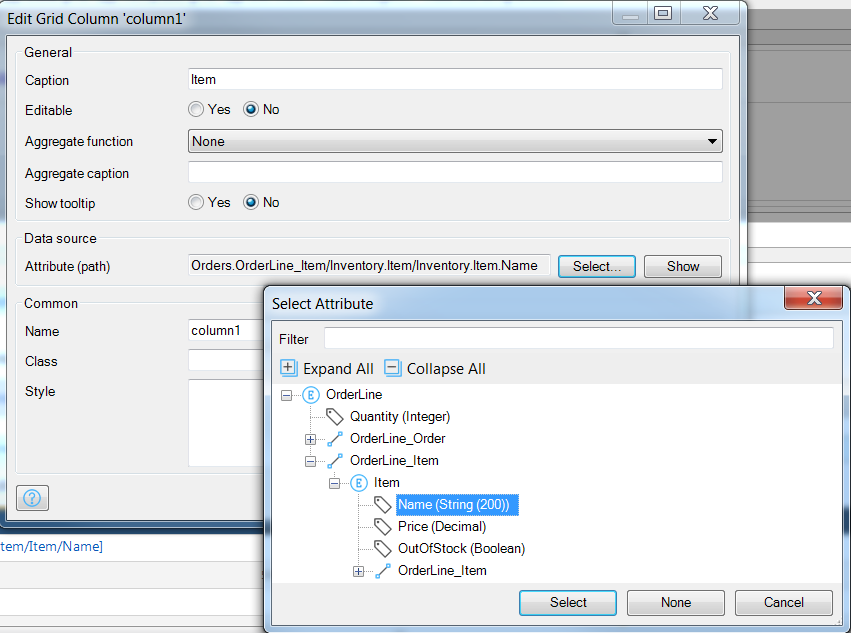
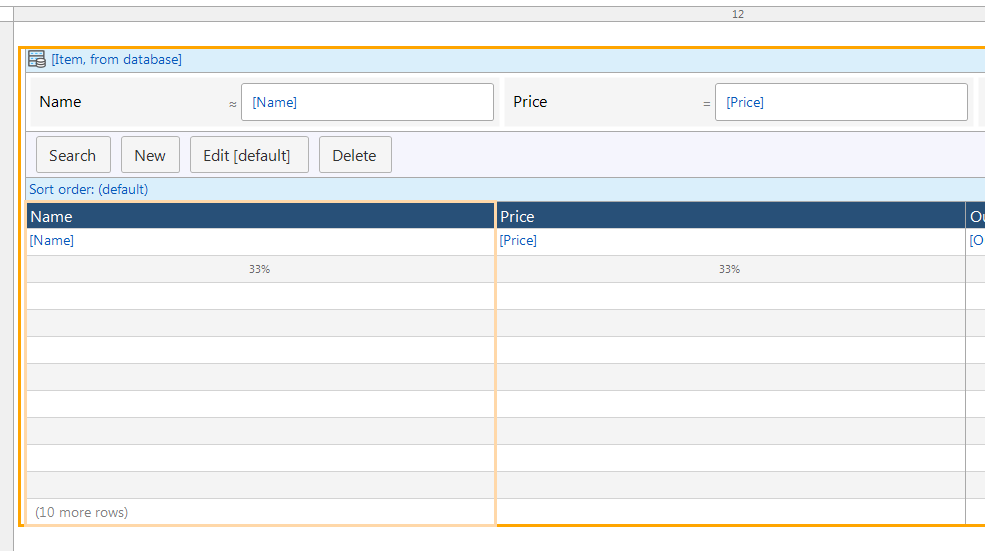
You’ll need to add columns related to Item, which are over the 1-to-1 association between OrderLine and Item. To do this, first add a new column by right clicking on the column header line, and the choosing Add column left or Add column right:
Right click on the new column and choose Select attribute, then you will prompted for the caption of the column and the source of information you want to add, which is specified as the Attribute (path).
Choose the Name attribute from Item, which will appear under the OrderLine_Item association
Go ahead and add the Price attribute to the data grid as well.
Okay, but where are the action buttons?
You’ll notice that, unlike the Data grid widget with a Database Entity source, the data by association doesn’t have any buttons out of the gate.
We will make them.
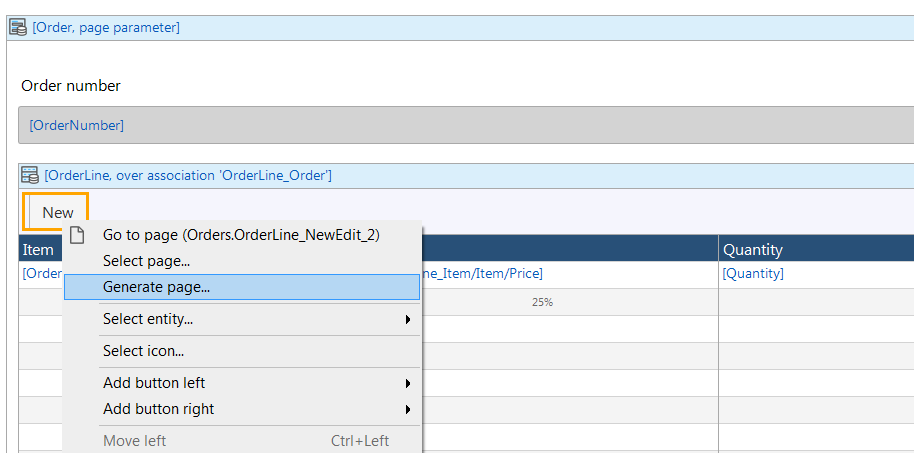
Right click on the gray “button bar” above the data grid column headers and select from context menu Add button > Create. Now our New button shows up:
On the New button, right click and choose our friend “Generate page…” and choose the page layout from the list of form options:
Now this result is interesting:
…well, not that interesting.
It created a form with Quantity from OrderLine, and Name from item, which is convenient. It chose the Name attribute because that’s the first string attribute it found on Item, and it knows it needs to give you a selection for Item because OrderLine has an association.
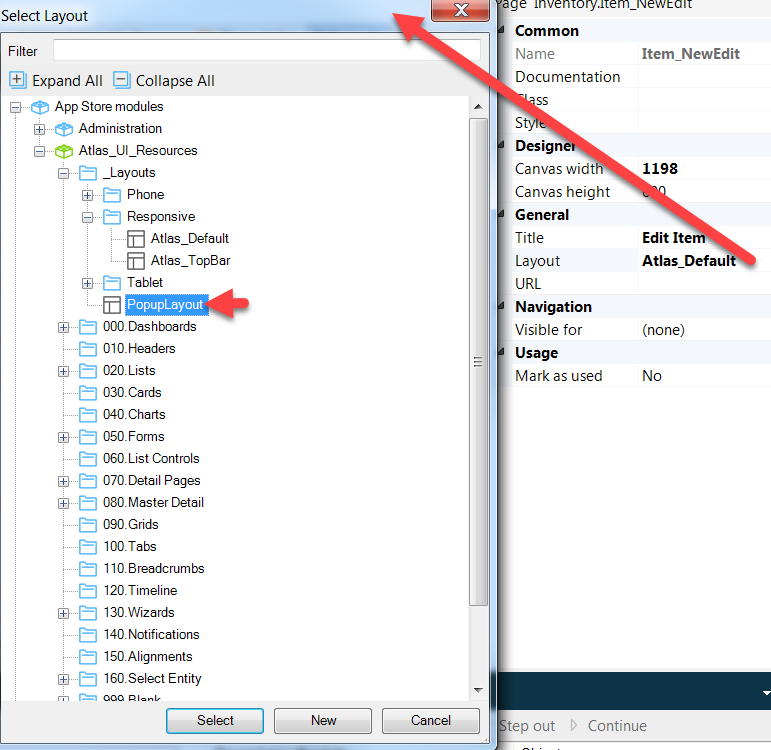
You should probably drag Item above Quantity though. Also, change the page layout in the Page Properties panel to be PopupLayout (Canvas widthxheight of 700×500 is good).
Now let’s build and run our program…but before we do, two last things…
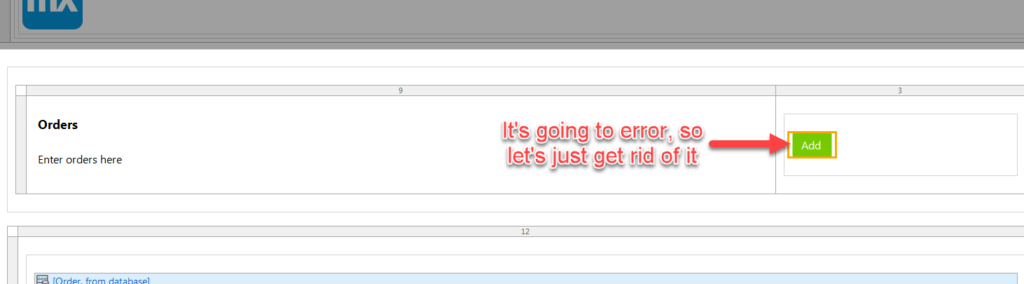
1. Get rid of this Add button on our Orders page because it doesn’t know what to add, and it’s not all that useful.
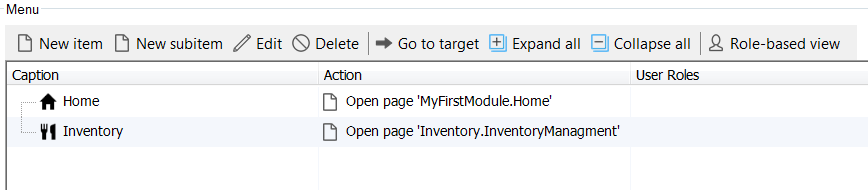
2. Remember to add an option in the Project Navigation for our Orders page:
Build and run
When you run the app, you will be prompted to synchronize the database because you added new entities. There is no sane reason for not doing this.
With the app built, and running, click on our new Orders navigation option, and click the new button on the Orders page.
Then, on the New/Edit Order page, click the New button above the OrderLine data grid.
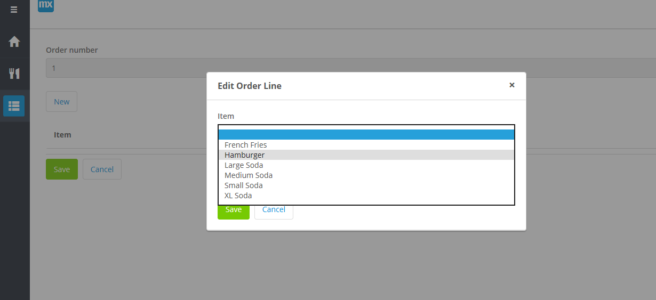
You are presented with our current inventory of items.
However, when you save the order, and return to the Orders page, you will see that there is some missing functionality: Total cost is not updating. Also, there’s no option to pay for the order.
We’ll return to total cost. Let’s tackle the pay option first using a Microflow.
Microflows
If you’re a developer, let’s get some frustrating realities about Mendix out of the way:
There is no code to write, only expressions in Microflows (similar to Excel formulas)
You cannot enter a Microflow via text, you must graph it out via the Microflow editor.
Microflows can get complicated, and you still have only the Microflow editor in which to manage them.
From the reactions I’ve seen from developers, Microflows are by far the bitterest pill to swallow. Part of the reason is simply that developers like to code, and Mendix basically doesn’t allow it (unless you are willing to step down into the Java layer, which sometimes is a good idea).
Just, put the apprehension aside and let’s get started.
In the project explorer add a new Microflow by right clicking on the Orders module and choosing “Add microflow…”
Call your microflow MF_PayForOrder
The convention I use and have seen used is to prefix microflows with MF_ for Microflow function (something is processed), or MC_ for Microflow calculation, which is used by attributes with calculated values, and also MV_ for microflow validation, which are used when we want to validate form data.
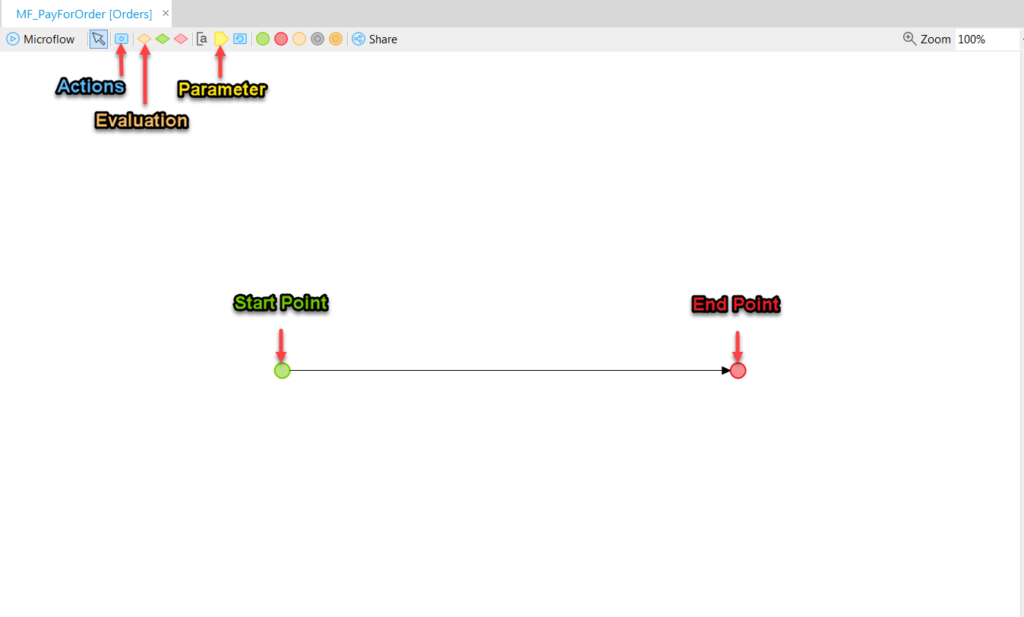
Inside the Microflow
All Microflows have a start point, one or more end points, and one or more Actions.
The Microflow will resemble any flow diagram you’ve ever graphed in Visio, the difference is it will actually be doing the actions listed in it.
For our current case, we need the microflow to action upon an order, and mark it as Paid.
This can only happen by receiving a parameter, which appears as the yellow shape indicated in the diagram above. Click on that and click again to set put it into the microflow, usually we put these above the start point:
As soon as you set it down, the Parameter Settings dialog will pop open and you will be asked to specify what Entity is being passed in. Choose Order, and you will see that the variable name is automatically populated (although it can be renamed), and it will be known throughout the logic flow using this name.
I’m going to rename it as OrderParam, just for clarity’s sake, and you will see that it shows both the variable name and the type below the parameter.
Next, click the little blue icon next to the arrow to create an action. Move the mouse to the middle of the microflow line and click again to insert the action. Then you will be prompted to choose the type of action:
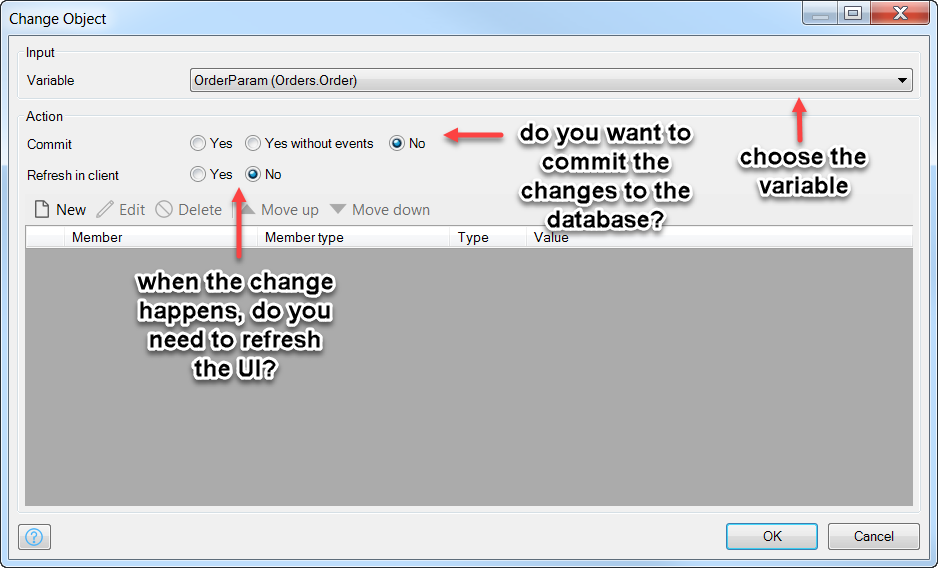
There are LOTS of options for an Action, and it’s easy to get overwhelmed. In our case, we are going to choose Change Object, because we want to change the values of the entity’s attribute. For this we must select the variable the action will apply to:
You also need to consider if you want to store the change right away in the database, or if the change is part of a bigger set of changes, whereby it should be committed later.
Furthermore, when the change happens, do you need to update the UI right away? If so, choose Yes for Refresh in client.
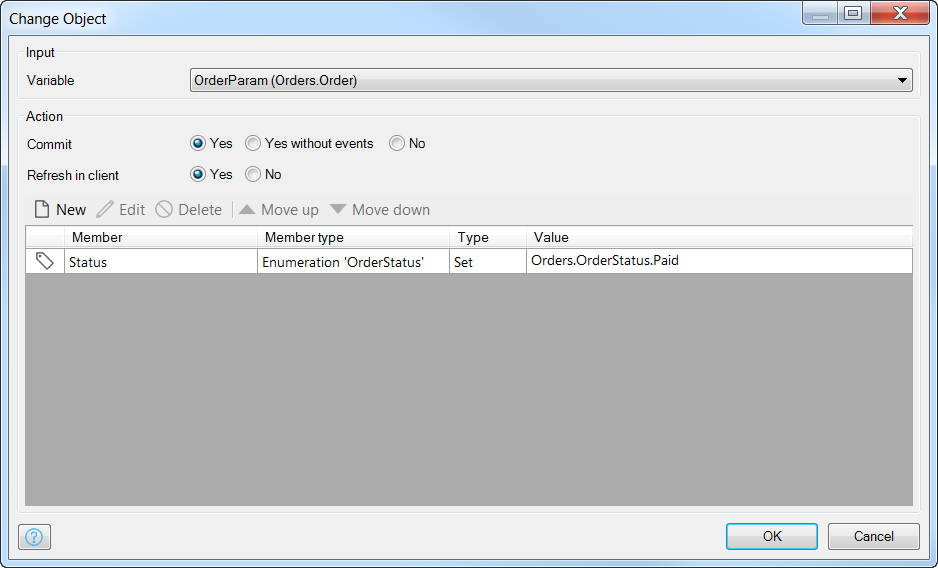
Finally, specify the attributes to change (only Status here) by clicking the New button above the attribute change list field.
For the member attribute, select Status. Since Status is an enumeration, we need to specify one of its values (NotPaid, Paid, Cancelled). You can do so by typing the module name (Orders) and then typing a dot will bring up the data fields available within that module (constants, enumerations), and finally another dot will bring up the enumeration’s possible values.
Let’s set it to Paid:
Orders.OrderStatus.Paid
In addition to setting this value, let’s commit the object right away (set Commit to Yes), and also refresh the UI (Refresh in client to Yes) so the order will reflect the change in status to the user immediately:
Note that the action will represent both of these settings in the top right corner, as an up arrow for commit, and a circling arrow for refresh in client.
Wiring up our Microflow
We have the logic to change the Order, but where is it going to be executed? Let’s add a [Paid] button to our Orders page:
Make sure you click on the button bar and not another element in order to get the right context menu
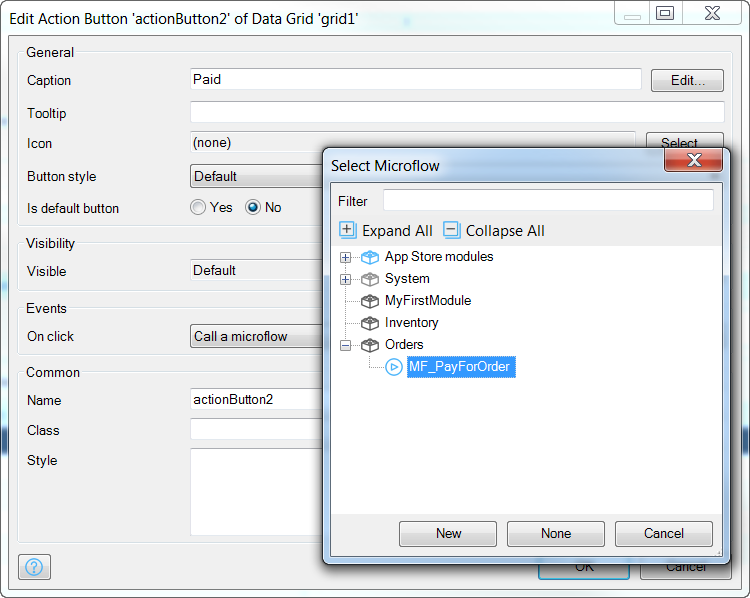
The button will appear with the label “Action”. Double click on the button to edit it, and in the settings of the dialog, set the caption to Paid, and go down to the on click event and select Call a microflow:
Some people have “Do nothing” as a default setting also
When you select Call a microflow, you will be immediately prompted to choose the Microflow from our modules. Find MF_PayForOrder:
That’s it, save all and Build/Run it!
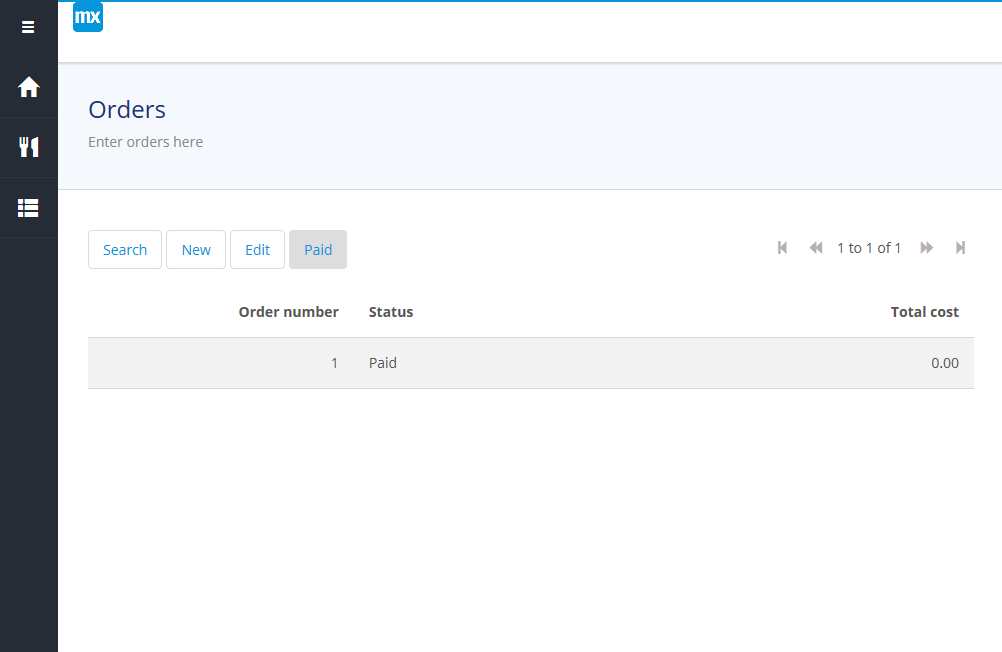
Paying for orders
Try out the new button on the Orders page. When you select an order and click it, the status should change to Paid:
One step closer to a second career as a burger stand cashier!
Next…
In the next part I will cover Microflow Actions in more depth, showing you how to calculate the total of the orders, as well as how to constrain the data so that it only shows under certain conditions.
Mendix is a rapid web application development platform that will likely be hated by developers and loved by the business.
It will be hated by developers because it effectively trivializes what we do. It will be loved by the business because it delivers on the promise of rapid applications that work, and capture key data which can then be reported on or integrated with other applications.
I am sympathetic to the complaints of developers. The business always wants easy answers to difficult problems, and Mendix will not always be the solution they want, and it will be difficult to communicate the why’s when it’s not.
Be aware though: if the business is interested in it, stonewalling this option may cause more problems than embracing it, because there are plenty of vendors who don’t share your concerns, and Mendix is predominantly a cloud-hosted offering.
That said, if you are running a business where your associates are building a Tower of Babel out of excel files, you would benefit greatly from this platform. It is excellent at book keeping and handing transaction records. Better yet, because it is actually code free, there will be very little maintenance to speak of.
Mendix is worth exploring, and this guide will take you through what it is and how it works.
Essentials
Mendix is free to develop with, it only costs money when you push the app to a Mendix server. There are on-premise offerings but it’s unlikely many customers are using them.
To get stared, you need a Mendix account. I recommend you sign up with your business email in the event you like the platform and want to discuss licensing.
Installing the Business Modeler
Once you sign up for a Mendix account, you need to install the Business Modeler which is the application used to develop a new Mendix app. Mendix has the modeler on a rapid release schedule and versions change frequently.
Apps developed in newer versions cannot be assumed to be backwards compatible, nor can older apps be expected to load in newer versions of the app. It is important then to get the right version of Mendix if you are working on an existing app.
If you are creating a new app, it is advised that you get the latest version of Mendix Business Modeler.
If your installing Mendix because someone else invited you to collaborate on their project, you will see upon login a list of projects that you have been given access to. Otherwise, you will see the option to create a New App:
Creating a new app
Mendix has templates to start from, but let’s make it simple and choose the uninspiring Blank gray app icon to start.
Like buying the Brand-X cereal at the grocery store.
Next you will be prompted to name your app, and make sure you enable Online Services which allows for version control, and collaboration. The only time you would not want this is if you are just working on a personal project.
Note: saying no to this option still allows you to deploy to a cloud, it’s just not a dedicated cloud, and the resources allocated to it will be transient. It may go dormant during periods of no use, and then it will take a minute to spin back up when you access it again.
Inside the Business Modeler
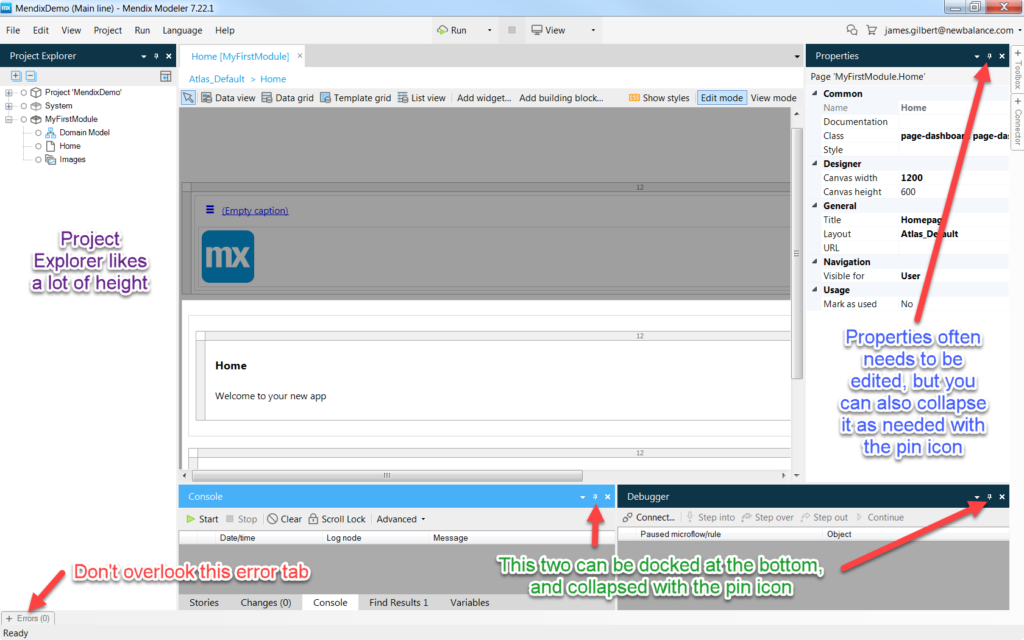
With your app created, you will see the main project view, which includes several functional panels.
You can rearrange these for better space efficiency, for example, the central panel can use more space, so the project explorer and properties panel can shrink down, and you can drag Console and Debugger into the button so they have more horizontal room.
I like the following setup, and use the panel pins to hide areas when I don’t need to see them. The center, content panel is the most commonly used one, followed by Project Explorer, which will fill up quickly with content:
The Error tab is important to find because you cannot run your project if it any errors. Of course, Mendix will tell you that if you try.
Mendix Terminology (the basics)
Module – a grouping of functions (Microflows), content (pages, images, enumerations), and a database schema whose entities can be accessed from other module’s domain modules and Microflows
Microflow – a function that can perform actions on the database, on the UI and do basic logic
Page – a UI arrangement of input components and widgets, can be a full page or a pop-up dialog style page
Page Layout – a template for presentation of a page (for example, a standard web page or a popup page)
Snippet – a grouping of UI elements which can be used within a page. A good example is a snippet for a display of a record type that is to be repeated across the page depending on the number of records
Entity – a database table schema
Attribute – a database column, but using Mendix’s embellished data types
Association – a reference from one attribute to another Entity
Starter Project Modules
All projects are going to start out with the following content in the Project Explorer:
Project ‘YourProjectName’ node
Global project settings go here, including application Navigation, App Store Modules (external add-ins to extend Mendix), Security settings which govern what user roles can see what pages and Microflows (functions)
Security level begins in off state, which allows anyone to access, and is good for getting started, but most of the time you begin working on Security roles early on and will set this to Prototype / demo
System – holds some data schema related to users and logins; generally you leave this alone except to extend or change the application startup function (or Microflow, as Mendix calls functions).
MyFirstModule – has a Domain Model for quick start of database design (usually you want to create a new module though), a Home page for quick start layout of UI that will appear when the app runs, and an Images collection of pictures used in the stock Home page.
Using the Domain model editor
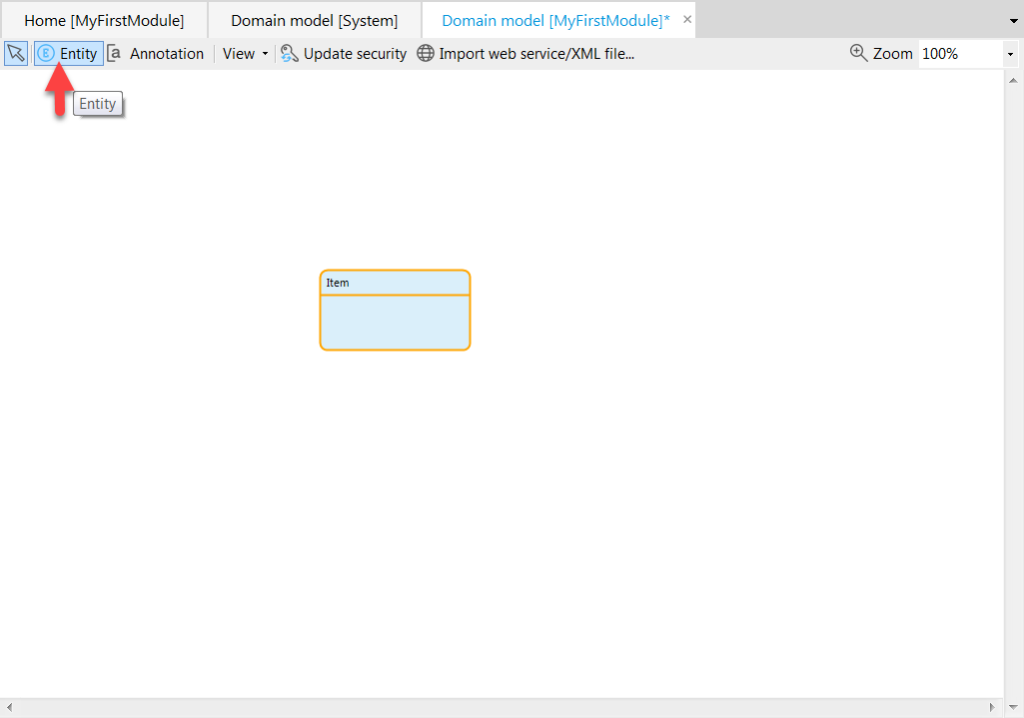
Always start with the data schema. You will be using entities, attributes, and associations. To add an entity, click the Entity button in the top left and a new entity will appear on the panel which you can drag around.
Try to contain your excitement.
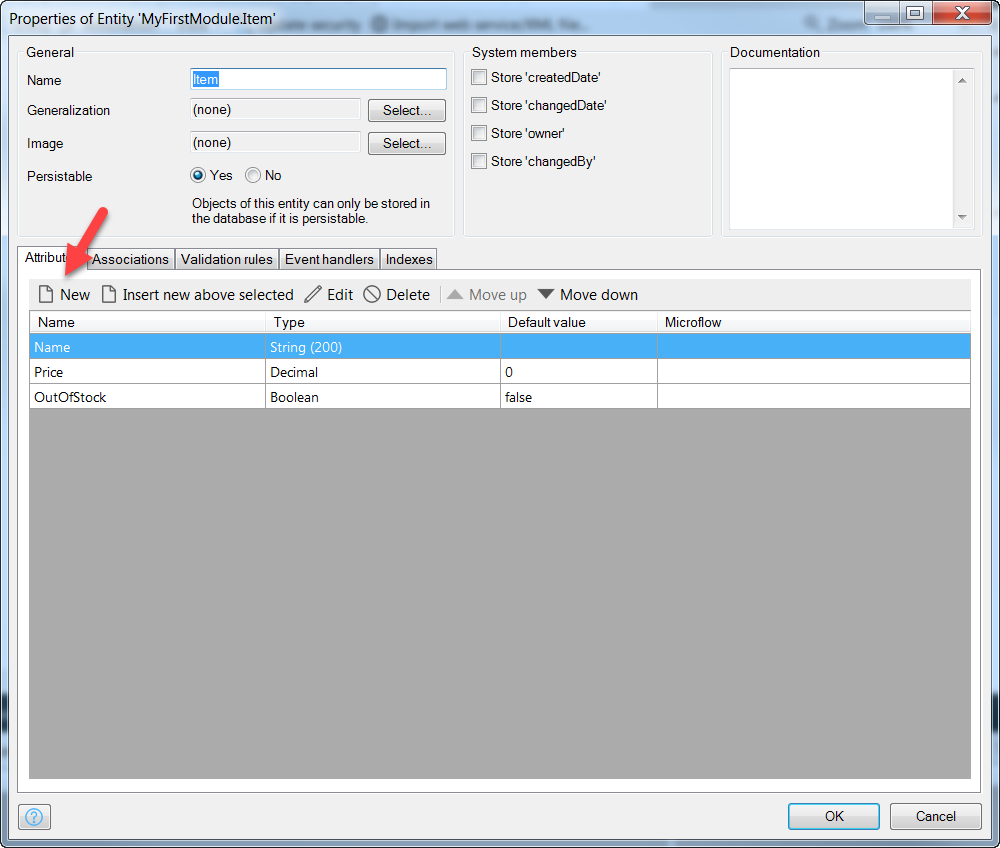
Double click on this and you will be able to edit the properties of the entity:
Name – how the entity will be referred to throughout the app. Mendix likes capitalized values, and no spaces, such as MyEntity
Generalization – you can base entities on other entities which is similar to object oriented programming inheritance. This feature should be used conservatively because it can incur complexity and overhead quickly. Only use it when you need it.
Image – I’ve never used this.
Persistable – You don’t always want to keep your data, sometimes you want entities for temporary use. These will be managed by the app and stored in memory instead of in the database.
System members – fields that can be tracked automatically by Mendix. I have generally checked these off for main entities.
Documentation field – these will show up throughout the Mendix UI. If you populate them, Mendix can provide nice Javadoc documentation. It’s okay to leave this blank until your app matures.
The tabs appearing below these settings
Attributes – these are the fields of your Entity, they all need a type and have an optional default value, if the value is calculated and not stored, it will use a Microflow to determine its value. More often, you are not using calculated values but calculating them externally since it’s better app design.
Associations – are references to other entities. These are actually stored like attributes, but Mendix manages them separately because there are more conditions around them, such as how Mendix should behave when an entity with an association is deleted; should the associated records be deleted also? These cases can be specified.
Validation rules – you can specify that an attribute must be entered, but in most cases it is better to do this through UI functions.
Event handlers – events such as Create, Delete, Modify, and Rollback can trigger Microflows either before of after the event. This is very useful.
Indexes – this matters when you have a table with a lot of data
To add a new attribute, click on the New button in the Attributes tab:
We need an objective…
So we’ll create a simple order app to fill out this demo.
We already have an Item entity, we’ll need Order (which is linked to a user account), and also OrderLine, so we can have a many to one relationship between the Item and the Order, and we can also specify attributes like quantity.
But thinking ahead, it’s clear that items will need to be managed separately from orders. So lets make a new module for items. Right click on the Project node in the Project Explorer and choose Add module…
You will be prompted simply to provide a name, so we’ll call it ‘Inventory’.
The ‘Inventory’ module
The new Module will appear in the Explorer, and it will have a domain model ready to populate. You can cut and paste your Item entity into it.
We need a UI to manage the items; create them, modify them, and later on maybe have some other overview information.
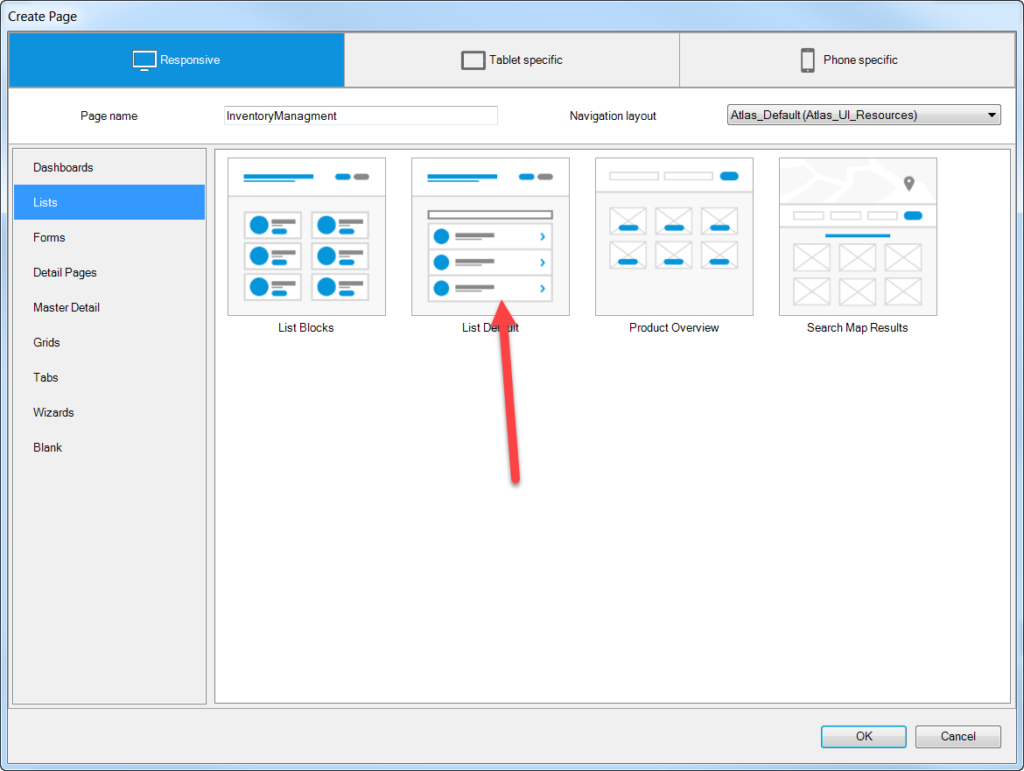
Right click on the Inventory module and choose Add page…
Mendix presents a smorgasbord of templates to choose from, and that’s overwhelming. So let’s go with the standard option; choose List in the left-side navigation, and select List Default:
Why do we keep choosing the boring stuff?
The new page will appear with some default elements like a title, and a paragraph / subtitle. But before you get going, give the page a title in the properties panel! Let’s call it “Inventory Management”.
I always forget to do this!
You can quickly edit the page by giving it title text and a sub heading. Just click on those elements and start typing and it will overwrite the text.
Then delete that content within the box below this, and move your mouse over to the toolbox tab that appears on the right edge of the app, click or hover over this tab and the toolbox pain will appear, filled with (SO MANY) widgets to use on your page.
The page will have a bunch of filler content to start. Clear the stuff within the region below the page title and sub title.
We’ll use a simple out-of-the-box widget called Data grid, which gives a very standard table presentation of an Entity’s records. Drag it to the region you cleared.
You’ll also notice the number headings over the content regions. These are Bootstap related. Mendix outputs the page content into Bootstrap’s 12 column layout to facilitate responsive web design. This way, the content will wrap as needed, depending on the size of the screen.
Mendix really forces you to adhere to this by requiring columns add up to 12 and telling you when they don’t. But don’t be mad, responsive web design is the inescapable reality of the Internet.
The Widget’s Data Source
When you drag the Data grid into the box, it will show up in the most general way, with no idea what to display. Double click on it to set its Data source, click the [Select…] button next to the Entity (path) field, and choose the Entity in the Select dialog.
As it turns out, Item is our only option anyways.
Mendix will prompt you if you want to auto-populate the table columns with the fields of Item. Yes, that’s helpful!
I also want to automatically fill the contents of my tax forms…
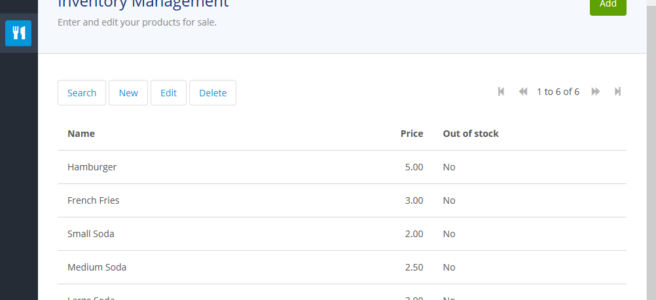
Now the data grid appears with columns found in Item:
OutOfStock attribute is out of screenshot
The New/Edit page
It’s pretty obvious Mendix has the ability to show a bunch of data from a table in this data grid widget, big whoop. But where the platform starts to shine is how simple it makes creation of pages to fill out that data.
Let’s setup its New/Edit page for Item. All we need to do is right-click on the New button that appears in the data grid, and choose Generate page…
This will give you the page dialog again, this time showing only forms in the left-side navigation, and we are going to choose Form Vertical for a nice vertical display of each field:
Notice that the Page name is prepopulated to be <EntityName>_NewEdit
This one action will:
Create the new/edit page that can save the record to the database
Wire up the New button to launch it in the web app
Wire up the Edit button to launch it in the web app for an existing record
No code
Take a look at the page properties by clicking outside the actionable area of the page (either the darkened region above or the blank region to the right). Otherwise you will may be looking at the properties of a selected element.
With the page properties showing, look at the Layout field.
The page layout it’s using (Atlas_Default) will cause the web application to open a new page when the item is created or edited.
It would be a better UX to just have a popup since Item is not a complicated entity with many fields and logic. If you click on the page layout’s value, you can select a popup layout.
Find PopupLayout in the Select dialog:
Use the Filter search to make it easier to find
Also, edit the Canvas width and height properties so that our popup is reasonably sized. The popup layout will scroll the content if needed, but we’ll be fine with the minimum Mendix popup layout size: 600w x 500h.
Save All, and we can test run the app!
Building and running(?)
Go to the Run button at the top center of the app menu, and select Run Locally. The project begins to compile…and finds some errors.
You can look at these in the Errors tab that appears at the bottom left of the application. Double click on the error and it shows you the context.
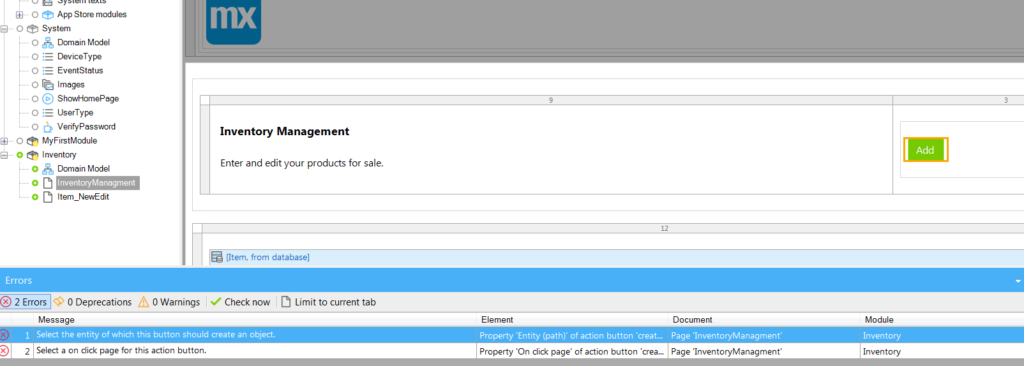
Green Add button doesn’t know what to do with itself.
One problem is that the Add button we left on our Inventory Management page doesn’t know what to add. We have to tell it the entity. Right click on it and choose Select entity… and choose Item from our Inventory module. The other error is it doesn’t know what page to use for adding a new Item. Conveniently, we can use our Item_NewEdit page which Mendix helpfully generated. Find it under the Inventory module and select it.
Now you will see that all errors are gone. Let’s try running it now.
Go to the top of the business modeler, in the middle of the menu select the drop down next to the Run button and choose Run Locally from the drop down:
The other Run option sends the build to the Mendix cloud
This will cause Mendix to build the application as a local Apache web server, and initialize that server so we can see it in our browser on localhost.
Note: the other Run option sends our build to the Mendix development cloud to be hosted, which is also fine because we don’t have to pay for hosting until we want to deploy our app to a dedicated hosting node.
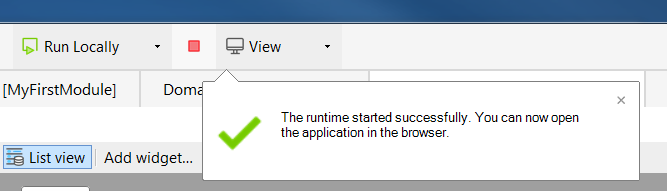
Your app should now build with no issue, but you will need to wait until the web server is up and running (Mendix builds and runs an Apache server for each app), and it takes time.
Also, the first time you successfully run your app, Mendix will ask if you want to create a default database for it. Of course you do!
Filed under questions you probably shouldn’t say ‘No’ to.
After a little more building, it will prompt you that it’s ready to show itself. You’ll know because it will tell you:
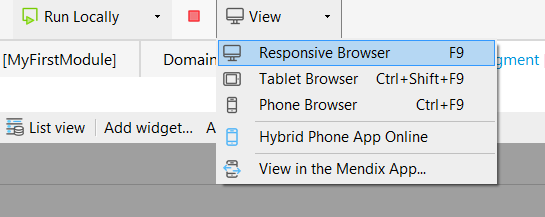
There are options for Viewing so that you can see your app behaving as it would on a mobile-sized screen, but usually we’re going with the Responsive Browser:
This will launch you browser and show your running app.
First run of your app
Well…this sucks.
We need to make our new page available.
Navigation needs your new page
We have a page to create and edit items, or so it appears we do, but the user currently has no way of getting to your Inventory Management page.
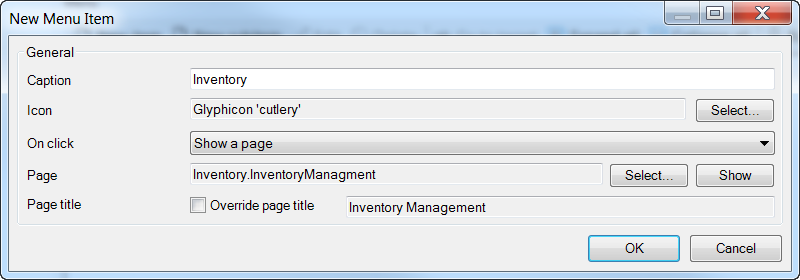
It must be added in the Navigation node under the Project node:
On this screen click New item under menu, and add the following, selecting your Inventory Management page:
Now our Navigation Items list will look like this:
Our inventory must be of the edible variety…
Save all changes, and build/run it again by click Run locally.
Using our Inventory Management screen
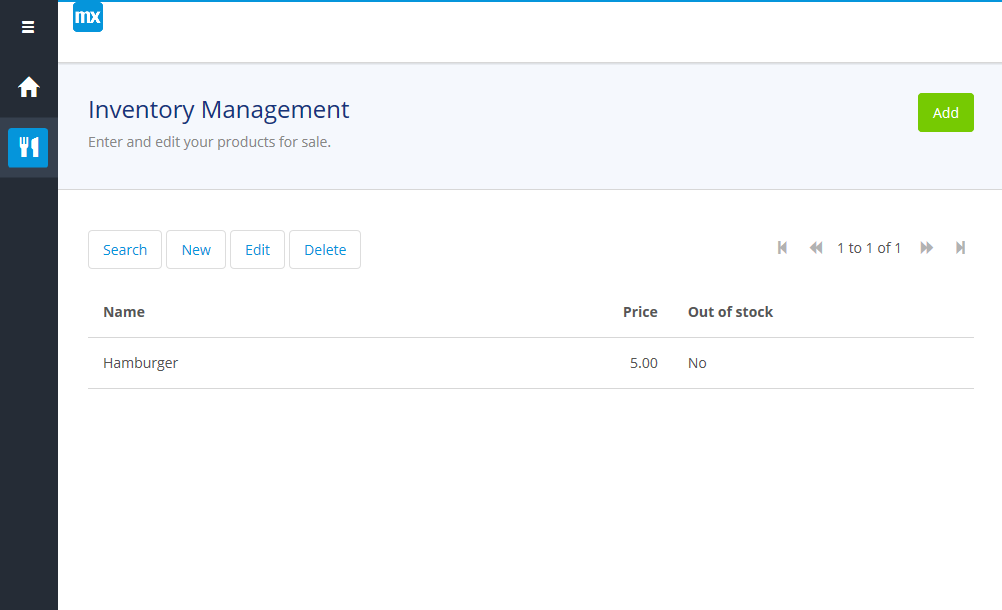
Now when you run the app, your new navigation item will appear. And when you click it, the page will:
It looks good for zero custom design work, and it works.
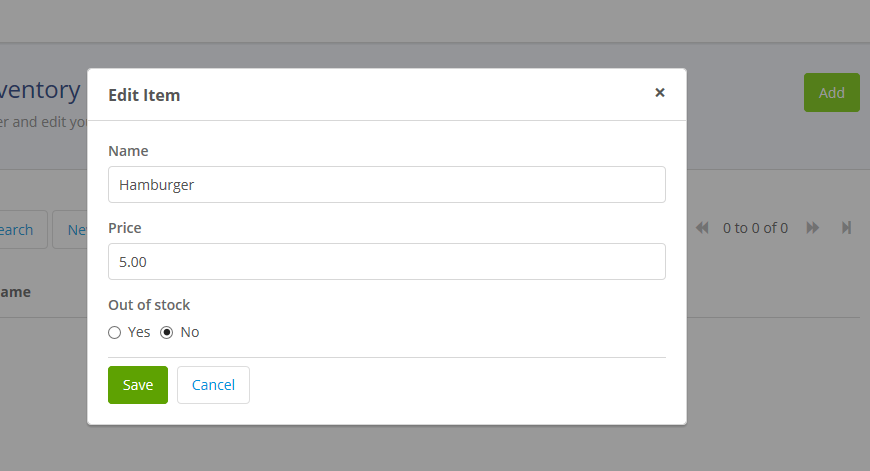
Click the green Add button or the New button to add an item and the Item New/Edit page pops up, ready for settings:
The ubiquitous stock of hamburger inventory
Set the Name, set the Price, set the In/Out-off Stock, click Save and our item is added to our inventory:
Let’s add more items:
It’s all about the beverage sales.
To edit an item, click it and click the Edit button:
AKA “The Bladder Buster”
Recap of Part 1
You can probably imagine easily some problems with the setup as is.
First of all, only certain people should ever see this page (that’s were security roles come in).
Secondly, what if a lazy employee adds a duplicate product (validation rules)
Thirdly, what about tracking changes made to the product (more app/data design needed)
…And so on. These are important questions that you should be asking in order to make a better app. But we’re not going to cover them here.
In the next part, I will build the Ordering functionality of our app which will allow you at the very least to handle the IT needs of your fledgling burger business.
We will cover associations, Microflows, nested data widgets, and data source constraints.
It doesn’t take a lot of development to end up with a critically low amount of disk space. Depending on what you develop, you could face this scenario in a matter of months, and then the grim reality of living day-to-day with low space sets in, and you become a sort of data-survivor; making drastic decisions because you have know choice.
I’ve been operating in this mode for months now, because I have a phenomenally souped-up laptop with an Achilles heal hard drive of 250GB. Worse yet, I can’t upgrade.
So here are my best tips on how to live another day when you have no options but jettison ballast…
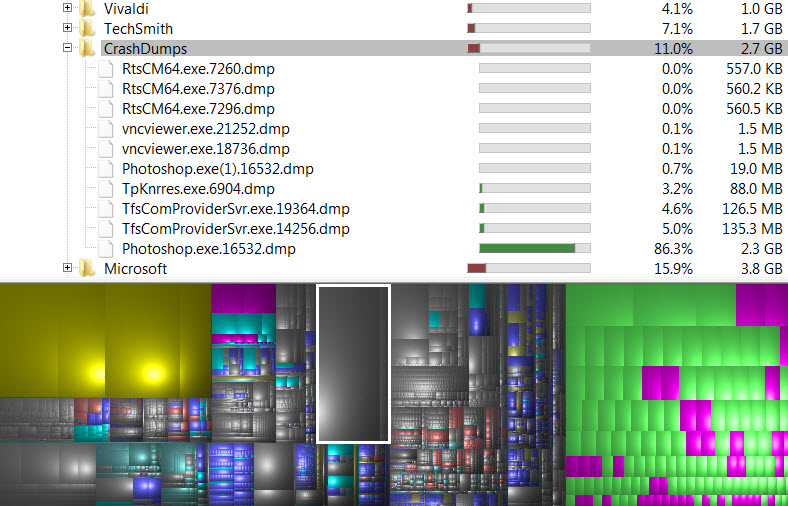
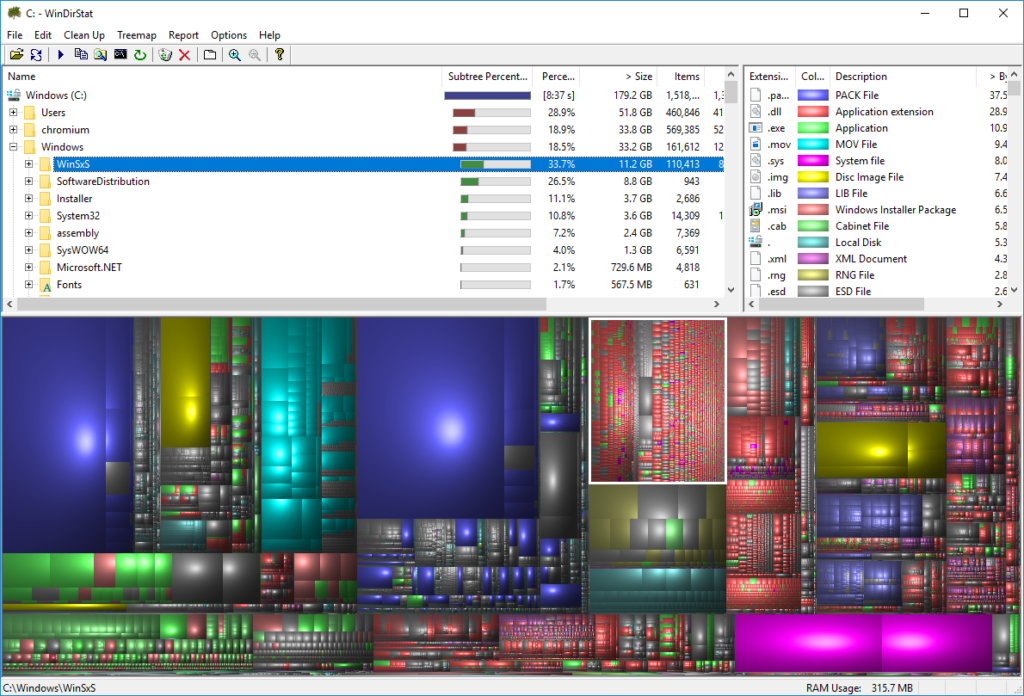
WinDirStat: The Last Honest App
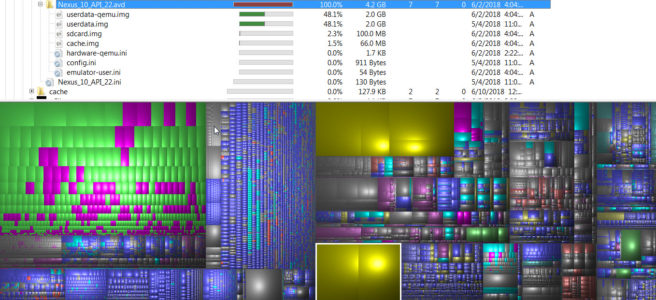
You probably already have this little program, WinDirStat, with the world’s ugliest icon, and Pac-Man progress bars. And it is the only tool I trust to tell me the reality of my hard disk.
An icon only a developer could love.
Run it on the offending drive, and after a reasonable time, it will produce another ugly graphic which shows you a “colorful” tree map of your disk usage. You will spot quickly the worst-offending files because they will glare at you in alarmingly discordant color swatches, which hurt the eyes; and they should, because those files are hurting your drive.
But here’s the rub, depending on your company’s policies and Windows restrictions, there are some sources of pain that cannot be remedied. One glaring example is pagefile.sys, which is used for virtual memory.
Guess which file is pagefile.sys?
That said, windirstat shows you were to prune. You can see your disk contents arranged in blocks and when you click on them, it will show you where in the labirynth of folders the file exists.
There are other good options, but I recommend this utility to gain the necessary oversight of your starving hard drive’s vital signs.
When you’ve decided you can live without Outlook…
Let’s face it, without more space, your PC has no outlook. And when push comes to shove, you may be looking at that OST file under your Outlook directory with eyes like carving knives.
Because my company uses Office365, I am able to use the web client. The web client isn’t great (ss of writing this, I can’t setup an email signature in it), but like I said, I have to free up space, and having every email I’ve ever sent or received sitting on my hard drive is not an option.
So I learned to use the web client, and it’s actually not too bad. The new web integrations for office make previewing a file much better, and you can also open the file in the local app (Word, Excel, PowerPoint, etc) with a single click from the preview.
Once you decide to eliminate the OST file upon which Outlook relies, you need to be aware of one trick Outlook has up its sleeve…
“Clever girl…”
Sure, go ahead, delete the file. Boom! Gigs back. Hooray! Much rejoicing! But then, next day, it’s back, and you’re in worse shape now because you celebrated by installing a bunch of stupid applications, didn’t you?
Still not dead.
The secret of OST’s regenerative ability is Lync (which is now called Skype for Business). There’s an option in Skype settings which will cause the OST to be recreated if it is found missing.
Disable that like so:
Exit out of Skype, delete the OST, restart Skype. OST stays gone now. Hopefully. [plot left open for sequel]
Hibernation is for bears.
Hibernation mode is a handy windows feature that allows your computer to go into a powered-off state, and then, when the season is right, awake with all your programs running as just like before, and then maybe tear open a few campers’ SUVs.
How does it do this? By creating a file as big as your PC’s total RAM, which is intolerably large!
But you can shut it off and get all of that bear-sized space back. Run CMD as Administrator, and execute the following command:
powercfg.exe /hibernate off
I can almost fit in this hard disk.
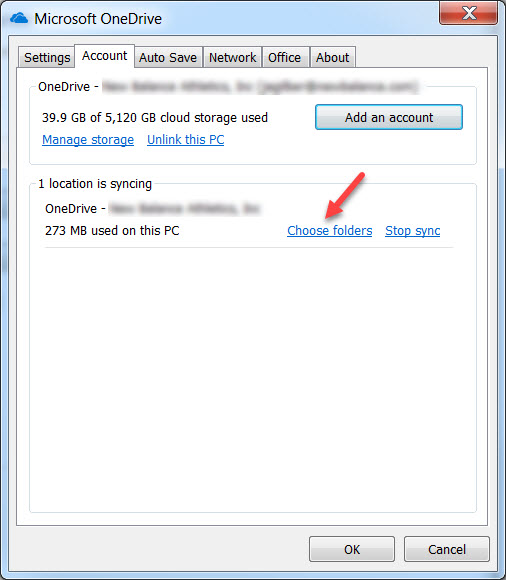
Not all of OneDrive needs to be synchronized.
The beauty of cloud storage is that it has so much space to offer. I use OneDrive, and I find it practical to have a couple folders kept in sync for convenience.
Make sure that you aren’t syncing the entirety of your OneDrive folder. You have to go into OneDrive settings and specify what folders it should keep in sync. Otherwise, you have gained zero advantage to using cloud storage.
Better to be embarrassed by poverty than by riches.
Additionally, the folders you do keep synced you have to practice good data hygiene on. So everything I discuss in the following tip is relevant to your cloud synced folder…
Now, about your Downloads folder…
I know, you’re going to tell me you’ve already deleted the big stuff out of here. But wait a minute, here’s an interesting theory for you to reflect upon: the Downloads folder is a window into your aptitude or lack thereof for managing your hard drive.
Psychobable, you say? Go to the folder. Take a look at the contents you decided not to delete and ask yourself. Why are they still there?
If you have some application install files that are hard to find, put them up on OneDrive or some other cloud storage. If the install file isn’t hard to find and you can with minimal effort download it again, delete the stupid thing. Don’t hoard your data!
I had 4 copies of Filezilla when I last checked. Is Filezilla going to vanish from the Internet? Is it going to become a SaaS (perpetually paid for program) like the Adobe Scrooge Suite?
No it’s not. Delete it.
Those documents you downloaded from Gmail. Are they yours? Then put them in a different folder. Are they from someone else? Then delete them, because you can very easily find the email they were attached to and redownload them IF NEEDED.
Survival is about need.
Need. Survival is about need. There is no room for convenience. Either move the document to a better place, or delete it.
Data hygene starts with the Downloads folder, the way health starts with diet. The Download folder is like your mouth. Files are like food. If you need the food, store it, if you don’t…well, you know what a body does.
Remove old versions of programs, if you can.
In most cases, you don’t need old versions of programs. Sometimes you do though.
Generally, this problem is most accute for developers because we don’t always have the option to upgrade our projects to a later version of an IDE, and IDEs are the fattest of resource hogs in the application pen. But if you’re still hanging onto VS2010, and you haven’t used it in the last 6 months. It’s time to make the survivor’s choice.
Here’s a more challenging scenario: VS 2015 and VS 2017. In some cases I’ve seen, there are projects I simply cannot port, usually this happens on team projects that are archived in TFS.
If you can’t remove it, don’t. But here’s what I can do. I can remove those VS2015 projects, because…they’re on TFS. Which brings me to the next tip…
Delete projects that are *safely* under source control.
Man, the whole point of Git, TFS, or (heaven help you) SVN, is that you transfer authority of the files to a central repository. It’s safe! The reason it exists is so you don’t have to data hoard versions of your code. Including the latest versions. If you’re not actively working on the project, and the latest changes are checked in, simply delete the local copy.
Yes, it’s a hassle to pull it back down, but this goes back to data hygiene. It’s also a hassle to make your bed in the morning, and shave, and keep your car passenger worthy.
Strangely enough, it’s an upside to not have a choice. You need space. You need to incur some inconveniences to get it. Take a chainsaw to your file tree…for the good of the tree!
Some trees deserve the chainsaw.
Android Studio hates your hard disk.
AVD Block Party
I like Android Studio, but Android Studio hates my PC.
Besides being a massive pile of bytes, Android Studio spawns virtual device images for emulation purposes, and a single instance of a android device image takes up an ever more expansive amount of space.
AVD Block Party Location. Be there, and be square-ish.
Apparently, Google’s Android team has found it most conducive to development to appropriate every byte a device could possibly utilize in order to provide you an emulated version.
Now, I won’t be as drastic as some developers who flat out refuse to use the emulator, I don’t think that’s reasonable (although it is arguably better practice to use a real device). I also understand that some images you may have configured specially because you were building for a non-common device. So take notes, or screenshots even, of those configuration settings, and remove the images until you need them again.
Nervous Database is logging itself.
If you work with Microsoft SQL or MySQL, be aware that both of them will produce snapshots of their databases under certain circumstances, such as an application crash.
These files are generally small, but could grow into a big problem. And you don’t need them.
For Microsoft SQL, the files are named SqlDump<some number>.mdmp
For MySQL, the files are named mysql-bin.<some number>
CrashDumps
Some programs will save snapshots of files in progress when they crash. This is not a uniform practice, but I’ve spotted the place where most apps are putting their “crash dumps” in a folder called “CrashDumps” (in the local app data folder).
C:\Users\<your-user>\AppData\Local\CrashDumps
Presuming you haven’t just experienced a program crash, you can clean this folder out. Depending on which program crashed, it could be claiming a sizable chunk of your drive.
The bigger they are the larger they crash.
Windows tries to help.
I’m assuming, at this point, that you have muscle memory for launching Disk Cleanup utility. And hopefully, you have admin privileges over your computer to get the bonus cache of junk files. This is usually slim pickings though. But just in case, you should know about Windows’ ‘Disk Cleanup’ app, and also setup your Disk Defragmenter to run regularly.
We take what we can get.
WinSxS (Windows 10)
WinSxS folder on Windows 10
Windows SxS (Side-by-Side) is an unhappy compromise of an OS caught between 32 and 64 bits, and a library of legacy to boot.
On Windows 10, you will quickly notice this teaming colony of files, small but many.
There are lots of tips for slimming down this multi-stomached digestive system, but the quick one is to run the following from the command line (with Admin privelages) which will remove cached components that have been updated to newer versions…
Here’s where I alienate the general audience and report some strange edge cases that being I have had to deal with as a disk space survivalist.
The most unnerving one is this: at one point in my efforts to save space, I came across wave files that were massive. Surprised to find them, I listened to one, and honestly, it sounded like me using my computer. It was ambient, like a room, and had occasional sounds of life. After a few seconds, I was sufficiently creeped out, I stopped listening.
Maybe it’s a Cortana thing, or some other mic resource gone awry. All I really know is that my computer didn’t need gigantic WAV files in order to improve my user experience.
In the rare case that you also have these files, you know that they reside in the Windows\Temp folder.
To handle them, I simply wrote a 1 line bat file to delete them and scheduled it to run on logon and every 2 hours.
Making a simple mp3 converter for various audio files
FFmpeg was created as a Linux tool to facilitate movie format decoding. It was later wrapped into the mplayer project, where it remained a stand-alone exe used by the mplayer libraries.
While MPlayer is no more, FFmpeg continues to find its way into countless media production applications, since it does such a good job and offers so many conversion options. If you have a media conversion tool, there’s a good chance FFmpeg is sitting somewhere in the application’s bin folder.
A lot of WordPress sites cannot recieve the audio formats aiff and m4a which are sometimes produced by media programs. So FFMPEG can help you convert it to the smaller, ultra-portable MP3 format.
The FFMPEG exe handles a sea of arguments, but for simplicity sake I’m just doing the obvious in the following one-liner bat file, which will take an audio file, and convert it to MP3 (128k sample rate) using for output the same file name as passed in with the .mp3 extension instead of the source extension. It will create the output file in the same location as the input. So once you have this file bat file created, you can just drag audio files onto it and see the output file created in the same location.
Take the following, and edit the “LOCATION_OF_YOUR_FFMPEG_EXE” part to be the path of where the ffmpeg exe ended up after your download.
Save the file to your desktop, or somewhere convenient for dropping files.
Drag an audio file from any folder onto the bat file and watch for an MP3 version of it to be created in that same folder.