Preamble:
Mendix is a rapid web application development platform that will likely be hated by developers and loved by the business.
It will be hated by developers because it effectively trivializes what we do. It will be loved by the business because it delivers on the promise of rapid applications that work, and capture key data which can then be reported on or integrated with other applications.
I am sympathetic to the complaints of developers. The business always wants easy answers to difficult problems, and Mendix will not always be the solution they want, and it will be difficult to communicate the why’s when it’s not.
Be aware though: if the business is interested in it, stonewalling this option may cause more problems than embracing it, because there are plenty of vendors who don’t share your concerns, and Mendix is predominantly a cloud-hosted offering.
That said, if you are running a business where your associates are building a Tower of Babel out of excel files, you would benefit greatly from this platform. It is excellent at book keeping and handing transaction records. Better yet, because it is actually code free, there will be very little maintenance to speak of.
Mendix is worth exploring, and this guide will take you through what it is and how it works.
Essentials
Mendix is free to develop with, it only costs money when you push the app to a Mendix server. There are on-premise offerings but it’s unlikely many customers are using them.
To get stared, you need a Mendix account. I recommend you sign up with your business email in the event you like the platform and want to discuss licensing.
Installing the Business Modeler
Once you sign up for a Mendix account, you need to install the Business Modeler which is the application used to develop a new Mendix app.
Mendix has the modeler on a rapid release schedule and versions change frequently.
Apps developed in newer versions cannot be assumed to be backwards compatible, nor can older apps be expected to load in newer versions of the app. It is important then to get the right version of Mendix if you are working on an existing app.
If you are creating a new app, it is advised that you get the latest version of Mendix Business Modeler.
You can find all versions of Mendix here: https://docs.mendix.com/releasenotes/desktop-modeler/
Logging in
If your installing Mendix because someone else invited you to collaborate on their project, you will see upon login a list of projects that you have been given access to. Otherwise, you will see the option to create a New App:

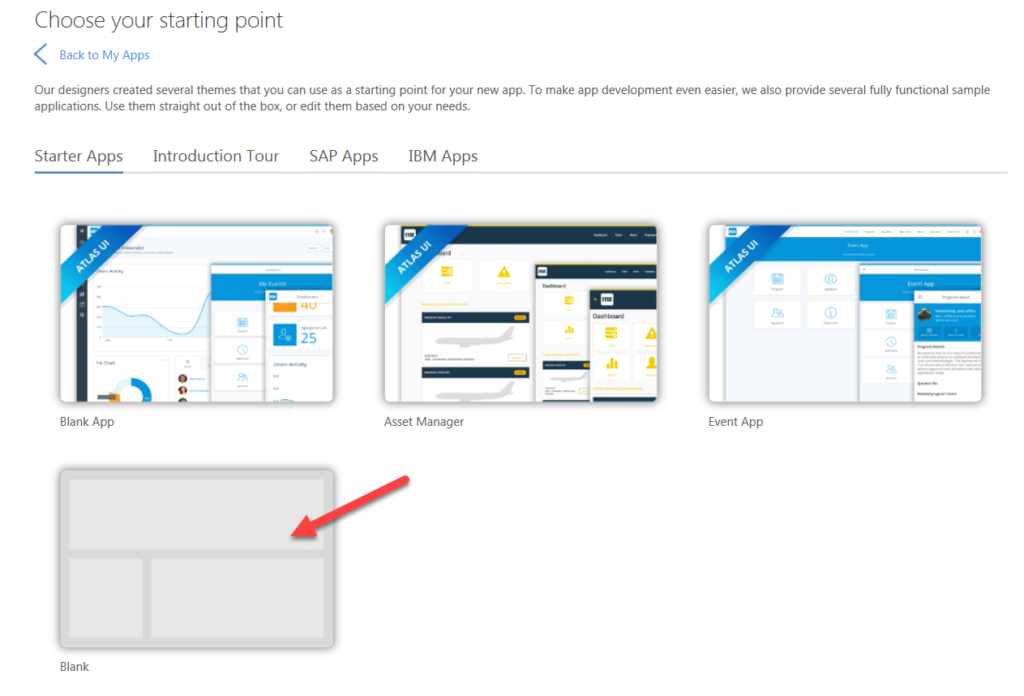
Creating a new app
Mendix has templates to start from, but let’s make it simple and choose the uninspiring Blank gray app icon to start.
Next you will be prompted to name your app, and make sure you enable Online Services which allows for version control, and collaboration. The only time you would not want this is if you are just working on a personal project.
Note: saying no to this option still allows you to deploy to a cloud, it’s just not a dedicated cloud, and the resources allocated to it will be transient. It may go dormant during periods of no use, and then it will take a minute to spin back up when you access it again.

Inside the Business Modeler
With your app created, you will see the main project view, which includes several functional panels.
You can rearrange these for better space efficiency, for example, the central panel can use more space, so the project explorer and properties panel can shrink down, and you can drag Console and Debugger into the button so they have more horizontal room.
I like the following setup, and use the panel pins to hide areas when I don’t need to see them. The center, content panel is the most commonly used one, followed by Project Explorer, which will fill up quickly with content:
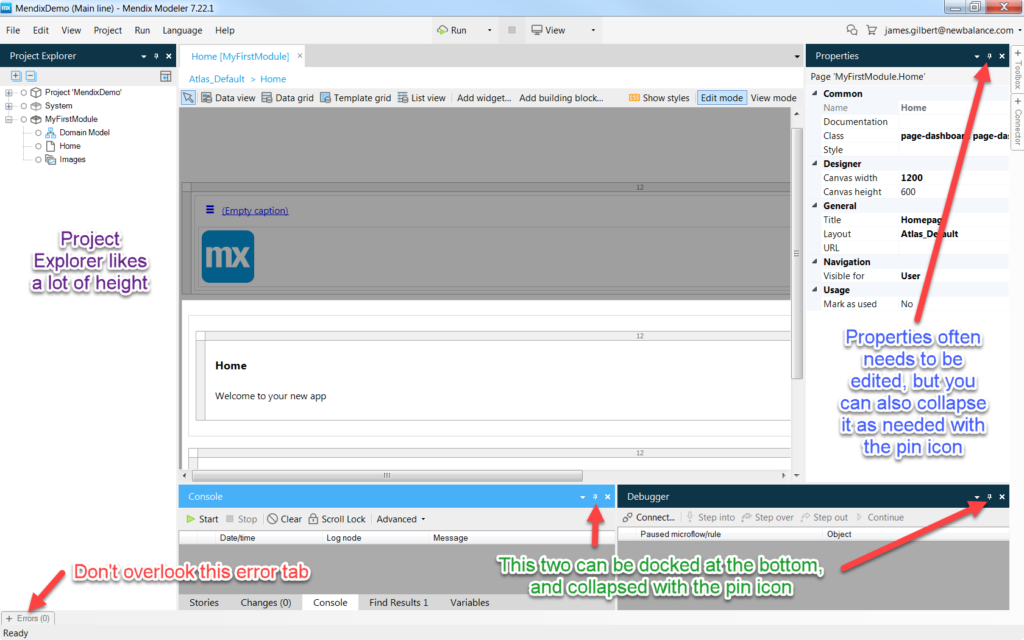
The Error tab is important to find because you cannot run your project if it any errors. Of course, Mendix will tell you that if you try.
Mendix Terminology (the basics)
- Module – a grouping of functions (Microflows), content (pages, images, enumerations), and a database schema whose entities can be accessed from other module’s domain modules and Microflows
- Microflow – a function that can perform actions on the database, on the UI and do basic logic
- Page – a UI arrangement of input components and widgets, can be a full page or a pop-up dialog style page
- Page Layout – a template for presentation of a page (for example, a standard web page or a popup page)
- Snippet – a grouping of UI elements which can be used within a page. A good example is a snippet for a display of a record type that is to be repeated across the page depending on the number of records
- Entity – a database table schema
- Attribute – a database column, but using Mendix’s embellished data types
- Association – a reference from one attribute to another Entity
Starter Project Modules
All projects are going to start out with the following content in the Project Explorer:
- Project ‘YourProjectName’ node
- Global project settings go here, including application Navigation, App Store Modules (external add-ins to extend Mendix), Security settings which govern what user roles can see what pages and Microflows (functions)
- Security level begins in off state, which allows anyone to access, and is good for getting started, but most of the time you begin working on Security roles early on and will set this to Prototype / demo
- System – holds some data schema related to users and logins; generally you leave this alone except to extend or change the application startup function (or Microflow, as Mendix calls functions).
- MyFirstModule – has a Domain Model for quick start of database design (usually you want to create a new module though), a Home page for quick start layout of UI that will appear when the app runs, and an Images collection of pictures used in the stock Home page.
Using the Domain model editor
Always start with the data schema. You will be using entities, attributes, and associations. To add an entity, click the Entity button in the top left and a new entity will appear on the panel which you can drag around.
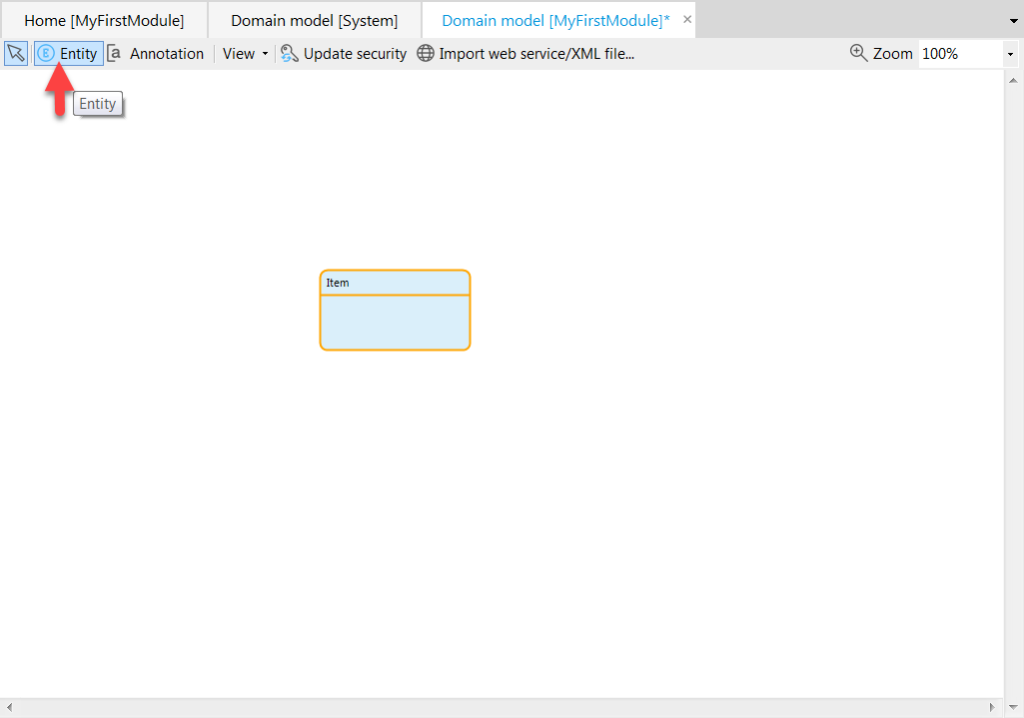
Double click on this and you will be able to edit the properties of the entity:
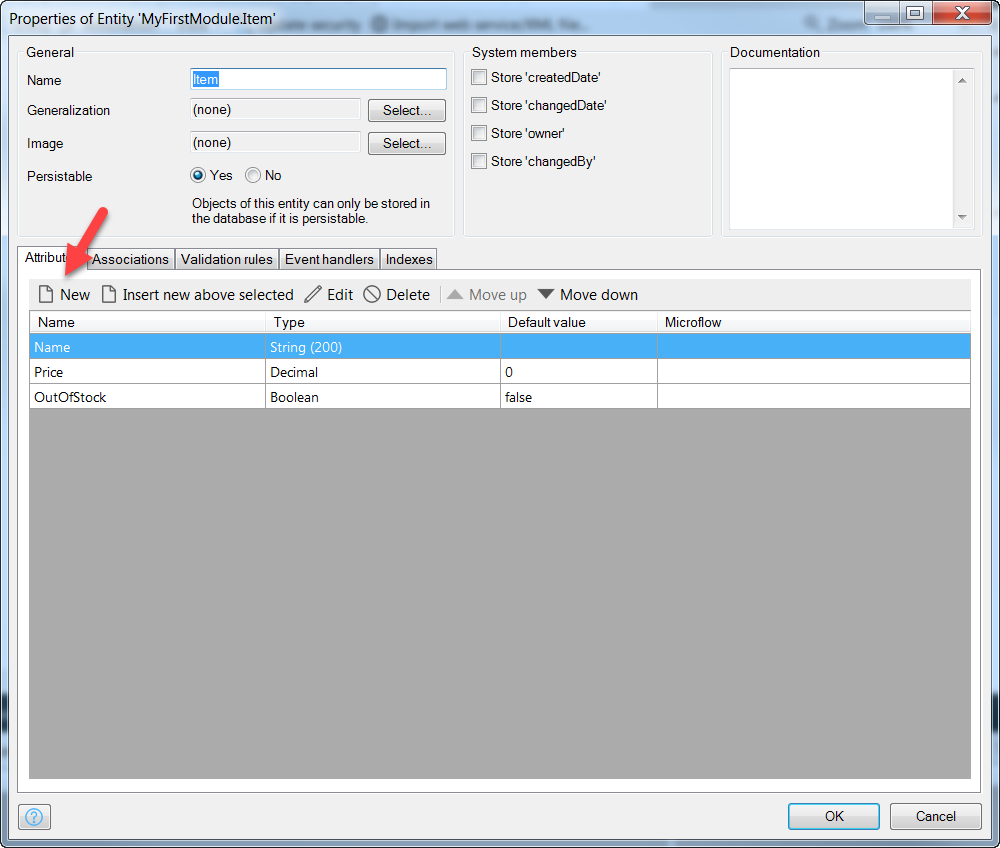
- Name – how the entity will be referred to throughout the app. Mendix likes capitalized values, and no spaces, such as MyEntity
- Generalization – you can base entities on other entities which is similar to object oriented programming inheritance. This feature should be used conservatively because it can incur complexity and overhead quickly. Only use it when you need it.
- Image – I’ve never used this.
- Persistable – You don’t always want to keep your data, sometimes you want entities for temporary use. These will be managed by the app and stored in memory instead of in the database.
- System members – fields that can be tracked automatically by Mendix. I have generally checked these off for main entities.
- Documentation field – these will show up throughout the Mendix UI. If you populate them, Mendix can provide nice Javadoc documentation. It’s okay to leave this blank until your app matures.
- The tabs appearing below these settings
- Attributes – these are the fields of your Entity, they all need a type and have an optional default value, if the value is calculated and not stored, it will use a Microflow to determine its value. More often, you are not using calculated values but calculating them externally since it’s better app design.
- Associations – are references to other entities. These are actually stored like attributes, but Mendix manages them separately because there are more conditions around them, such as how Mendix should behave when an entity with an association is deleted; should the associated records be deleted also? These cases can be specified.
- Validation rules – you can specify that an attribute must be entered, but in most cases it is better to do this through UI functions.
- Event handlers – events such as Create, Delete, Modify, and Rollback can trigger Microflows either before of after the event. This is very useful.
- Indexes – this matters when you have a table with a lot of data
To add a new attribute, click on the New button in the Attributes tab:
We need an objective…
So we’ll create a simple order app to fill out this demo.
We already have an Item entity, we’ll need Order (which is linked to a user account), and also OrderLine, so we can have a many to one relationship between the Item and the Order, and we can also specify attributes like quantity.
But thinking ahead, it’s clear that items will need to be managed separately from orders. So lets make a new module for items. Right click on the Project node in the Project Explorer and choose Add module…
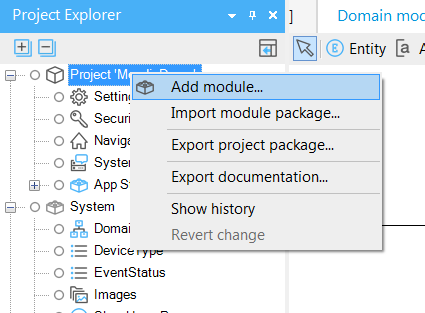
You will be prompted simply to provide a name, so we’ll call it ‘Inventory’.
The ‘Inventory’ module
The new Module will appear in the Explorer, and it will have a domain model ready to populate. You can cut and paste your Item entity into it.
We need a UI to manage the items; create them, modify them, and later on maybe have some other overview information.
Right click on the Inventory module and choose Add page…

Mendix presents a smorgasbord of templates to choose from, and that’s overwhelming. So let’s go with the standard option; choose List in the left-side navigation, and select List Default:
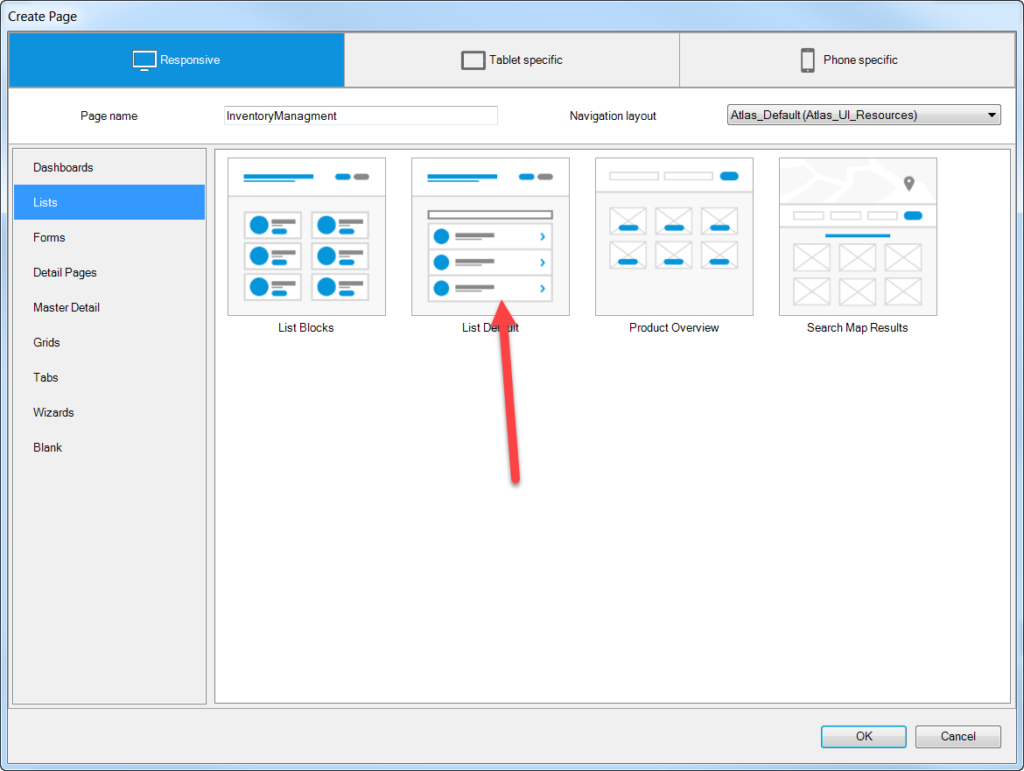
The new page will appear with some default elements like a title, and a paragraph / subtitle. But before you get going, give the page a title in the properties panel! Let’s call it “Inventory Management”.

You can quickly edit the page by giving it title text and a sub heading. Just click on those elements and start typing and it will overwrite the text.
Then delete that content within the box below this, and move your mouse over to the toolbox tab that appears on the right edge of the app, click or hover over this tab and the toolbox pain will appear, filled with (SO MANY) widgets to use on your page.

We’ll use a simple out-of-the-box widget called Data grid, which gives a very standard table presentation of an Entity’s records. Drag it to the region you cleared.
You’ll also notice the number headings over the content regions. These are Bootstap related. Mendix outputs the page content into Bootstrap’s 12 column layout to facilitate responsive web design. This way, the content will wrap as needed, depending on the size of the screen.
Mendix really forces you to adhere to this by requiring columns add up to 12 and telling you when they don’t. But don’t be mad, responsive web design is the inescapable reality of the Internet.
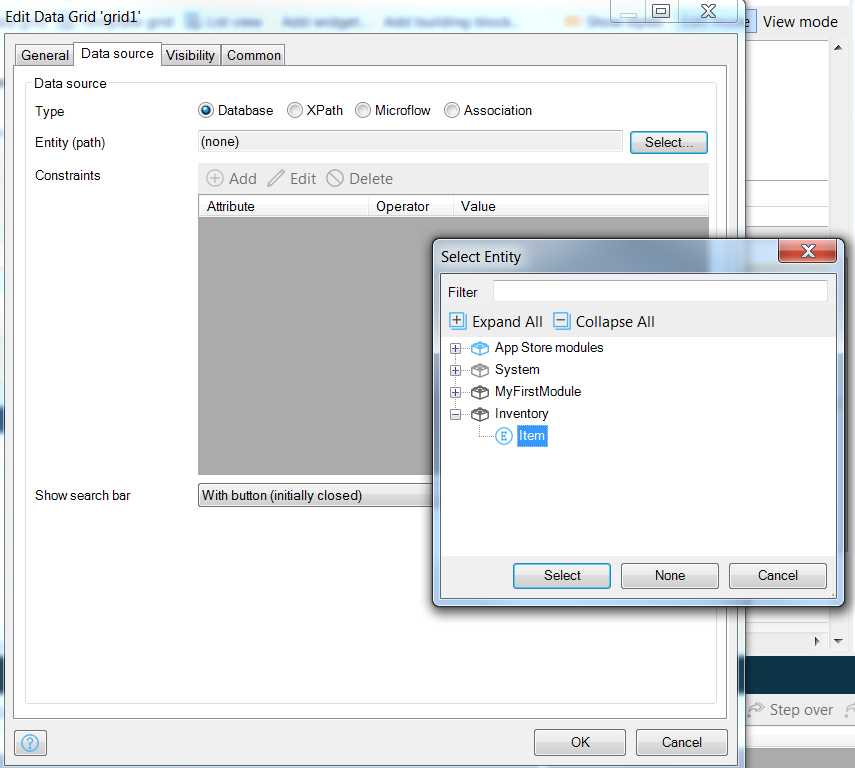
The Widget’s Data Source
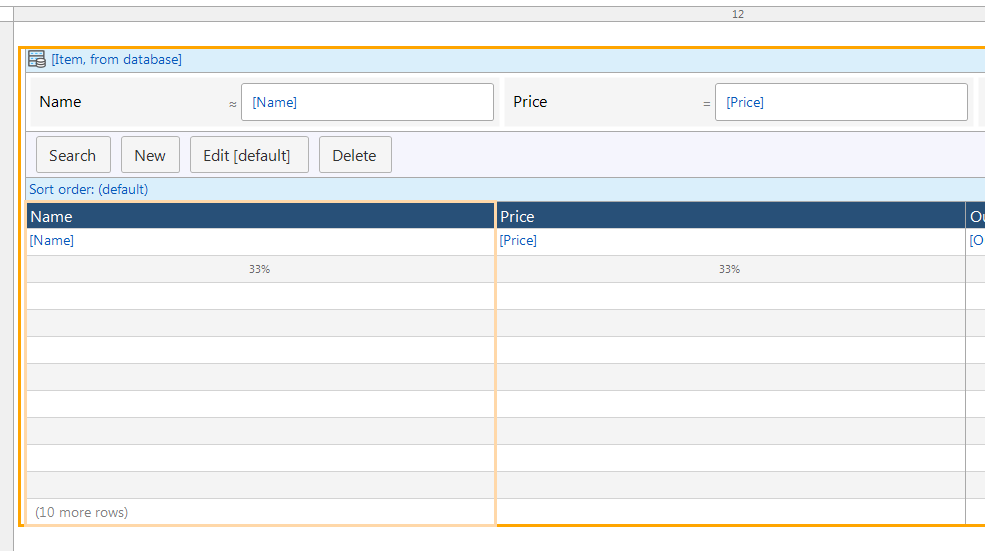
When you drag the Data grid into the box, it will show up in the most general way, with no idea what to display. Double click on it to set its Data source, click the [Select…] button next to the Entity (path) field, and choose the Entity in the Select dialog.
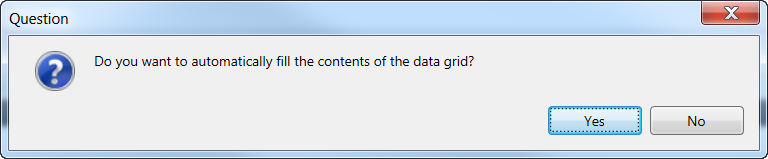
Mendix will prompt you if you want to auto-populate the table columns with the fields of Item. Yes, that’s helpful!
Now the data grid appears with columns found in Item:
The New/Edit page
It’s pretty obvious Mendix has the ability to show a bunch of data from a table in this data grid widget, big whoop. But where the platform starts to shine is how simple it makes creation of pages to fill out that data.
Let’s setup its New/Edit page for Item. All we need to do is right-click on the New button that appears in the data grid, and choose Generate page…

This will give you the page dialog again, this time showing only forms in the left-side navigation, and we are going to choose Form Vertical for a nice vertical display of each field:

This one action will:
- Create the new/edit page that can save the record to the database
- Wire up the New button to launch it in the web app
- Wire up the Edit button to launch it in the web app for an existing record
- No code
Take a look at the page properties by clicking outside the actionable area of the page (either the darkened region above or the blank region to the right). Otherwise you will may be looking at the properties of a selected element.
With the page properties showing, look at the Layout field.

The page layout it’s using (Atlas_Default) will cause the web application to open a new page when the item is created or edited.
It would be a better UX to just have a popup since Item is not a complicated entity with many fields and logic. If you click on the page layout’s value, you can select a popup layout.
Find PopupLayout in the Select dialog:
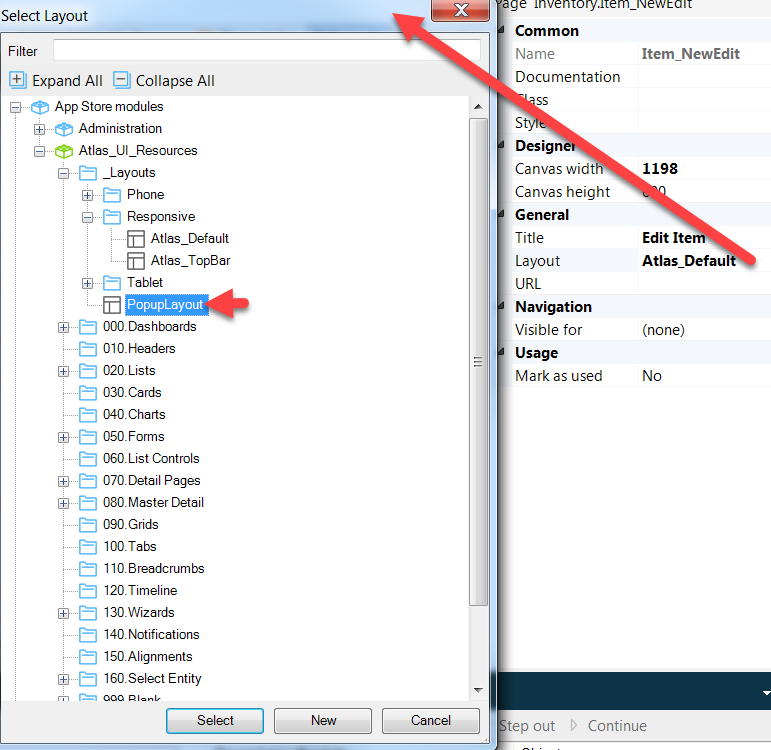
Use the Filter search to make it easier to find
Also, edit the Canvas width and height properties so that our popup is reasonably sized. The popup layout will scroll the content if needed, but we’ll be fine with the minimum Mendix popup layout size: 600w x 500h.
Save All, and we can test run the app!
Building and running(?)
Go to the Run button at the top center of the app menu, and select Run Locally. The project begins to compile…and finds some errors.
You can look at these in the Errors tab that appears at the bottom left of the application. Double click on the error and it shows you the context.
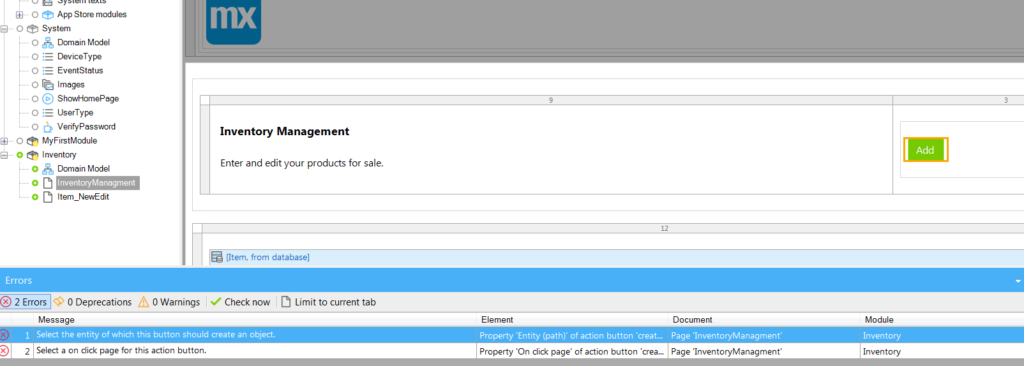
One problem is that the Add button we left on our Inventory Management page doesn’t know what to add. We have to tell it the entity. Right click on it and choose Select entity… and choose Item from our Inventory module. The other error is it doesn’t know what page to use for adding a new Item. Conveniently, we can use our Item_NewEdit page which Mendix helpfully generated. Find it under the Inventory module and select it.
Now you will see that all errors are gone. Let’s try running it now.
Go to the top of the business modeler, in the middle of the menu select the drop down next to the Run button and choose Run Locally from the drop down:

This will cause Mendix to build the application as a local Apache web server, and initialize that server so we can see it in our browser on localhost.
Note: the other Run option sends our build to the Mendix development cloud to be hosted, which is also fine because we don’t have to pay for hosting until we want to deploy our app to a dedicated hosting node.
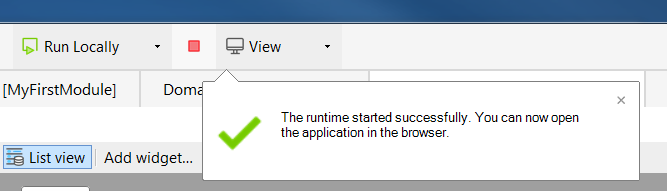
Your app should now build with no issue, but you will need to wait until the web server is up and running (Mendix builds and runs an Apache server for each app), and it takes time.
Also, the first time you successfully run your app, Mendix will ask if you want to create a default database for it. Of course you do!

After a little more building, it will prompt you that it’s ready to show itself. You’ll know because it will tell you:
There are options for Viewing so that you can see your app behaving as it would on a mobile-sized screen, but usually we’re going with the Responsive Browser:
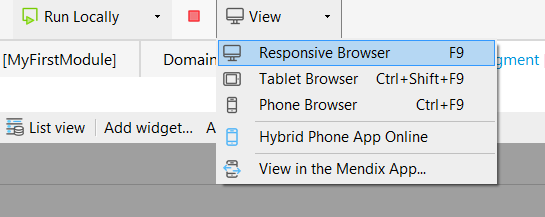
This will launch you browser and show your running app.
First run of your app

We need to make our new page available.
Navigation needs your new page
We have a page to create and edit items, or so it appears we do, but the user currently has no way of getting to your Inventory Management page.
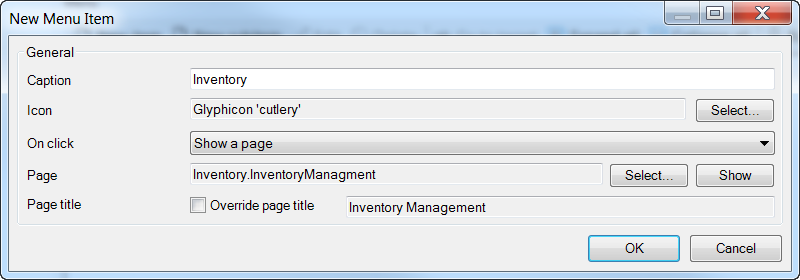
It must be added in the Navigation node under the Project node:

On this screen click New item under menu, and add the following, selecting your Inventory Management page:
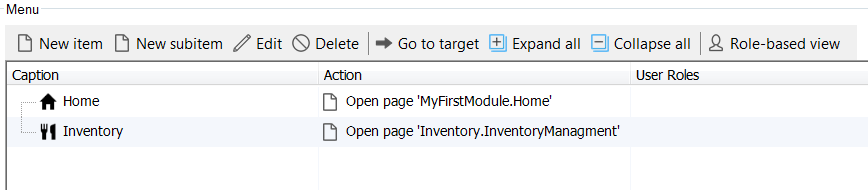
Now our Navigation Items list will look like this:
Save all changes, and build/run it again by click Run locally.
Using our Inventory Management screen
Now when you run the app, your new navigation item will appear. And when you click it, the page will:

Click the green Add button or the New button to add an item and the Item New/Edit page pops up, ready for settings:
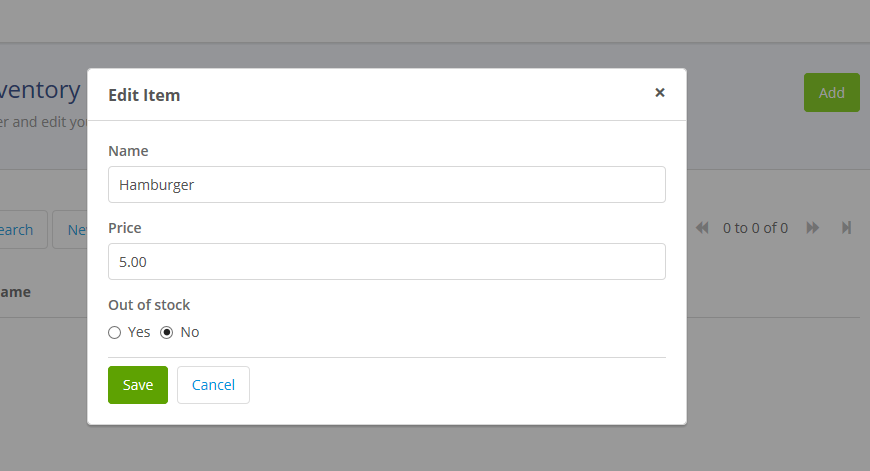
Set the Name, set the Price, set the In/Out-off Stock, click Save and our item is added to our inventory:
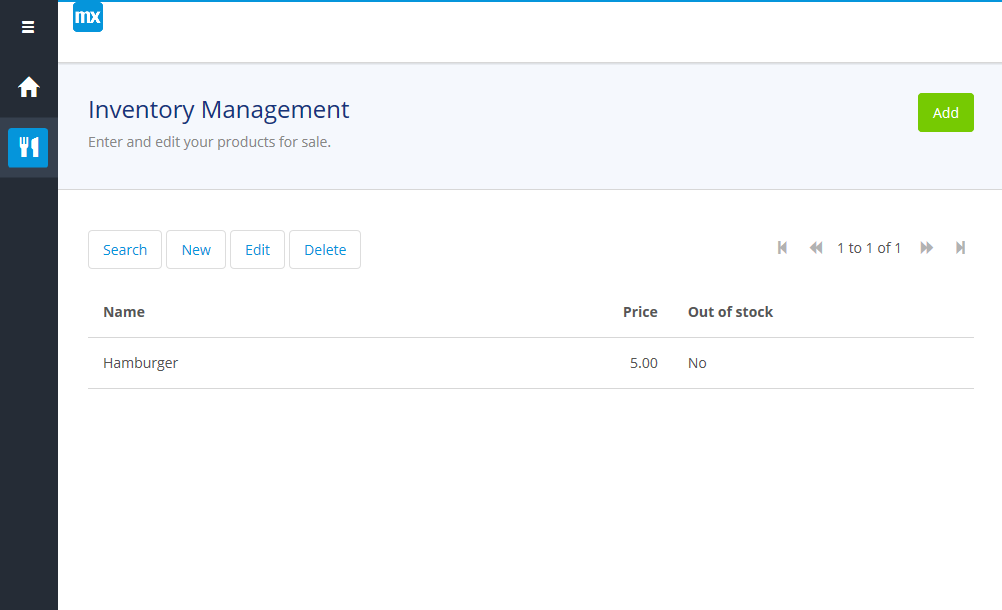
Let’s add more items:

To edit an item, click it and click the Edit button:

Recap of Part 1
You can probably imagine easily some problems with the setup as is.
- First of all, only certain people should ever see this page (that’s were security roles come in).
- Secondly, what if a lazy employee adds a duplicate product (validation rules)
- Thirdly, what about tracking changes made to the product (more app/data design needed)
…And so on. These are important questions that you should be asking in order to make a better app. But we’re not going to cover them here.
In the next part, I will build the Ordering functionality of our app which will allow you at the very least to handle the IT needs of your fledgling burger business.
We will cover associations, Microflows, nested data widgets, and data source constraints.