Mendix is growing as a utility for managing transactional information, and naturally, the business wants to know how those transactions are shaping the business. They’ll want reports, and they’ll even want reports of reports.
If you use Mendix for any capacity in your business, it won’t be long before you are asked to provide reporting capabilities of the data.
A quick note about the Export to Excel option
Before I get started with the methodology of preparing data for reporting, it should be noted that the simple Export to Excel function provided by the Data Grid control usually suffices. And it’s the right place to start when the business is unsure of their reporting needs.
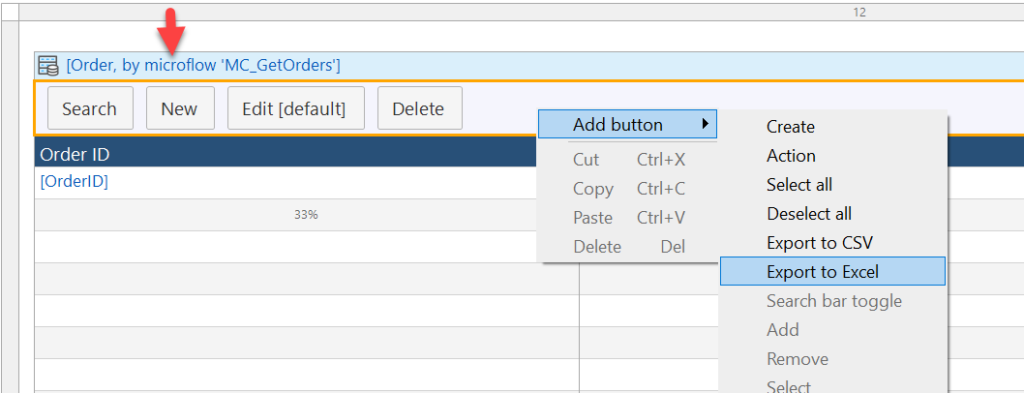
To use the Export to Excel function, you need to create a Microflow that gets a list of your objects, and provide that to a Data Grid control as the data source. Then you will see the option becomes available in the context menu of the button bar:
Once your needs outgrow Excel imports, you’ll want a setup that can facilitate reporting tools with data on demand…
Flatten the data (but not all of it)
The first thing to impress upon you is that it’s a terrible idea to provision your apps data as is. Should you embark on this fool’s errand, you will find that the time saved in getting the data into Tibco Spotfire or Microsoft Power BI becomes time spent trying to untangle it.
One reason is that it is all-but-certain that your app’s data model has associations that do not export well.
Another reason is that some of those tables don’t really belong as separate entities in the sense of reporting. A lot of them could be boiled down to columns on the parent table.
And sometimes the problem is the column values themselves aren’t good for reporting and need to be transformed in some way to be useful for analysis. This could mean applying a filter, or deriving a symbolic value, such as a business quarter, rather than a raw DateTime value.
Finally, there may be additional values you’d like to add to the report that don’t really belong in your app’s data. Maybe it’s as simple as applying a global label to your extract so that it can sit alongside other extracts.
Anyways, I think I’ve made the point that you are not looking to extract the master data–you want to make a copy of that data and flatten it.
You may disagree with me by the end of this walk-thru, after seeing the work we put into it, but experience tells me that producing reports from apps is and should be a task worth additional time and effort, and not simply a switch you flip on. And, once you’ve provided the data for reporting, stakeholders should understand that it requires maintenance and continued effort to change reporting capabilities.
Reporting considerations
We’re looking to stage the data before sending it out. This entails a few considerations:
- How often does the data need to be reported on? Usually, the business will agree to daily if steered in that direction. There is rarely a need to have more reporting than daily. Weekly should be fine for most uses, but the business will not always agree to that.
- What tables is the business interested in? Don’t ask this question out loud, ask it to yourself as a developer, what are the main tables in the app. Then be prepared with that list if the business asks you what they can get. But it really makes no sense to export everything your app stores.
- How far back is the business expecting to see the data? This has implications for the performance of preparing the data. If the data accumulates over a year’s time and you don’t put any limits on what you’re pumping out for reporting, you will face performance issues when you prepare the data. A year’s worth of data is usually acceptable, but it depends on the situation; you could be dealing with a large mass of data that was never reported on. In any case, you want to find ways to limit what you’re preparing for export.
In terms of how often the business wants the data for reporting, we’re going to use a Scheduled event in Mendix to make that happen. Similar to Schedule Tasks in Windows, AKA crons or cron jobs, you want to be doing this in the off hours of the day because making a copy of the data is not a cheap operation.
Data Staging
For this example, I am going to return to my Burger Stand App, which had Orders, OrderLines, and Items. It’s a very simple use case, but it’s suitable for our purpose.
We’ll house our data for reporting in its own module. Let’s call it DataStaging.
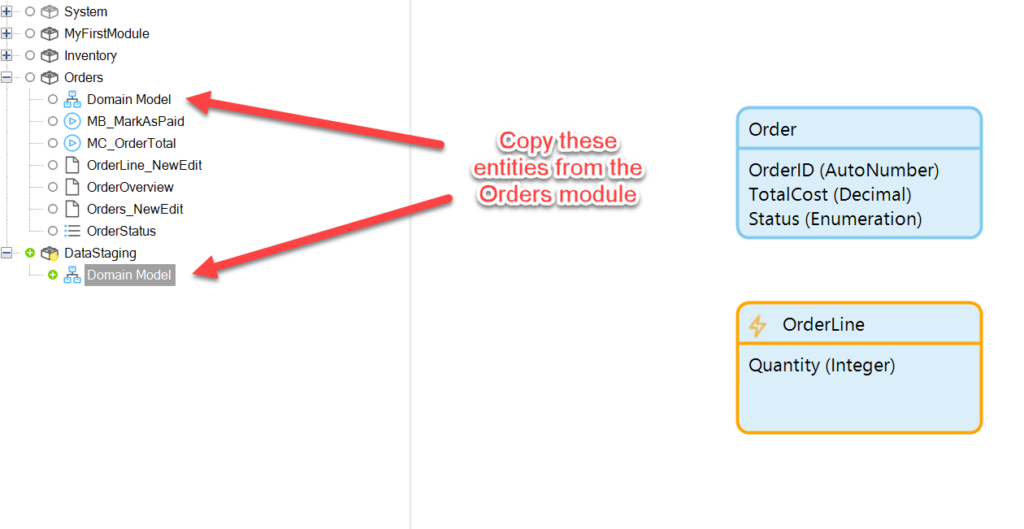
We want to copy the entities of interest out of their modules and into the new DataStaging module:
There should be no associations, validation rules, or event handlers in this module; we will delete all of these from entity copies:
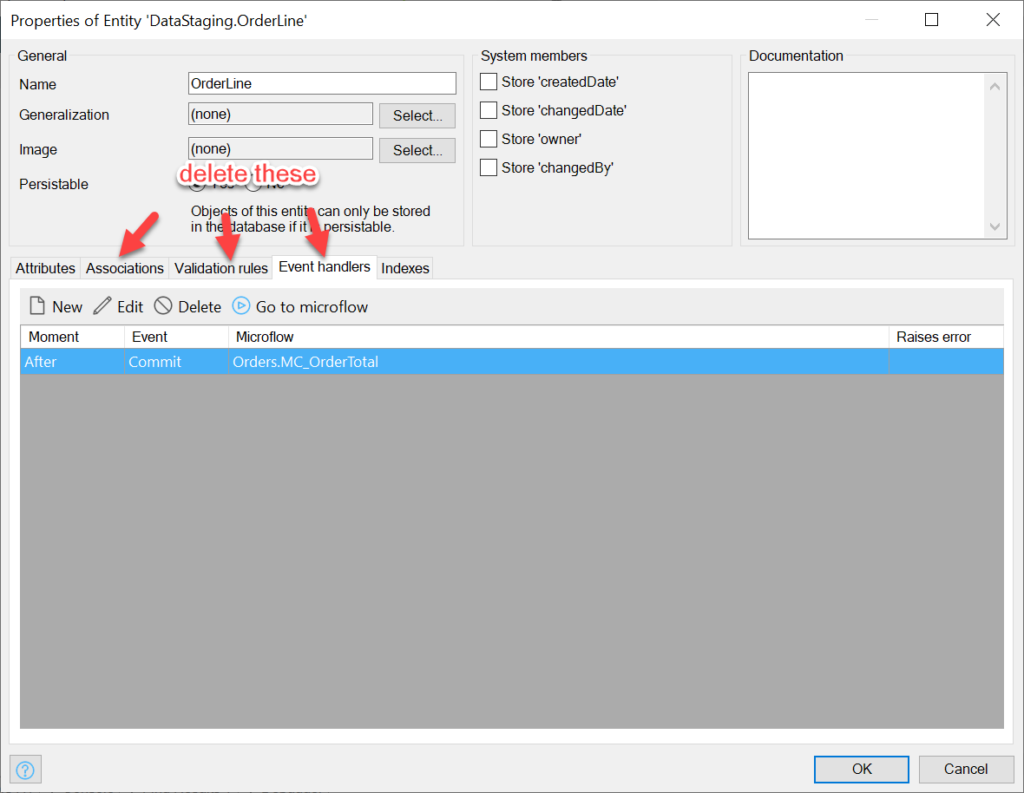
Then we will rename the entities to help distinguish them from the original data. I like a convention here, like Report<EntityName> or CopyOf<EntityName>.
We also need to provide an ID field so that we have a way of reforming the associations in the reporting tool. If a main entity table already has a unique identifier, it’s all set, but the children entities will need a field to refer to their parent entities, and it should be of the same type as the parent Id (string, long, etc). So I am going to add ‘OrderID’ to my ReportOrderLine entity:
We’re also interested in the createdDate field of the original data, so we have to make a copy of that field in our copy entity because Mendix won’t allow us to set an entity createdDate field directly.
Your staging entities should look like this:

In the app, each OrderLine refers to one Item entity. This is a good opportunity flatten data by copying the Item fields into the ReportOrderLine entity.
It’s easiest to simply copy the Item entity into the Data Staging module, and then copy and paste the relevant fields (Name and Price) to the ReportOrderLine entity:
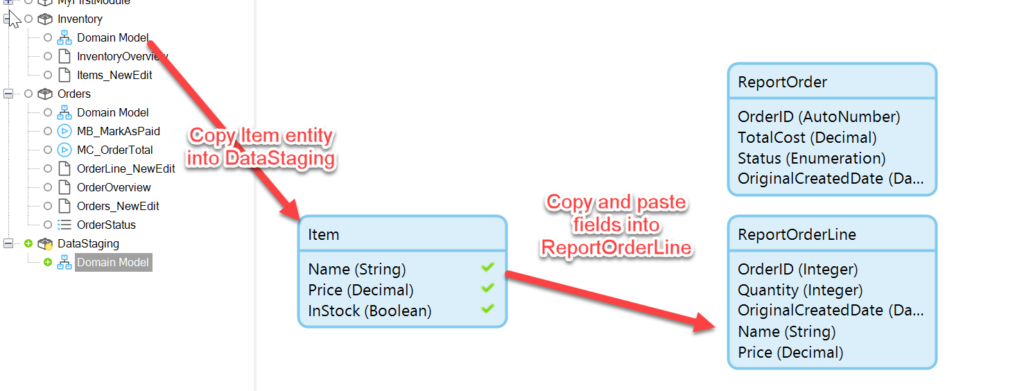
Once the fields are copied, they should be renamed to ItemName and ItemPrice. Then the Item entity can be deleted from the module.
Finally, change any AutoNumbers to Integers.
The result:

Copying the data to our flattened model
We’ve prepared a model for our master data to be flattened into, and we need to perform they actual copying of the data. We will make a Microflow that can then be scheduled to run at a interval.
In our new DataStaging Microflow, MF_PrepareReportData, the first thing we need to do is clear out existing report records.
Note: the only reason you would not want to remove them is if there is a need for the report data to always be available, and the absence of data during the brief time when the new data is being prepared is not acceptable to the business. In this case, you would need to iterate through the existing report data and change it, instead of removing it out-right. But that’s a lot more work, so hopefully you won’t need to provide for this scenario.
We can remove the existing records by first retrieving all of them from the database with a Retrieve action:

…and then deleting them with a Delete action. We do this for both ReportOrder and ReportOrderLine (for every report entity you have):

Now, we’re going to retrieve a year’s worth of Orders. To do this, we first create a variable with the Create a variable action, and then set it to be a date time type with the following value, which is the current time minus 356 days:

[%CurrentDateTime%] is a system defined dynamic value which holds the current time
Now we use this new variable in the XPath expression of the Retrieve action of Orders:
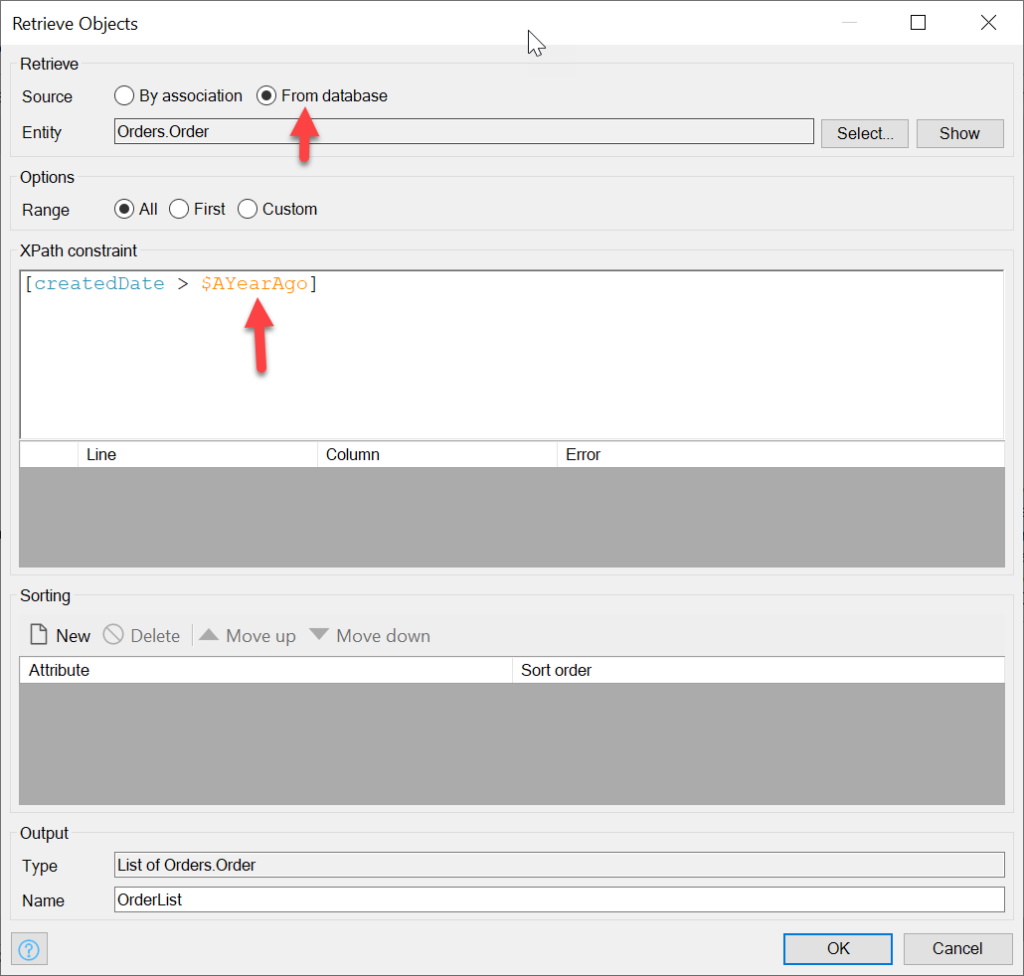
We will loop through the resulting list of Orders, and for each one, create a ReportOrder. Add a loop from the toolbar and set the Iterator variable to point to the OrdersList which you created with the Retrieve action:

For each Order, we create a ReportOrder, and we’ll need to copy to each field the corresponding Iterator’s field (make sure to Commit the new ReportOrder):

We also need to add logic within the same loop for the OrderLines; we need to use the context of the IteratorOrder to retrieve associated OrderLines. Additionally, we need to retrieve the item for each OrderLine since those fields will be going straight into our ReportOrderLine record.
In short, we need to make our loop bigger.

In our newly renovated loop, we’ll add a retrieve following the Create activity, and we’ll set it to retrieve by association the OrderLines associated with IteratorOrder:
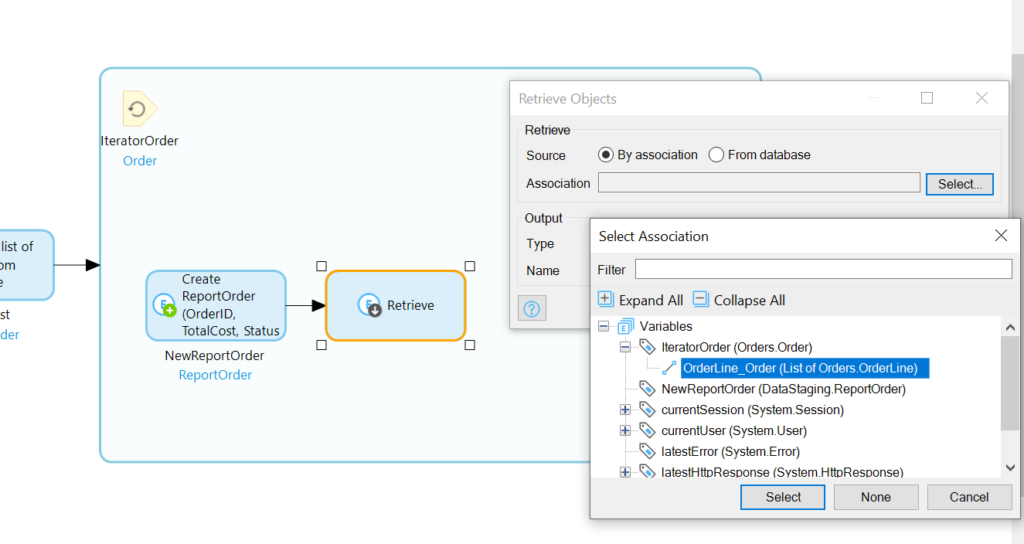
With the OrderLines of the IteratorOrder retrieve, we’ll need to loop through those:

Inside the sub-loop, we need first to retrieve the associated Item:
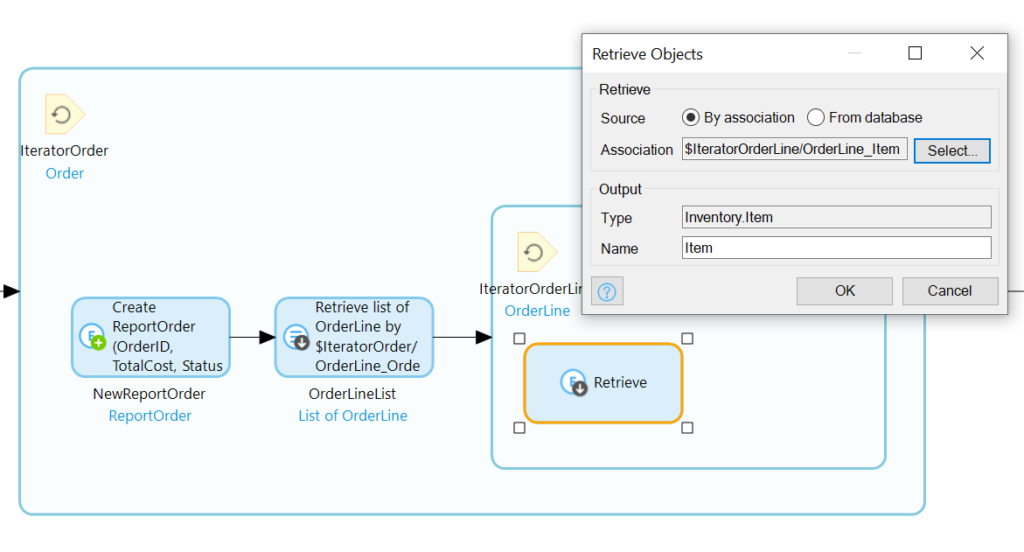
Now we’ll stuff the info from IteratorOrder (the OrderID), IteratorOrderLine (the Quantity), and Item
(Name and Price) into a new ReportOrderLineRecord:
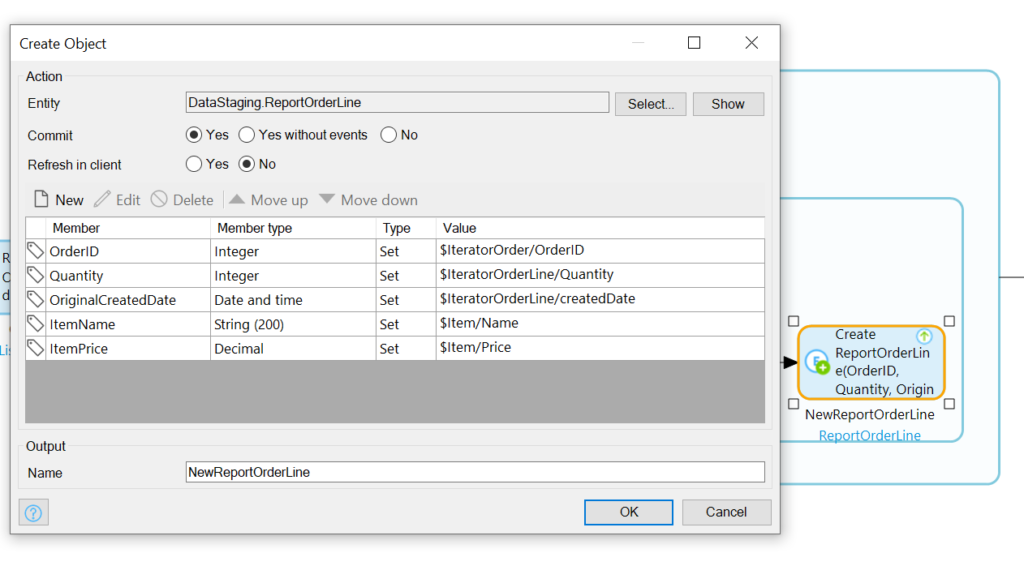
Phew! We’re done with the Microflow.
Testing the Microflow
Before we schedule the Microflow, we ought to, perhaps, and I’m only thinking out loud here, maybe considering testing it?
Additionally, it makes a huge amount of sense to have a button somewhere that can trigger this function, in case the business has an urgent need run a report.
We can add such a button on an Overview page in our DataStaging module:
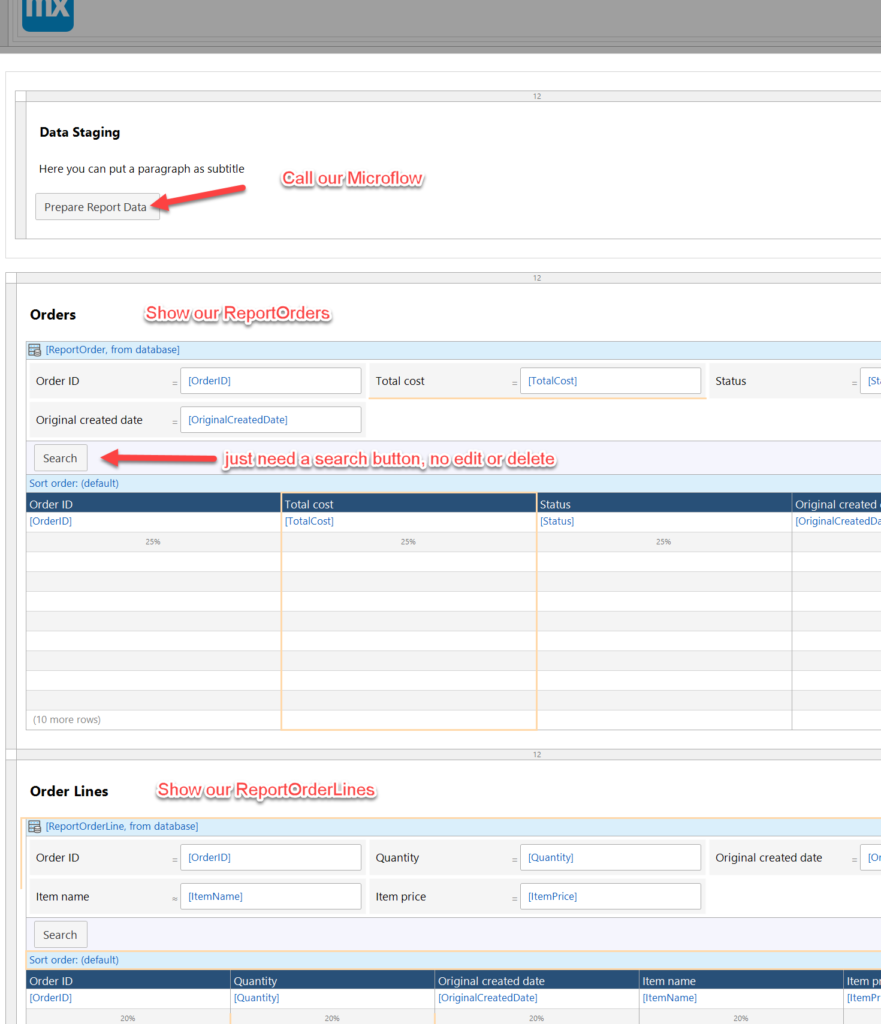
When you click the button you will need to leave the screen and return to see the data it produces because we did not cause any refresh in clients in our Microflow logic.
Scheduling the Microflow
We want the Microflow to run daily. In Mendix, this can be achieved with a Scheduled Event.
You can add a Scheduled Event to your DataStaging module by right-clicking the module and selecting Schedule event from the ‘Add other’ menu.
The key fields are the name of the event (I like the EVT_ naming convention), the Microflow to call (it’s going to be our MF_PrepareReportData), and the interval (repeat 1 Day). And note the timestamp too, set it for off hours. I’m on -4 hours Eastern Daylight Time, so I’ll set it to 4 AM UTC to have it run at midnight:

Enabling the Event on Mendix cloud
It’s critical to ensure that this scheduled event is enabled once the app is deployed to Mendix Cloud.
You can find this setting under Environments, and then choose Details of the environment, and go to the Model Options tab:

OData
The out-of-the-box OData resource offered by Mendix works well for options such as Spotfire.
It’s simple enough to setup, too.
We need to add a OData Published Resource, via the Add Other resource menu:

This resource needs a few configurations.
The General tab of the settings will show you an example of the URL to access in order to get at the data. It’s important to point out that this URL will depend on where you deploy your app (Localhost, Sandbox, Test, Acceptance, or Production enviroment):

Since I’m just working locally now, I’m going to be using the URL as is. Probably you will want to use the production URL of your app, followed by the /odata/<Published OData service name>.
In the Resources tab, you have to specify that you want to publish the ReportOrder and ReportOrderLine entities by adding them as Published Resources:
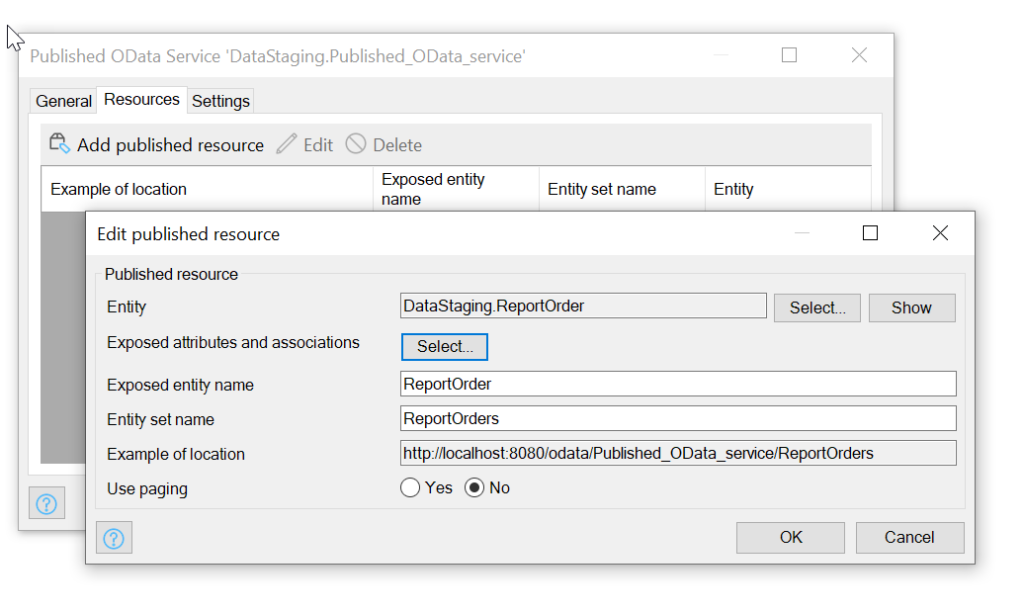

When the app is running, we can provide this OData URL to Spotfire or other reporting suites.
Looking at the data in Spotfire
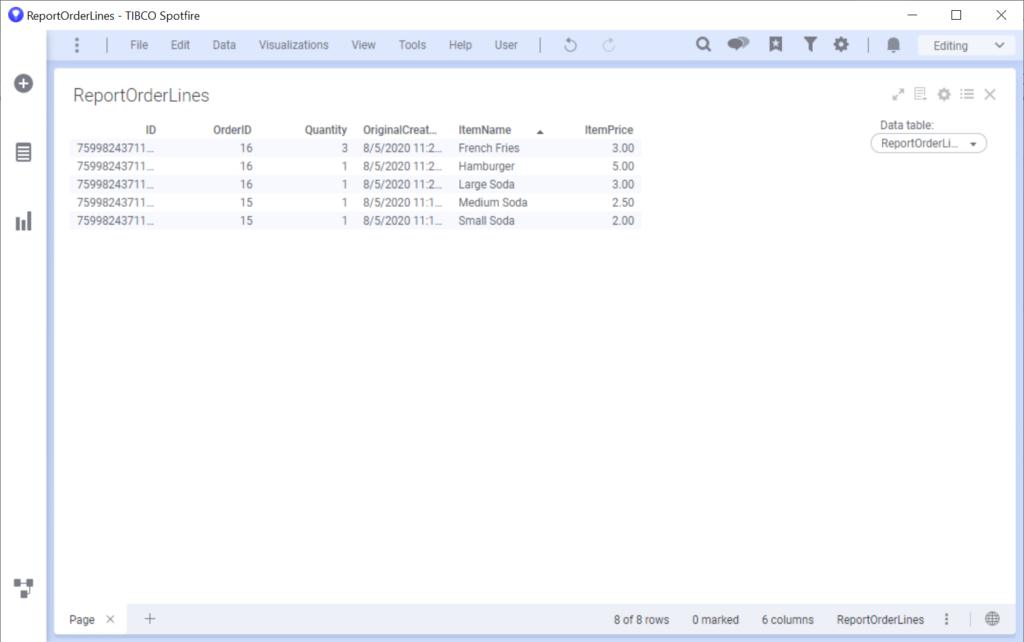
Using Spotfire is well outside the scope of this little article, but I wanted to show you the fruit of our labors.
In Spotfire, you want to add a new Connection and choose the OData option:
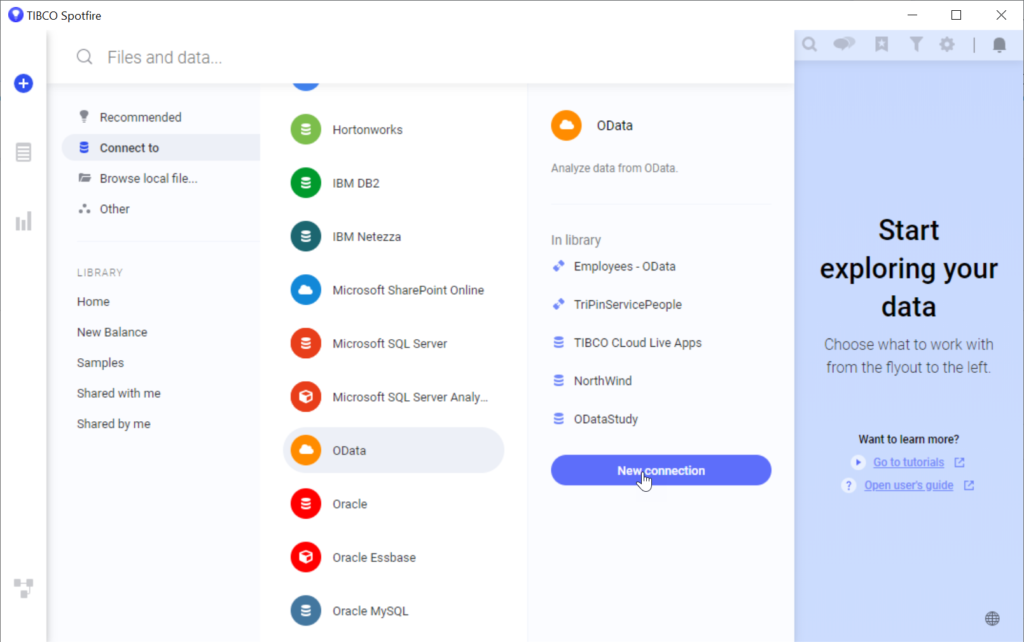
In the next step you’ll provide the OData URL of your Published OData Resource, and also any credentials you setup in the Security tab of the Published service settings:

If your connection is working you will be given a list of tables to pull from. Since we went through the effort of distilling our data to only the tables and info we want to report, this step is quite easy: choose all of them:

We can create a report by adding the data tables to our analysis:
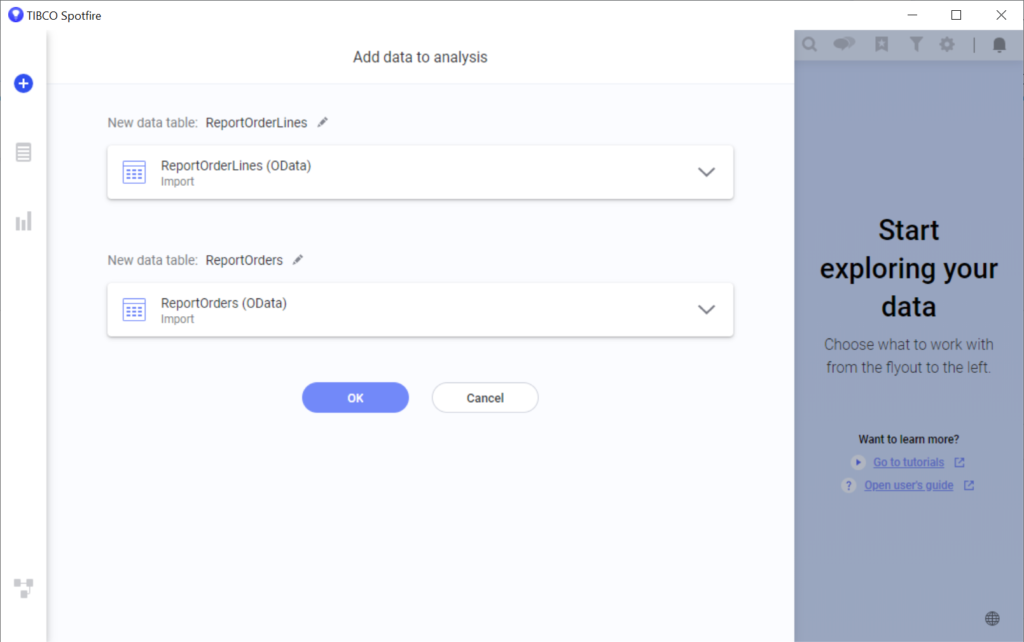
And behold, our data:
