In the first part, I covered the essentials to getting started with the rapid web application development platform known as Mendix.
We’re going to expand out the app we started in the first part, and explore new concepts with it, such as Attribute Associations, Data grid columns, and Microflows.
Let’s get going!
Orders module
It’s good to divide your app up into different functional areas using modules. Modules incur no performance hit or overhead, they are simply a grouping of the various functional parts of your app.
Each module will have its own domain model, but that doesn’t mean we can’t reference entities in a different module’s domain model, it simply helps us organize something complicated: our application.
To create a new module, right click on the Project node in the Project Explorer panel:
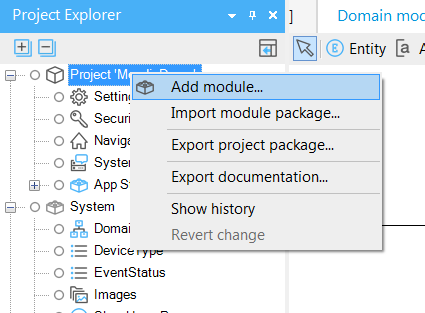
Name the module “Orders”.
Now let’s open up the Orders domain model and add an order entity with the following attributes:

Note on the OrderNumber attribute, we don’t need to create a unique id for each entity, Mendix does that behind the scenes, and manages all the associations that go along with it. However, in this case, it makes sense to store an additional ID, like a deli counter number so that we have a quick point of reference for our order.
In other cases you may have a unique identifier already as part of your process, maybe its an alphanumeric string. No problem, you can add it and put constraints around it, but Mendix will still store a unique numeric id behind the scenes in the application database.
Note: Mendix uses HSQL as its default database, however, this can be reconfigured to point to another kind of database such as Postgres, etc.
By using the AutoNumber data type, Mendix will create an auto-increment number field and increment it each time it creates a new instance of that entity.
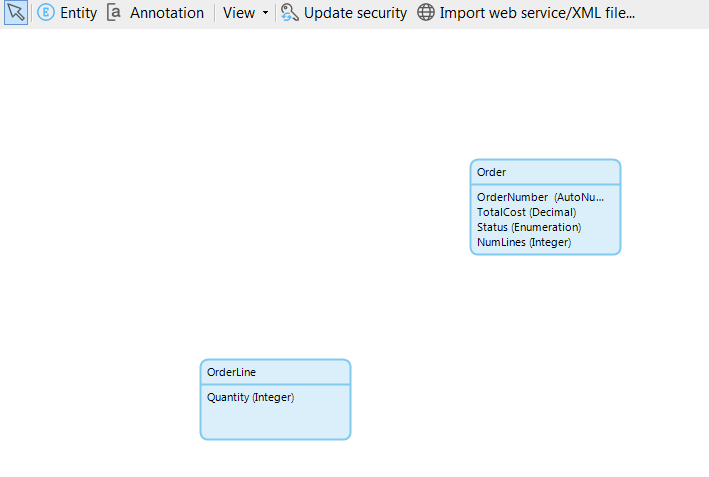
OrderLine
We have an Item entity, and we have an Order entity, and we need to associate the two, but let’s think about this: we need another entity that records the association from the Order to the Item. We need OrderLine because an Order may or may not be associated to an Item, and there will likely be additional data such as Quantity, and other fields that qualify the order’s relationship with the Item.
So lets start with the simplest concept of an order line:
Associating two entities
Obviously, OrderLine is going to be associated to Order, but the direction matters because it implies the child->parent relationship. Since OrderLine is the child of Order, let’s create an association by hovering the mouse over the edge of OrderLine, then clicking and dragging to Order:

Double click on the name of the association, which defaults to <ChildEntity>_<ParentEntity> (in the case above, it’s adding a 2 because it knows I did this already), and the settings for the association will open in a dialog window:
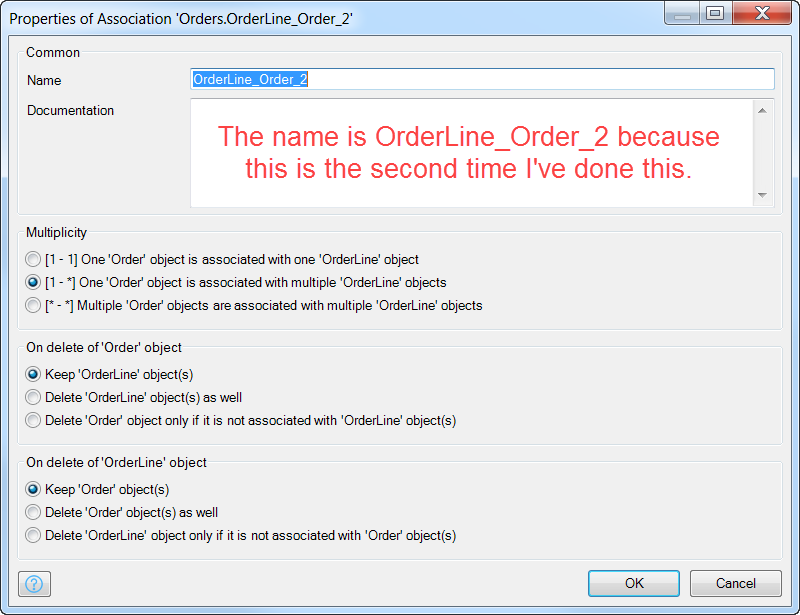
The Multiplicity of the dialog is the most important part. Since we drew a child to parent relationship, it defaulted to “one Order object is associated with multiple OrderLine objects”, which is true.
The delete behaviors are also worth noting. How should Mendix handle related data when part of that data gets deleted?
Well, it’s usually a better practice not to delete database records. We can always flag them and exclude them, and this is a better way, but if you have a good use-case for actually deleting the records, you will need to consider Mendix’s association deletion behaviors.
OrderLine to Item
We need another association to our Item entity, which lives in our Inventory Module. This time, many order lines will refer to a single item.
We can’t draw this association as we did above, but Mendix has another way to create associations; double click on the item go to the Associations tab, and click New:
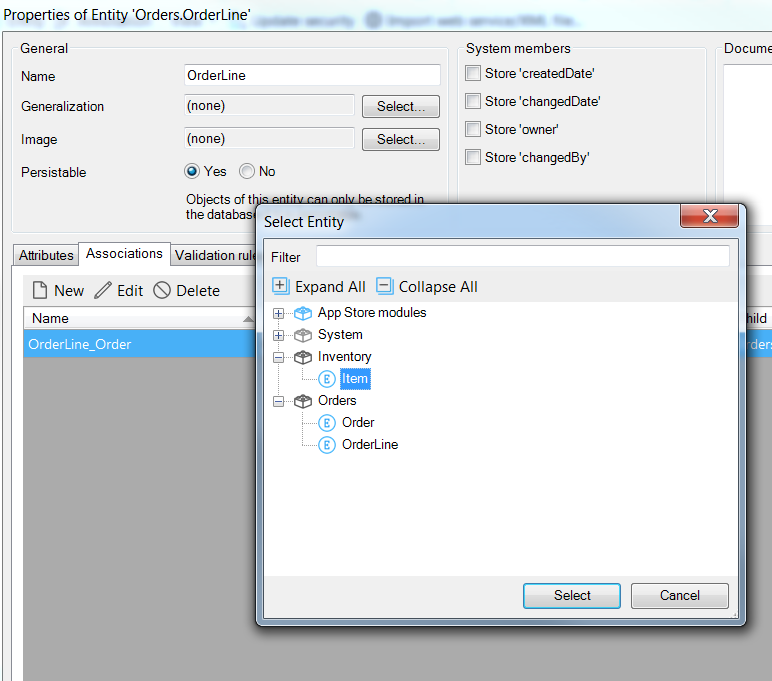
The Select Entity dialog will pop up as soon as you click New, and you can navigate to your Item entity under the Inventory module.
When the new association appears in the Associations list, you can double click on its name and edit the Multiplicity to be [1 – *]:

Our Orders domain model draws a line from OrderLine going off the screen because it is referencing another domain model’s entity:

Simple though it may be, this is all we need to get going on our UI.
A UI for taking orders
Add a new page to the Orders module, and call it Orders_Overview. As before, remove that junk content that it creates with:

Don’t forget to set a page title in the Page properties!

Add a Data grid widget to the region you emptied, and associate it to the Order entity:

Mendix will again offer to populate the Data grid columns for you based on the attributes it finds in Orders, you will, of course, agree, and the result will look like this:

We don’t need all the search fields, just Order number and Status will do fine:

OrderLine’s New/Edit page
Same as before, we want to auto-generate a New/Edit page for order by right clicking on the New button and choosing “Generate page…”
Select from the layout from the dialog’s form options:

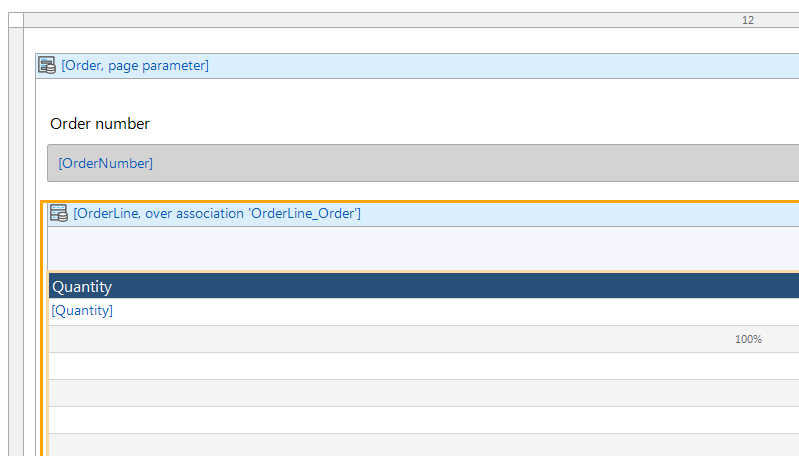
Remove most fields from this page except for the OrderNumber AutoNumber (which can’t be edited anyway because its a read only field). And add a data grid.
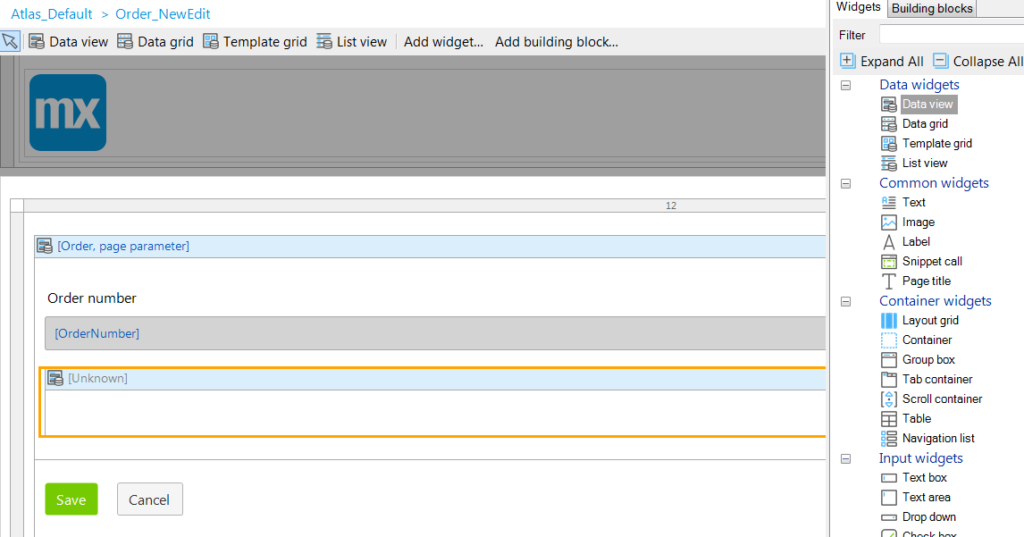
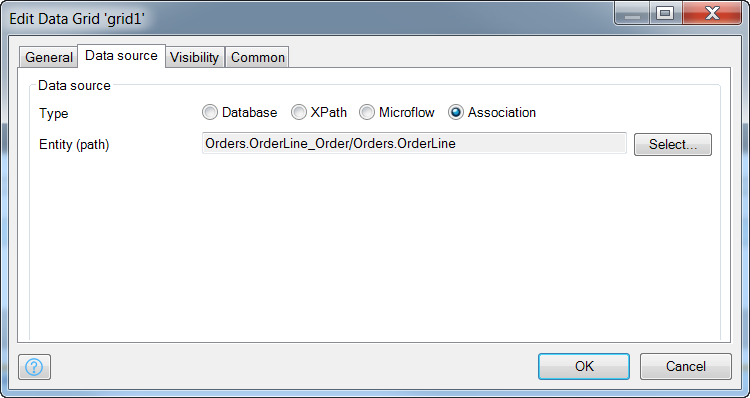
In the data source tab, specify Over Association, and select DataLine, this will instruct the widget to only display OrderLines associated with the Order for which the page was opened (a new order or edited order).
When you click okay, and say Yes to the prompt about automatically filling the grid’s columns, you should see the single attribute belonging to OrderLine, Quantity:
You’ll need to add columns related to Item, which are over the 1-to-1 association between OrderLine and Item. To do this, first add a new column by right clicking on the column header line, and the choosing Add column left or Add column right:
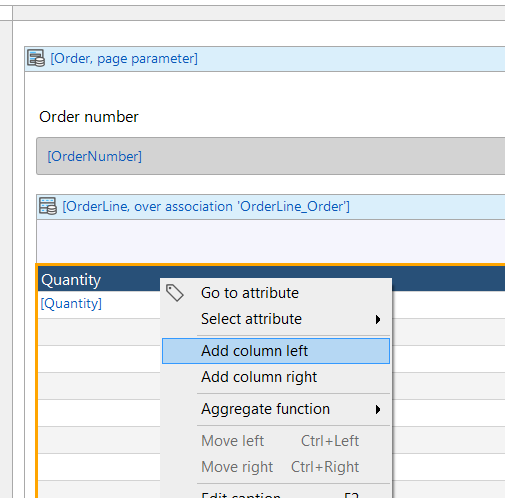
Right click on the new column and choose Select attribute, then you will prompted for the caption of the column and the source of information you want to add, which is specified as the Attribute (path).
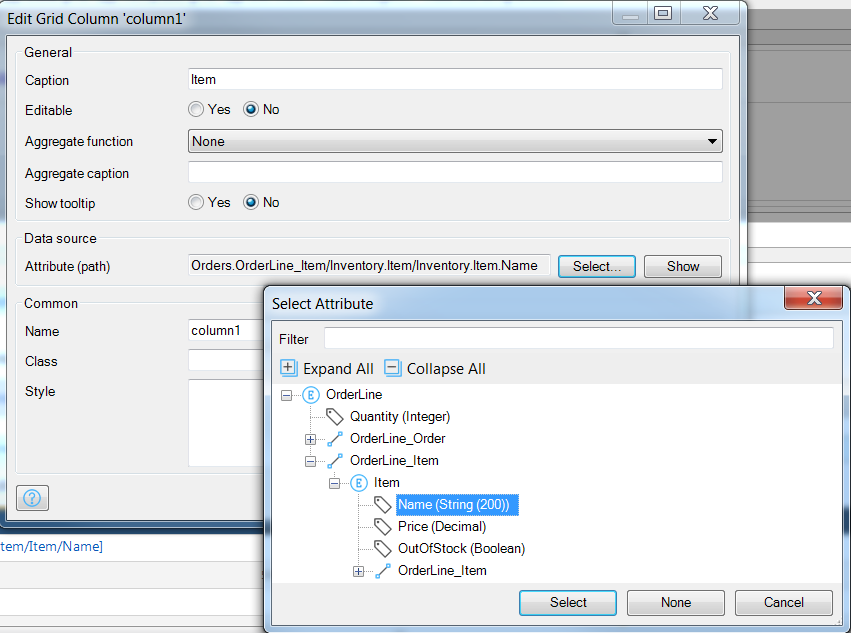
Go ahead and add the Price attribute to the data grid as well.

You’ll notice that, unlike the Data grid widget with a Database Entity source, the data by association doesn’t have any buttons out of the gate.
We will make them.
Right click on the gray “button bar” above the data grid column headers and select from context menu Add button > Create. Now our New button shows up:
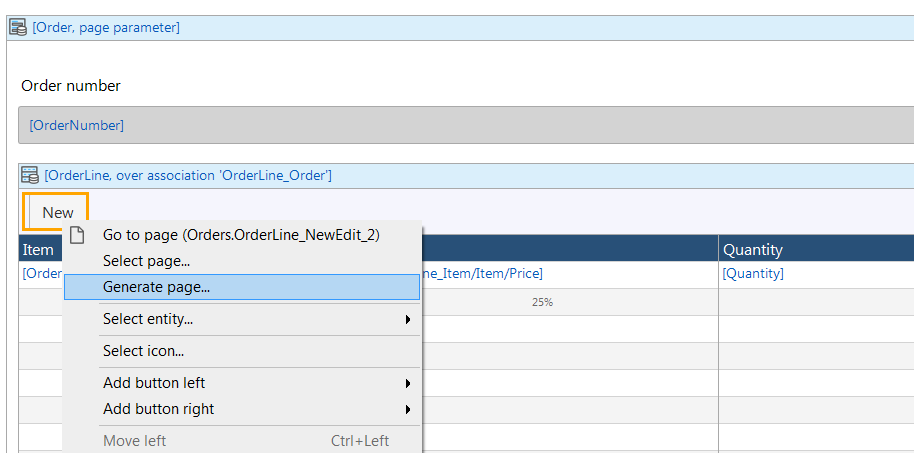
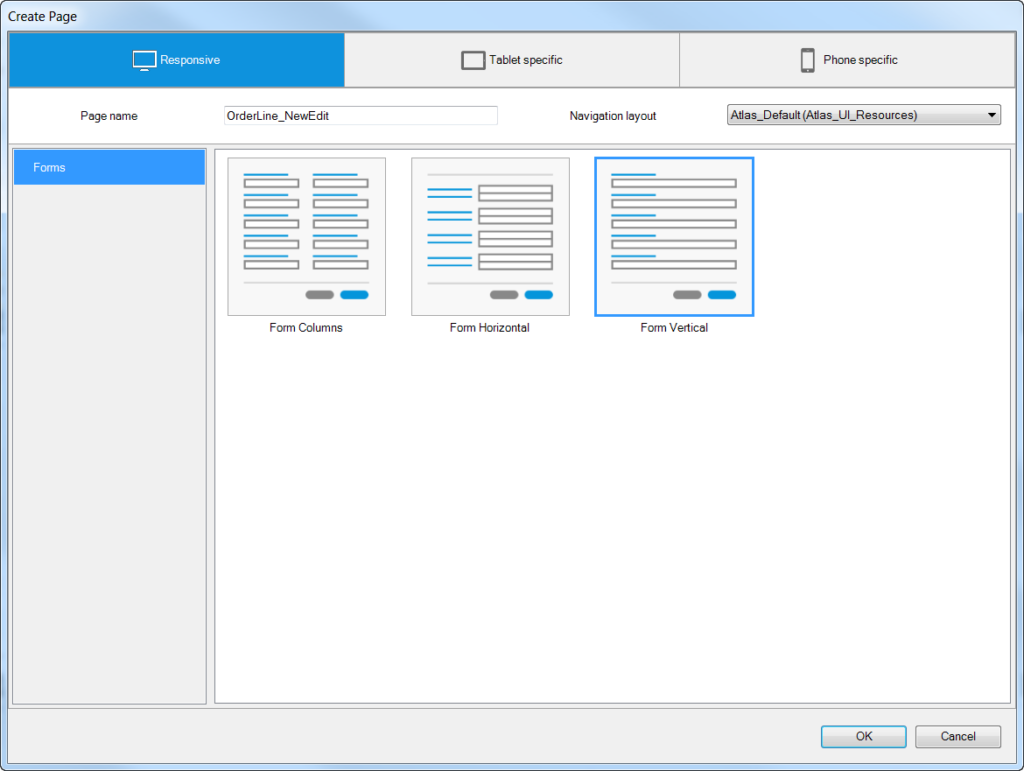
On the New button, right click and choose our friend “Generate page…” and choose the page layout from the list of form options:
Now this result is interesting:

It created a form with Quantity from OrderLine, and Name from item, which is convenient. It chose the Name attribute because that’s the first string attribute it found on Item, and it knows it needs to give you a selection for Item because OrderLine has an association.
You should probably drag Item above Quantity though. Also, change the page layout in the Page Properties panel to be PopupLayout (Canvas widthxheight of 700×500 is good).
Now let’s build and run our program…but before we do, two last things…
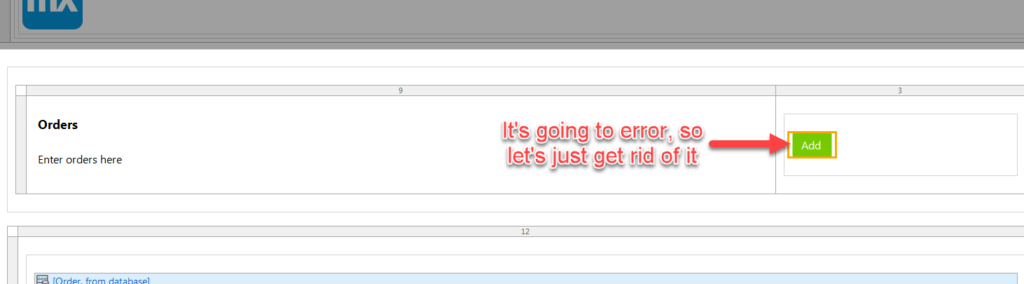
1. Get rid of this Add button on our Orders page because it doesn’t know what to add, and it’s not all that useful.
2. Remember to add an option in the Project Navigation for our Orders page:

Build and run
When you run the app, you will be prompted to synchronize the database because you added new entities. There is no sane reason for not doing this.
With the app built, and running, click on our new Orders navigation option, and click the new button on the Orders page.
Then, on the New/Edit Order page, click the New button above the OrderLine data grid.

You are presented with our current inventory of items.
However, when you save the order, and return to the Orders page, you will see that there is some missing functionality: Total cost is not updating. Also, there’s no option to pay for the order.
We’ll return to total cost. Let’s tackle the pay option first using a Microflow.
Microflows
If you’re a developer, let’s get some frustrating realities about Mendix out of the way:
- There is no code to write, only expressions in Microflows (similar to Excel formulas)
- You cannot enter a Microflow via text, you must graph it out via the Microflow editor.
- Microflows can get complicated, and you still have only the Microflow editor in which to manage them.
From the reactions I’ve seen from developers, Microflows are by far the bitterest pill to swallow. Part of the reason is simply that developers like to code, and Mendix basically doesn’t allow it (unless you are willing to step down into the Java layer, which sometimes is a good idea).
Just, put the apprehension aside and let’s get started.
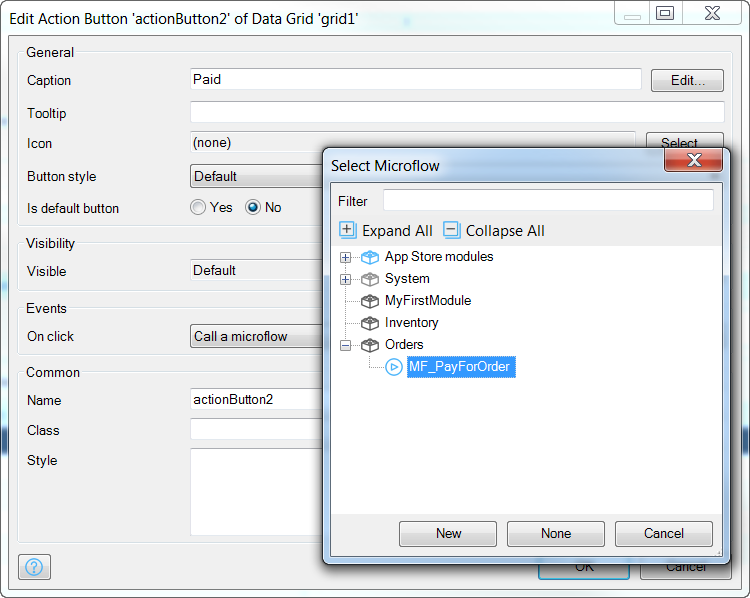
In the project explorer add a new Microflow by right clicking on the Orders module and choosing “Add microflow…”
Call your microflow MF_PayForOrder
The convention I use and have seen used is to prefix microflows with MF_ for Microflow function (something is processed), or MC_ for Microflow calculation, which is used by attributes with calculated values, and also MV_ for microflow validation, which are used when we want to validate form data.
Inside the Microflow
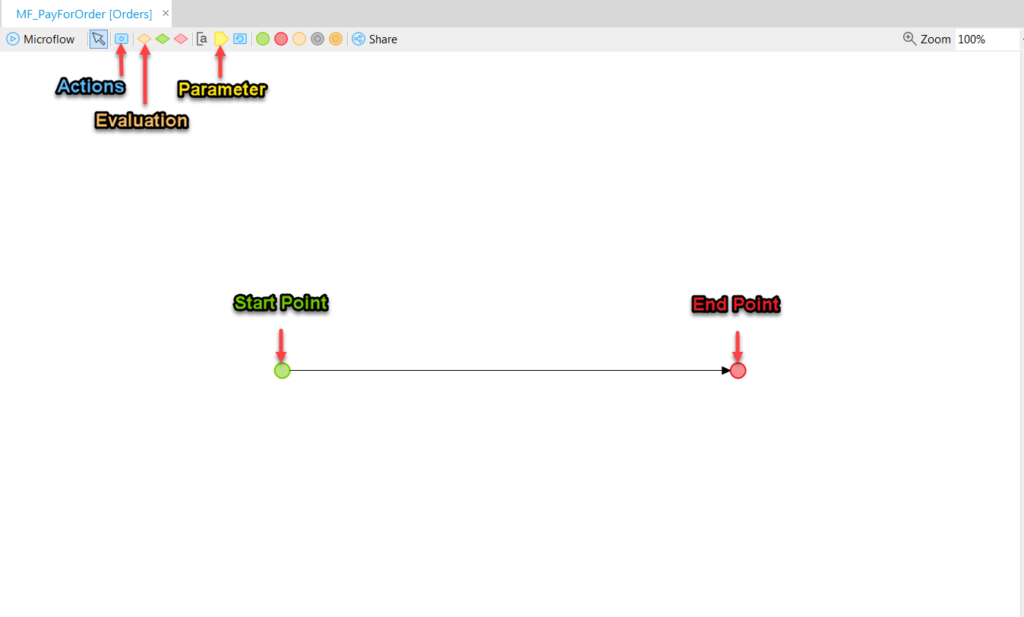
The Microflow will resemble any flow diagram you’ve ever graphed in Visio, the difference is it will actually be doing the actions listed in it.
For our current case, we need the microflow to action upon an order, and mark it as Paid.
This can only happen by receiving a parameter, which appears as the yellow shape indicated in the diagram above. Click on that and click again to set put it into the microflow, usually we put these above the start point:

As soon as you set it down, the Parameter Settings dialog will pop open and you will be asked to specify what Entity is being passed in. Choose Order, and you will see that the variable name is automatically populated (although it can be renamed), and it will be known throughout the logic flow using this name.
I’m going to rename it as OrderParam, just for clarity’s sake, and you will see that it shows both the variable name and the type below the parameter.

Next, click the little blue icon next to the arrow to create an action. Move the mouse to the middle of the microflow line and click again to insert the action. Then you will be prompted to choose the type of action:

There are LOTS of options for an Action, and it’s easy to get overwhelmed. In our case, we are going to choose Change Object, because we want to change the values of the entity’s attribute. For this we must select the variable the action will apply to:
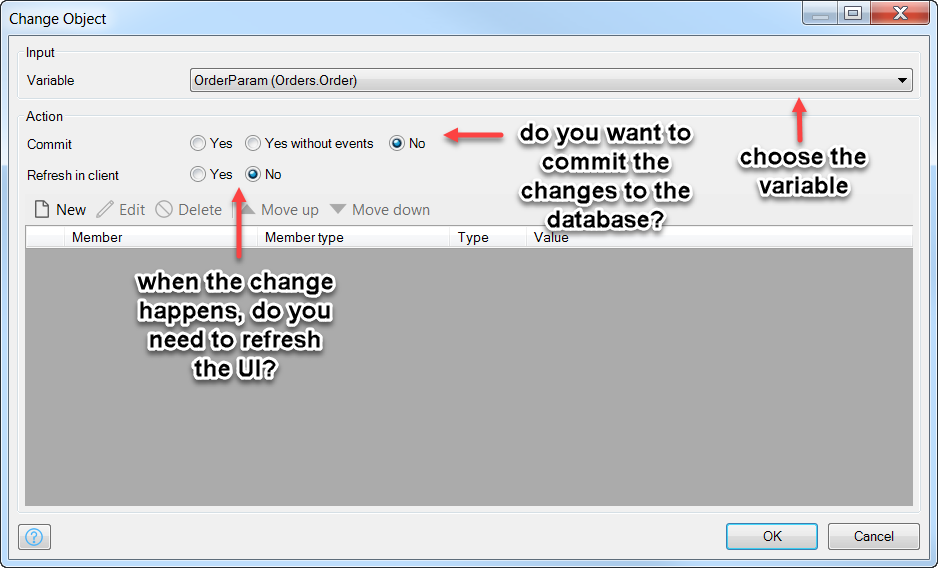
You also need to consider if you want to store the change right away in the database, or if the change is part of a bigger set of changes, whereby it should be committed later.
Furthermore, when the change happens, do you need to update the UI right away? If so, choose Yes for Refresh in client.
Finally, specify the attributes to change (only Status here) by clicking the New button above the attribute change list field.
For the member attribute, select Status. Since Status is an enumeration, we need to specify one of its values (NotPaid, Paid, Cancelled). You can do so by typing the module name (Orders) and then typing a dot will bring up the data fields available within that module (constants, enumerations), and finally another dot will bring up the enumeration’s possible values.
Let’s set it to Paid:

In addition to setting this value, let’s commit the object right away (set Commit to Yes), and also refresh the UI (Refresh in client to Yes) so the order will reflect the change in status to the user immediately:
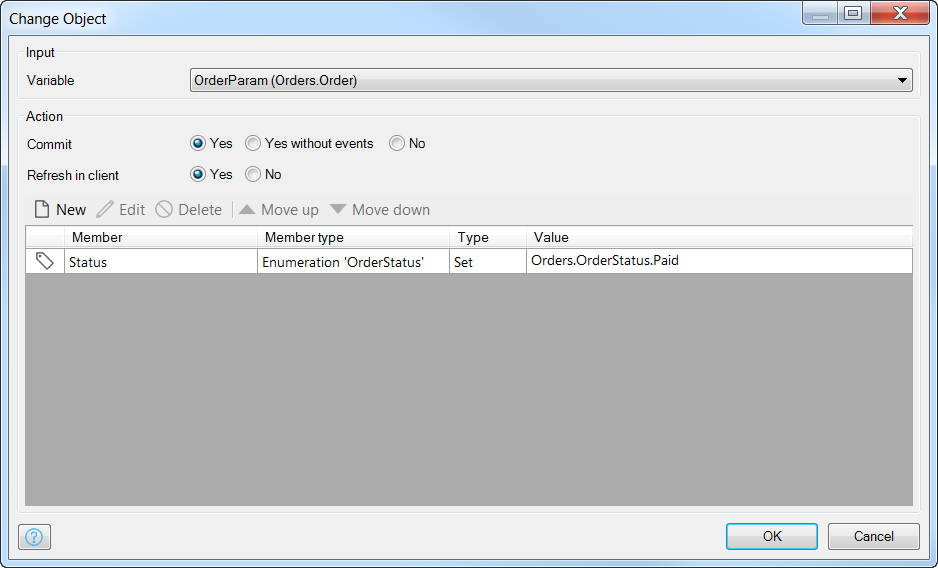

Note that the action will represent both of these settings in the top right corner, as an up arrow for commit, and a circling arrow for refresh in client.
Wiring up our Microflow
We have the logic to change the Order, but where is it going to be executed? Let’s add a [Paid] button to our Orders page:

The button will appear with the label “Action”. Double click on the button to edit it, and in the settings of the dialog, set the caption to Paid, and go down to the on click event and select Call a microflow:

When you select Call a microflow, you will be immediately prompted to choose the Microflow from our modules. Find MF_PayForOrder:
That’s it, save all and Build/Run it!
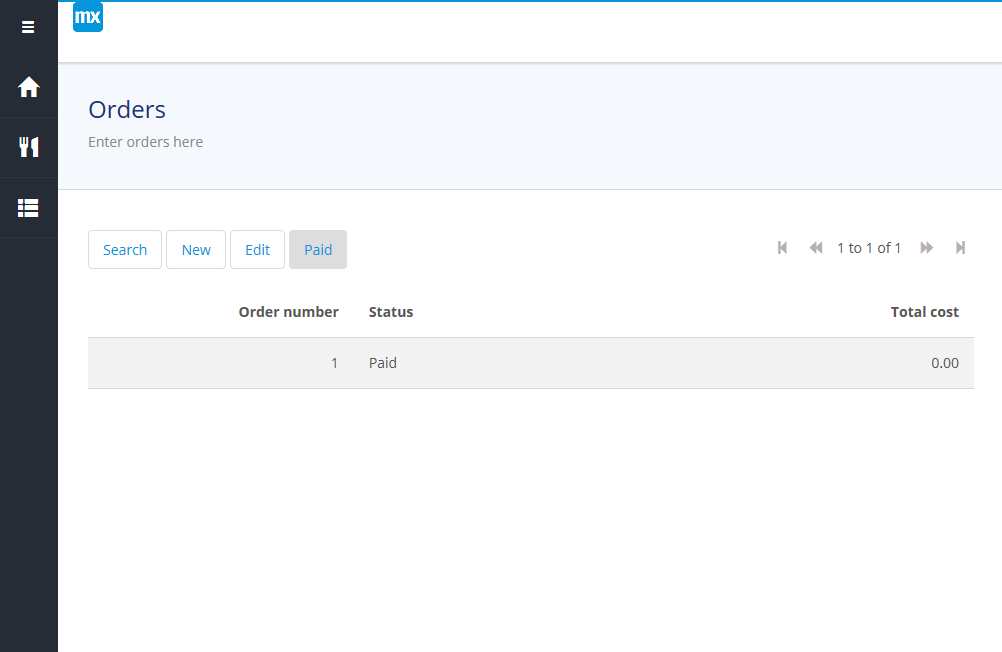
Paying for orders
Try out the new button on the Orders page. When you select an order and click it, the status should change to Paid:
Next…
In the next part I will cover Microflow Actions in more depth, showing you how to calculate the total of the orders, as well as how to constrain the data so that it only shows under certain conditions.